Ricoh Aficio SP 4310N Manuals - Page 54
Lift the printer using the inset grips on both sides of the printer., the underside of the printer
 |
View all Ricoh Aficio SP 4310N manuals
Add to My Manuals
Save this manual to your list of manuals |
Page 54 highlights
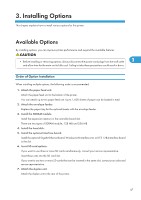
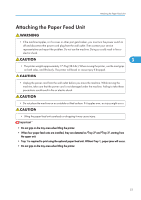
3. Installing Options 1. Check the package contains the following: 3 BMU107S 2. Turn off the printer's power switch, and then unplug the printer's power cord from the wall outlet. 3. Remove the adhesive tape from the optional paper feed unit. 4. Lift the printer using the inset grips on both sides of the printer. CEE039 5. There are three upright pins on the optional paper feed unit. Align them with the holes on the underside of the printer, and then carefully lower the printer. CEE080 6. After installing the option, print the configuration page to confirm the installation. • When moving the printer, remove the paper feed unit. 52
-
 1
1 -
2
-
3
-
4
-
5
-
6
-
7
-
8
-
9
-
10
-
11
-
12
-
13
-
14
-
15
-
16
-
17
-
18
-
19
-
20
-
21
-
22
-
23
-
24
-
25
-
26
-
27
-
28
-
29
-
30
-
31
-
32
-
33
-
34
-
35
-
36
-
37
-
38
-
39
-
40
-
41
-
42
-
43
-
44
-
45
-
46
-
47
-
48
-
 49
49 -
 50
50 -
 51
51 -
 52
52 -
 53
53 -
 54
54 -
 55
55 -
 56
56 -
 57
57 -
 58
58 -
 59
59 -
60
-
61
-
62
-
63
-
64
-
65
-
66
-
67
-
68
-
69
-
70
-
71
-
72
-
73
-
74
-
75
-
76
-
77
-
78
-
79
-
80
-
81
-
82
-
83
-
84
-
85
-
86
-
87
-
88
-
89
-
90
-
91
-
92
-
93
-
94
-
95
-
96
-
97
-
98
-
99
-
100
-
101
-
102
-
103
-
104
-
105
-
106
-
107
-
108
-
109
-
110
-
111
-
112
-
113
-
114
-
115
-
116
-
117
-
118
-
119
-
120
-
121
-
122
-
123
-
124
-
125
-
126
-
127
-
128
-
129
-
130
-
131
-
132
-
133
-
134
-
135
-
136
-
137
-
138
-
139
-
140
-
141
-
142
-
143
-
144
-
145
-
146
-
147
-
148
-
149
-
150
-
151
-
152
-
153
-
154
-
155
-
156
-
157
-
158
-
159
-
160
-
161
-
162
-
163
-
164
-
165
-
166
-
167
-
168
-
169
-
170
-
171
-
172
-
173
-
174
-
175
-
176
-
177
-
178
-
179
-
180
-
181
-
182
-
183
-
184
-
185
-
186
-
187
-
188
-
189
-
190
-
191
-
192
-
193
-
194
-
195
-
196
-
197
-
198
-
199
-
200
-
201
-
202
-
203
-
204
-
205
-
206
-
207
-
208
-
209
-
210
-
211
-
212
-
213
-
214
-
215
-
216
-
217
-
218
-
219
-
220
-
221
-
222
-
223
-
224
-
225
-
226
-
227
-
228
-
229
-
230
-
231
-
232
-
233
-
234
-
235
-
236
-
237
-
238
-
239
-
240
-
241
-
242
-
243
-
244
-
245
-
246
-
247
-
248
-
249
-
250
-
251
-
252
 |
 |

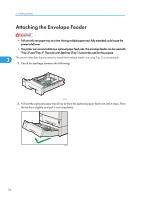
1.
Check the package contains the following:
BMU107S
2.
Turn off the printer's power switch, and then unplug the printer's power cord from the wall
outlet.
3.
Remove the adhesive tape from the optional paper feed unit.
4.
Lift the printer using the inset grips on both sides of the printer.
CEE039
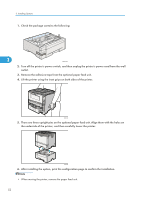
5.
There are three upright pins on the optional paper feed unit. Align them with the holes on
the underside of the printer, and then carefully lower the printer.
CEE080
6.
After installing the option, print the configuration page to confirm the installation.
•
When moving the printer, remove the paper feed unit.
3. Installing Options
52
3