Ricoh Aficio SP 4310N Manuals - Page 98
Setting the SSID, For details, see Web Image Monitor Help, and Using Web Image Monitor - service mode
 |
View all Ricoh Aficio SP 4310N manuals
Add to My Manuals
Save this manual to your list of manuals |
Page 98 highlights
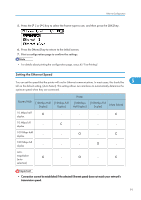
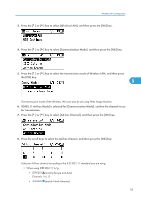
5. Configuration Channels 1 to 11 • When using IEEE 802.11 a: Channels 36,40,44,48 9. Press the [Menu] key to return to the initial screen. 10. Print a configuration page to confirm the settings. • For details, see Web Image Monitor Help, and "Using Web Image Monitor", Software Guide. • For details about printing the configuration page, see p.45 "Test Printing". Setting the SSID When [Communication Mode] is set to [Infrastructure Mode] or [802.11 Ad-hoc Mode], you must specify 5 the Service Set Identifier (SSID) of the wireless access point that the printer will connect to for network access. Ask your network administrator for the SSID to use. 1. In the [Wireless LAN] menu, press the [ ] or [ ] key to select [SSID Setting], and then press the [OK] key. If an SSID has been set, you can check the current SSID setting. 2. Press [SSID], and then press [Enter]. 3. Enter the characters, and then press the [OK] key. You can switch among lower /upper cases and numeric characters by pressing [ab/AB/12]. The characters that can be used are ASCII 0 × 20-0 × 7e (32 bytes). 96
-
 1
1 -
2
-
3
-
4
-
5
-
6
-
7
-
8
-
9
-
10
-
11
-
12
-
13
-
14
-
15
-
16
-
17
-
18
-
19
-
20
-
21
-
22
-
23
-
24
-
25
-
26
-
27
-
28
-
29
-
30
-
31
-
32
-
33
-
34
-
35
-
36
-
37
-
38
-
39
-
40
-
41
-
42
-
43
-
44
-
45
-
46
-
47
-
48
-
49
-
50
-
51
-
52
-
53
-
54
-
55
-
56
-
57
-
58
-
59
-
60
-
61
-
62
-
63
-
64
-
65
-
66
-
67
-
68
-
69
-
70
-
71
-
72
-
73
-
74
-
75
-
76
-
77
-
78
-
79
-
80
-
81
-
82
-
83
-
84
-
85
-
86
-
87
-
88
-
89
-
90
-
91
-
92
-
 93
93 -
 94
94 -
 95
95 -
 96
96 -
 97
97 -
 98
98 -
 99
99 -
 100
100 -
 101
101 -
 102
102 -
 103
103 -
104
-
105
-
106
-
107
-
108
-
109
-
110
-
111
-
112
-
113
-
114
-
115
-
116
-
117
-
118
-
119
-
120
-
121
-
122
-
123
-
124
-
125
-
126
-
127
-
128
-
129
-
130
-
131
-
132
-
133
-
134
-
135
-
136
-
137
-
138
-
139
-
140
-
141
-
142
-
143
-
144
-
145
-
146
-
147
-
148
-
149
-
150
-
151
-
152
-
153
-
154
-
155
-
156
-
157
-
158
-
159
-
160
-
161
-
162
-
163
-
164
-
165
-
166
-
167
-
168
-
169
-
170
-
171
-
172
-
173
-
174
-
175
-
176
-
177
-
178
-
179
-
180
-
181
-
182
-
183
-
184
-
185
-
186
-
187
-
188
-
189
-
190
-
191
-
192
-
193
-
194
-
195
-
196
-
197
-
198
-
199
-
200
-
201
-
202
-
203
-
204
-
205
-
206
-
207
-
208
-
209
-
210
-
211
-
212
-
213
-
214
-
215
-
216
-
217
-
218
-
219
-
220
-
221
-
222
-
223
-
224
-
225
-
226
-
227
-
228
-
229
-
230
-
231
-
232
-
233
-
234
-
235
-
236
-
237
-
238
-
239
-
240
-
241
-
242
-
243
-
244
-
245
-
246
-
247
-
248
-
249
-
250
-
251
-
252
 |
 |
