Samsung NX58R5601SS/AA User Manual - Page 62
Oven racks, Do not spray the gliding rack with cooking spray or other lubricant sprays.
 |
View all Samsung NX58R5601SS/AA manuals
Add to My Manuals
Save this manual to your list of manuals |
Page 62 highlights
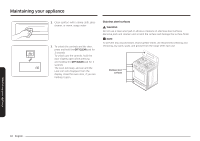
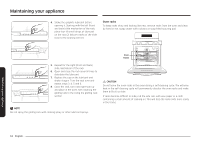
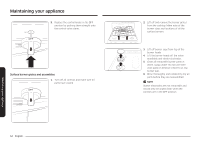
Maintaining your appliance 4. Shake the graphite lubricant before opening it. Starting with the left (front and back) slide mechanism of the rack, place four (4) small drops of lubricant on the two (2) bottom tracks of the slide close to the bearing carriers. Oven racks To keep racks shiny and looking like new, remove racks from the oven and clean by hand in hot, soapy water with a plastic or soap-filled scouring pad. Oven Racks 5. Repeat for the right (front and back) slide mechanism of the rack. 6. Open and close the rack several times to distribute the lubricant. 7. Replace the cap on the lubricant and shake it again. Turn the rack over and repeat steps 3, 4, 5 and 6. 8. Close the rack, turn rack right-side-up and place in the oven. See installing the gliding rack in the Using the gliding rack section. NOTE Do not spray the gliding rack with cooking spray or other lubricant sprays. CAUTION Do not leave the oven racks in the oven during a self-cleaning cycle. The extreme heat in the self-cleaning cycle will permanently discolor the oven racks and make them difficult to slide. If racks become difficult to slide, rub the side rails with wax paper or a cloth containing a small amount of cooking oil. This will help the racks slide more easily in the tracks. Maintaining your appliance 62 English
-
 1
1 -
2
-
3
-
4
-
5
-
6
-
7
-
8
-
9
-
10
-
11
-
12
-
13
-
14
-
15
-
16
-
17
-
18
-
19
-
20
-
21
-
22
-
23
-
24
-
25
-
26
-
27
-
28
-
29
-
30
-
31
-
32
-
33
-
34
-
35
-
36
-
37
-
38
-
39
-
40
-
41
-
42
-
43
-
44
-
45
-
46
-
47
-
48
-
49
-
50
-
51
-
52
-
53
-
54
-
55
-
56
-
 57
57 -
 58
58 -
 59
59 -
 60
60 -
 61
61 -
 62
62 -
 63
63 -
 64
64 -
 65
65 -
 66
66 -
 67
67 -
68
-
69
-
70
-
71
-
72
-
73
-
74
-
75
-
76
-
77
-
78
-
79
-
80
-
81
-
82
-
83
-
84
-
85
-
86
-
87
-
88
-
89
-
90
-
91
-
92
-
93
-
94
-
95
-
96
-
97
-
98
-
99
-
100
-
101
-
102
-
103
-
104
-
105
-
106
-
107
-
108
-
109
-
110
-
111
-
112
-
113
-
114
-
115
-
116
-
117
-
118
-
119
-
120
-
121
-
122
-
123
-
124
-
125
-
126
-
127
-
128
-
129
-
130
-
131
-
132
-
133
-
134
-
135
-
136
-
137
-
138
-
139
-
140
-
141
-
142
-
143
-
144
-
145
-
146
-
147
-
148
-
149
-
150
-
151
-
152
-
153
-
154
-
155
-
156
-
157
-
158
-
159
-
160
-
161
-
162
-
163
-
164
-
165
-
166
-
167
-
168
-
169
-
170
-
171
-
172
-
173
-
174
-
175
-
176
-
177
-
178
-
179
-
180
-
181
-
182
-
183
-
184
-
185
-
186
-
187
-
188
-
189
-
190
-
191
-
192
-
193
-
194
-
195
-
196
-
197
-
198
-
199
-
200
-
201
-
202
-
203
-
204
-
205
-
206
-
207
-
208
-
209
-
210
-
211
-
212
-
213
-
214
-
215
-
216
-
217
-
218
-
219
-
220
-
221
-
222
-
223
-
224
-
225
-
226
-
227
-
228
-
229
-
230
-
231
-
232
-
233
-
234
-
235
-
236
-
237
-
238
-
239
-
240
-
241
-
242
-
243
-
244
-
245
-
246
-
247
-
248
-
249
-
250
-
251
-
252
-
253
-
254
-
255
 |
 |
