Samsung SGH-A867 User Manual (user Manual) (ver.f4) (English) - Page 98
Managing Address Book Entries, Group Name
 |
View all Samsung SGH-A867 manuals
Add to My Manuals
Save this manual to your list of manuals |
Page 98 highlights
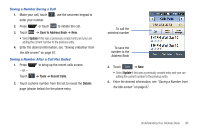
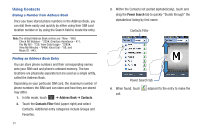
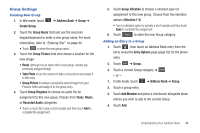
Removing an Entry From a Group 1. Touch , then touch an Address Book entry from the list to reveal the Entry Options page (page 92) for the phone entry. 2. Touch Edit ➔ Group. 3. Touch a remaining Group category to then assign the entry to this new group. 4. Touch Save to store the new assignment. - or - 1. In Idle mode, touch ➔ Address Book ➔ Group. 2. Touch a group entry. 3. Touch Remove Member and place a checkmark alongside those entries you wish to add to the current Group. 4. Touch Remove. Editing a Caller Group To edit a Group entry, there must be at least one member as part of the selected group. 1. In Idle mode, touch ➔ Address Book ➔ Group. 2. Touch a current Group entry. 95 3. Touch More ➔ Edit Group. 4. Make modifications to the Group Name, Group Picture, Group Ringtone, Group Vibration fields. For more information, refer to "Creating New Group" on page 94. 5. Touch Save to store your changes. Managing Address Book Entries You can copy, delete, and view the memory status for the Phone and SIM entries on your phone. Copying an Entry to the SIM Card Note: When storing an Address Book entry into the SIM card, note that only the name, phone number, group, and slot location are initially offered as fields (some SIM cards may allow an address as well). To save additional information for a particular contact, such as other phone numbers, or e-mail, it is important to add new fields to that Contact information. It is also important to note that if you move the SIM card to another phone that does not support additional fields on the SIM card, this additional information may not be available. 1. In Idle mode, touch ➔ Address Book ➔ SIM Management ➔ Copy Contacts to SIM. The phone then displays a list of your current contacts.
-
 1
1 -
2
-
3
-
4
-
5
-
6
-
7
-
8
-
9
-
10
-
11
-
12
-
13
-
14
-
15
-
16
-
17
-
18
-
19
-
20
-
21
-
22
-
23
-
24
-
25
-
26
-
27
-
28
-
29
-
30
-
31
-
32
-
33
-
34
-
35
-
36
-
37
-
38
-
39
-
40
-
41
-
42
-
43
-
44
-
45
-
46
-
47
-
48
-
49
-
50
-
51
-
52
-
53
-
54
-
55
-
56
-
57
-
58
-
59
-
60
-
61
-
62
-
63
-
64
-
65
-
66
-
67
-
68
-
69
-
70
-
71
-
72
-
73
-
74
-
75
-
76
-
77
-
78
-
79
-
80
-
81
-
82
-
83
-
84
-
85
-
86
-
87
-
88
-
89
-
90
-
91
-
92
-
 93
93 -
 94
94 -
 95
95 -
 96
96 -
 97
97 -
 98
98 -
 99
99 -
 100
100 -
 101
101 -
 102
102 -
 103
103 -
104
-
105
-
106
-
107
-
108
-
109
-
110
-
111
-
112
-
113
-
114
-
115
-
116
-
117
-
118
-
119
-
120
-
121
-
122
-
123
-
124
-
125
-
126
-
127
-
128
-
129
-
130
-
131
-
132
-
133
-
134
-
135
-
136
-
137
-
138
-
139
-
140
-
141
-
142
-
143
-
144
-
145
-
146
-
147
-
148
-
149
-
150
-
151
-
152
-
153
-
154
-
155
-
156
-
157
-
158
-
159
-
160
-
161
-
162
-
163
-
164
-
165
-
166
-
167
-
168
-
169
-
170
-
171
-
172
-
173
-
174
-
175
-
176
-
177
-
178
-
179
-
180
-
181
-
182
-
183
-
184
-
185
-
186
-
187
-
188
-
189
-
190
-
191
-
192
-
193
-
194
-
195
-
196
-
197
-
198
 |
 |
