Sharp MX-M850 Quick Start Guide - Page 18
Changing Paper In A Tray
 |
View all Sharp MX-M850 manuals
Add to My Manuals
Save this manual to your list of manuals |
Page 18 highlights
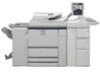
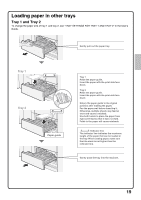
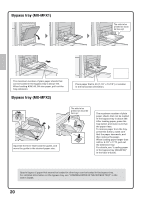
CHANGING PAPER IN A TRAY Names of the trays The names of the trays are shown below. For the number of sheets of paper that can be loaded in each tray, see the following manuals: • User's Guide, "PAPER TRAY SETTINGS" • Safety Guide, "SPECIFICATIONS" (8) (1) (2) (3) (4) (5) (6) (1) Tray 1 (7) (2) Tray 2 (3) Tray 3 (4) Tray 4 (5) Tray 5 (large capacity tray / large (8) capacity trays) (6) Tray 6 (large capacity trays) (5) (7) Tray 7 (large capacity trays) (8) Bypass tray Print side face up or face down When loading paper in a tray, the print side is loaded face up or face down depending on the tray. Trays 1 to 4 Load the paper with the print side face down. Bypass tray and trays 5 to 7 Load the paper with the print side face up. 16
-
 1
1 -
2
-
3
-
4
-
5
-
6
-
7
-
8
-
9
-
10
-
11
-
12
-
 13
13 -
 14
14 -
 15
15 -
 16
16 -
 17
17 -
 18
18 -
 19
19 -
 20
20 -
 21
21 -
 22
22 -
 23
23 -
24
-
25
-
26
-
27
-
28
-
29
-
30
-
31
-
32
-
33
-
34
-
35
-
36
-
37
-
38
-
39
-
40
-
41
-
42
-
43
-
44
-
45
-
46
-
47
-
48
-
49
-
50
-
51
-
52
-
53
-
54
-
55
-
56
-
57
-
58
-
59
-
60
-
61
-
62
-
63
-
64
-
65
-
66
-
67
-
68
-
69
-
70
-
71
-
72
-
73
-
74
-
75
-
76
-
77
-
78
-
79
-
80
-
81
-
82
-
83
-
84
-
85
-
86
-
87
-
88
-
89
-
90
-
91
-
92
-
93
-
94
-
95
-
96
-
97
-
98
-
99
-
100
-
101
-
102
-
103
-
104
-
105
-
106
-
107
-
108
 |
 |

16
CHANGING PAPER IN A TRAY
Names of the trays
The names of the trays are shown below.
For the number of sheets of paper that can be loaded in each tray, see the following manuals:
• User's Guide, "PAPER TRAY SETTINGS"
• Safety Guide, "SPECIFICATIONS"
Print side face up or face down
When loading paper in a tray, the print side is loaded face up or face down depending on the tray.
Trays 1 to 4
Load the paper with the print side face down.
Bypass tray and trays 5 to 7
Load the paper with the print side face up.
(5)
(8)
(6)
(7)
(1)
(5)
(8)
(3)
(2)
(4)
(1) Tray 1
(2) Tray 2
(3) Tray 3
(4) Tray 4
(5) Tray 5 (large capacity tray / large
capacity trays)
(6) Tray 6 (large capacity trays)
(7) Tray 7 (large capacity trays)
(8) Bypass tray