Sharp MX-M850 Quick Start Guide - Page 84
Place the originals., Select settings in the touch panel., Press the [START] key.
 |
View all Sharp MX-M850 manuals
Add to My Manuals
Save this manual to your list of manuals |
Page 84 highlights
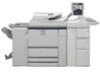
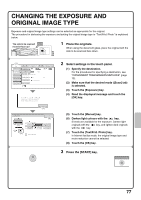
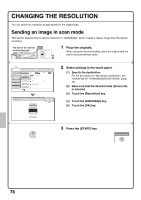
SELECTING A SPECIAL MODE The procedure for selecting a special mode for image send is explained below. The settings that must be selected vary for each special mode, however, the general procedure is the same. As an example, the procedure for "ERASING PERIPHERAL SHADOWS ON THE IMAGE (Erase)" is explained. The side to be scanned must be face up! 1 Place the originals. When using the document glass, place the original with the side to be scanned face down. (2) Scan Internet Fax Address Book (1) Address Entry Original Exposure Fax Scan: Auto Data Entry USB Mem. Scan Auto A4 Send: Auto Text Send Settings Resolution 200X200dpi Address Review File Format PDF PDF File Colour Mode Auto/Greyscale Quick File Special Modes (3) Scan/Special Modes OK Program Timer Erase Dual Page Scan (4) Suppress 1 Backgr2oiunn1d Card Shot 2 Job Build Mixed Size Original Slow Scan Mode Original Count File Quick File 2 Select settings in the touch panel. (1) Specify the destination. For the procedures for specifying a destination, see "CONVENIENT TRANSMISSION METHODS" (page 72). (2) Make sure that the desired mode ([Scan] tab) is selected. (3) Touch the [Special Modes] key. (4) Touch the [Erase] key. The erase settings will be configured to erase a width of 3/4" around the edges of the original. Scan/Special Modes Erase Edge Erase Centre Erase Edge+Centre Erase Side Erase Cancel OK (6OK ) Edge 15 (0~20) mm (5) (5) Set the erasure width to 15 mm with the keys. The erase area is set to "Edge Erase" by default. To select "Centre Erase", "Edge+Centre Erase" or "Side Erase" touch the appropriate key. (6) Touch the [OK] key. 3 Press the [START] key. Cancel scanning 82
-
 1
1 -
2
-
3
-
4
-
5
-
6
-
7
-
8
-
9
-
10
-
11
-
12
-
13
-
14
-
15
-
16
-
17
-
18
-
19
-
20
-
21
-
22
-
23
-
24
-
25
-
26
-
27
-
28
-
29
-
30
-
31
-
32
-
33
-
34
-
35
-
36
-
37
-
38
-
39
-
40
-
41
-
42
-
43
-
44
-
45
-
46
-
47
-
48
-
49
-
50
-
51
-
52
-
53
-
54
-
55
-
56
-
57
-
58
-
59
-
60
-
61
-
62
-
63
-
64
-
65
-
66
-
67
-
68
-
69
-
70
-
71
-
72
-
73
-
74
-
75
-
76
-
77
-
78
-
 79
79 -
 80
80 -
 81
81 -
 82
82 -
 83
83 -
 84
84 -
 85
85 -
 86
86 -
 87
87 -
 88
88 -
 89
89 -
90
-
91
-
92
-
93
-
94
-
95
-
96
-
97
-
98
-
99
-
100
-
101
-
102
-
103
-
104
-
105
-
106
-
107
-
108
 |
 |