Sharp MX-M850 Quick Start Guide - Page 96
Manual Finishing
 |
View all Sharp MX-M850 manuals
Add to My Manuals
Save this manual to your list of manuals |
Page 96 highlights
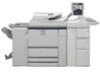
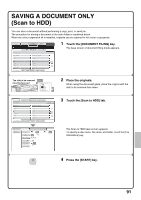
MANUAL FINISHING Manual finishing can be used to staple or punch holes in paper that has been loaded in the inserter. Copying and printing are not performed when the manual finishing function is used. As an example, manual finishing can be used to staple paper on which printing or copying has already been performed and thereby create booklets. For detailed information, see "MANUAL FINISHING MODE" in the User's Guide. Base screen Touch the [MANUAL FINISHING] key in the touch panel to open the base screen of manual finishing mode. Staple, punch, and folding settings are selected from the base screen. Set the output function. Plain A4 (1) Plain A4 (2) Top Tray (3) Offset Tray (4) Staple (5) Saddle Stitch Fold (6) 2 Hole Punch (7) 3 Hole Punch (1) [Top Inserter Tray] key, [Bottom Inserter Tray] key Select the tray in which you have loaded paper. (2) [Top Tray] key This sets the top tray of the finisher as the output tray. (3) [Offset Tray] key This sets the offset tray of the finisher as the output tray. (4) [Staple] key Use this to staple the loaded paper. When this key is touched, keys for selecting the stapling positions will appear. (5) [Saddle Stitch] key Use this to staple and fold the loaded paper at the centreline. (6) [Fold] key Use this to fold the loaded paper in half. (7) [2 Hole Punch] key, [3 Hole Punch] key Use this to punch holes in the loaded paper. 94
-
 1
1 -
2
-
3
-
4
-
5
-
6
-
7
-
8
-
9
-
10
-
11
-
12
-
13
-
14
-
15
-
16
-
17
-
18
-
19
-
20
-
21
-
22
-
23
-
24
-
25
-
26
-
27
-
28
-
29
-
30
-
31
-
32
-
33
-
34
-
35
-
36
-
37
-
38
-
39
-
40
-
41
-
42
-
43
-
44
-
45
-
46
-
47
-
48
-
49
-
50
-
51
-
52
-
53
-
54
-
55
-
56
-
57
-
58
-
59
-
60
-
61
-
62
-
63
-
64
-
65
-
66
-
67
-
68
-
69
-
70
-
71
-
72
-
73
-
74
-
75
-
76
-
77
-
78
-
79
-
80
-
81
-
82
-
83
-
84
-
85
-
86
-
87
-
88
-
89
-
90
-
 91
91 -
 92
92 -
 93
93 -
 94
94 -
 95
95 -
 96
96 -
 97
97 -
 98
98 -
 99
99 -
 100
100 -
 101
101 -
102
-
103
-
104
-
105
-
106
-
107
-
108
 |
 |