Sony BVME170A User Manual (Operating Instructions - BVM-E250A / BVM-E170A) - Page 18
Location and Function of Parts (BVM-E170A), Front Panel
 |
View all Sony BVME170A manuals
Add to My Manuals
Save this manual to your list of manuals |
Page 18 highlights
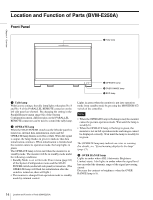
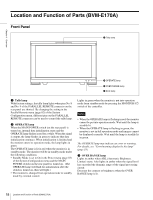
Location and Function of Parts (BVM-E170A) Front Panel 1 Tally lamp Chapter 1 Overview 2 OPERATE lamp 3 OVER RANGE lamp 4 ECO lamp a Tally lamp With factory settings, the tally lamp lights when pins No. 8 and No. 9 of the PARALLEL REMOTE connector on the rear panel are shorted. By changing the setting in the Parallel Remote menu (page 82) of the System Configuration menu, different pins on the PARALLEL REMOTE connector can be used to control the tally lamp. b OPERATE lamp When the MAIN POWER switch (on the rear panel) is turned on, internal data initialization starts and the OPERATE lamp flashes in red for a while. When the signal is output, the lamp flashes in green to indicate that data initialization continues. When initialization is finished and the monitor enters its operation mode, the lamp lights in green. The OPERATE lamp is lit in red when the monitor is in standby mode. The monitor will be in standby mode under the following conditions: • Standby Mode is set to On in the Power menu (page 83) of the System Configuration menu and the MAIN POWER switch (on the rear panel) is turned on. (The OPERATE lamp will flash for initialization after the switch is turned on, then will light.) • The monitor is changed from operation mode to standby mode by external control. Lights in green when the monitor is put into operation mode from standby mode by pressing the MONITOR I/1 switch of the controller. Notes • When the OPERATE lamp is flashing in red, the monitor cannot be put into operation mode. Wait until the lamp is steadily lit. • When the OPERATE lamp is flashing in green, the monitor is not in full operation mode and images cannot be displayed correctly. Wait until the lamp is steadily lit in green. The OPERATE lamp may indicate an error or warning. For details, see "Error/warning display by the lamp" (page 19). c OVER RANGE lamp Lights in amber when ABL (Automatic Brightness Limiter) starts. Also lights in amber when the signal level has exceeded the dynamic range of the signal processing circuit. Decrease the contrast or brightness when the OVER RANGE lamp is lit. 18 Location and Function of Parts (BVM-E170A)
-
 1
1 -
2
-
3
-
4
-
5
-
6
-
7
-
8
-
9
-
10
-
11
-
12
-
 13
13 -
 14
14 -
 15
15 -
 16
16 -
 17
17 -
 18
18 -
 19
19 -
 20
20 -
 21
21 -
 22
22 -
 23
23 -
24
-
25
-
26
-
27
-
28
-
29
-
30
-
31
-
32
-
33
-
34
-
35
-
36
-
37
-
38
-
39
-
40
-
41
-
42
-
43
-
44
-
45
-
46
-
47
-
48
-
49
-
50
-
51
-
52
-
53
-
54
-
55
-
56
-
57
-
58
-
59
-
60
-
61
-
62
-
63
-
64
-
65
-
66
-
67
-
68
-
69
-
70
-
71
-
72
-
73
-
74
-
75
-
76
-
77
-
78
-
79
-
80
-
81
-
82
-
83
-
84
-
85
-
86
-
87
-
88
-
89
-
90
-
91
-
92
-
93
-
94
-
95
-
96
-
97
-
98
-
99
-
100
-
101
-
102
-
103
-
104
-
105
-
106
-
107
-
108
-
109
-
110
-
111
-
112
-
113
-
114
-
115
-
116
-
117
-
118
-
119
-
120
-
121
-
122
-
123
-
124
-
125
-
126
-
127
-
128
-
129
-
130
-
131
-
132
-
133
-
134
-
135
-
136
-
137
-
138
-
139
-
140
-
141
-
142
-
143
-
144
-
145
-
146
-
147
-
148
-
149
-
150
-
151
-
152
-
153
-
154
-
155
 |
 |
