Sony BVME170A User Manual (Operating Instructions - BVM-E250A / BVM-E170A) - Page 25
Installing an Input Adaptor (BVM-E170A
 |
View all Sony BVME170A manuals
Add to My Manuals
Save this manual to your list of manuals |
Page 25 highlights
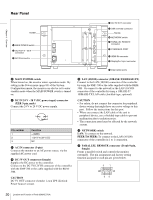
Chapter 2 Preparations Installing an Input Adaptor (BVM-E170A) 1 Loosen two screws and remove the cover of an input option port on the rear panel of the monitor. Make sure the MAIN POWER switch is turned off, and disconnect the AC power cord. Cover of an input option port 2 Insert the adaptor facing the board as shown below. Board For connecting Dual-link HD-SDI signals Two BKM-243HS or BKM-244CC input adaptors or one BKM-250TG input adaptor is required. When the BKM243HS or BKM-244CC adaptors are used, install the input adaptors in OPTION 1 and 2 option ports, or OPTION 3 and 4 option ports. The BKM-243HS or BKM-244CC cannot be used with the BKM-250TG for Dual-link operation. To connect the cable When the BKM-243HS or BKM-244CC adaptors are used, install the Link A signal to OPTION 1 or 3, and the Link B signal to OPTION 2 or 4. Connect the cable to the same input number (both INPUT 1 or both INPUT 2) of the input adaptors installed in OPTION 1 and 2 option ports, or OPTION 3 and 4 option ports. Example of Dual-link cable connection INPUT 1 INPUT 2 3 Push the adaptor in until it is firmly fit into the connector inside the monitor, then tighten the two screws to secure the adaptor. INPUT 1 OPTION 1 OPTION 3 and 4 and 2 INPUT 2 When the BKM-250TG is used, install the Link A signal to INPUT 1, and the Link B signal to INPUT 2. 25 Installing an Input Adaptor (BVM-E170A)
-
 1
1 -
2
-
3
-
4
-
5
-
6
-
7
-
8
-
9
-
10
-
11
-
12
-
13
-
14
-
15
-
16
-
17
-
18
-
19
-
 20
20 -
 21
21 -
 22
22 -
 23
23 -
 24
24 -
 25
25 -
 26
26 -
 27
27 -
 28
28 -
 29
29 -
 30
30 -
31
-
32
-
33
-
34
-
35
-
36
-
37
-
38
-
39
-
40
-
41
-
42
-
43
-
44
-
45
-
46
-
47
-
48
-
49
-
50
-
51
-
52
-
53
-
54
-
55
-
56
-
57
-
58
-
59
-
60
-
61
-
62
-
63
-
64
-
65
-
66
-
67
-
68
-
69
-
70
-
71
-
72
-
73
-
74
-
75
-
76
-
77
-
78
-
79
-
80
-
81
-
82
-
83
-
84
-
85
-
86
-
87
-
88
-
89
-
90
-
91
-
92
-
93
-
94
-
95
-
96
-
97
-
98
-
99
-
100
-
101
-
102
-
103
-
104
-
105
-
106
-
107
-
108
-
109
-
110
-
111
-
112
-
113
-
114
-
115
-
116
-
117
-
118
-
119
-
120
-
121
-
122
-
123
-
124
-
125
-
126
-
127
-
128
-
129
-
130
-
131
-
132
-
133
-
134
-
135
-
136
-
137
-
138
-
139
-
140
-
141
-
142
-
143
-
144
-
145
-
146
-
147
-
148
-
149
-
150
-
151
-
152
-
153
-
154
-
155
 |
 |
