Sony VPCL214FX User Guide - Page 93
Starting Wireless LAN Communications
 |
UPC - 027242820425
View all Sony VPCL214FX manuals
Add to My Manuals
Save this manual to your list of manuals |
Page 93 highlights
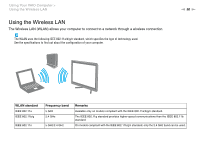
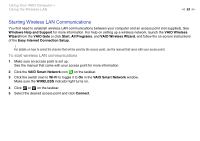
Using Your VAIO Computer > Using the Wireless LAN n 93 N Starting Wireless LAN Communications You first need to establish wireless LAN communications between your computer and an access point (not supplied). See Windows Help and Support for more information. For help on setting up a wireless network, launch the VAIO Wireless Wizard from the VAIO Gate or click Start, All Programs, and VAIO Wireless Wizard, and follow the on-screen instructions of the Easy Internet Connection Setup. ! For details on how to select the channel that will be used by the access point, see the manual that came with your access point. To start wireless LAN communications 1 Make sure an access point is set up. See the manual that came with your access point for more information. 2 Click the VAIO Smart Network icon on the taskbar. 3 Click the switch next to Wi-Fi to toggle it to On in the VAIO Smart Network window. Make sure the WIRELESS indicator light turns on. 4 Click or on the taskbar. 5 Select the desired access point and click Connect.
-
 1
1 -
2
-
3
-
4
-
5
-
6
-
7
-
8
-
9
-
10
-
11
-
12
-
13
-
14
-
15
-
16
-
17
-
18
-
19
-
20
-
21
-
22
-
23
-
24
-
25
-
26
-
27
-
28
-
29
-
30
-
31
-
32
-
33
-
34
-
35
-
36
-
37
-
38
-
39
-
40
-
41
-
42
-
43
-
44
-
45
-
46
-
47
-
48
-
49
-
50
-
51
-
52
-
53
-
54
-
55
-
56
-
57
-
58
-
59
-
60
-
61
-
62
-
63
-
64
-
65
-
66
-
67
-
68
-
69
-
70
-
71
-
72
-
73
-
74
-
75
-
76
-
77
-
78
-
79
-
80
-
81
-
82
-
83
-
84
-
85
-
86
-
87
-
 88
88 -
 89
89 -
 90
90 -
 91
91 -
 92
92 -
 93
93 -
 94
94 -
 95
95 -
 96
96 -
 97
97 -
 98
98 -
99
-
100
-
101
-
102
-
103
-
104
-
105
-
106
-
107
-
108
-
109
-
110
-
111
-
112
-
113
-
114
-
115
-
116
-
117
-
118
-
119
-
120
-
121
-
122
-
123
-
124
-
125
-
126
-
127
-
128
-
129
-
130
-
131
-
132
-
133
-
134
-
135
-
136
-
137
-
138
-
139
-
140
-
141
-
142
-
143
-
144
-
145
-
146
-
147
-
148
-
149
-
150
-
151
-
152
-
153
-
154
-
155
-
156
-
157
-
158
-
159
-
160
-
161
-
162
-
163
-
164
-
165
-
166
-
167
-
168
-
169
-
170
-
171
-
172
-
173
-
174
-
175
-
176
-
177
-
178
-
179
-
180
-
181
-
182
-
183
-
184
-
185
-
186
-
187
-
188
-
189
-
190
 |
 |