Toro 20330 Service Manual - Page 110
of the pulley that are intended to engage two
 |
UPC - 021038203300
View all Toro 20330 manuals
Add to My Manuals
Save this manual to your list of manuals |
Page 110 highlights
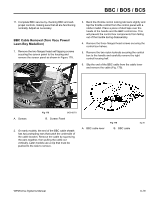
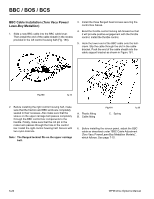
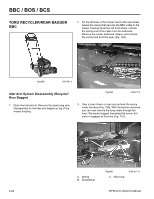
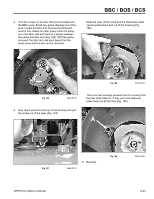
BBC / BOS / BCS 6. Now, disassemble the components on the crankshaft. If you have an impact wrench, the large nut on the crankshaft can be spun off. If you must remove it manually, wedge a bar or large screwdriver into the BBC flywheel (Fig. 190). This will hold the crankshaft so the nut can be removed. 8. Roll the self-propel belt off the pulley and remove the pulley and the key in the crankshaft. 9. Inspect the pulley. One end of the keyway is blocked off. If that is broken, the pulley will bounce up and down during use and make a rattling noise (Fig. 192). There are two bumps on the outside of the pulley that are intended to engage two holes in the flywheel. If this wall is broken out or the bumps on the pulley are damaged, the pulley must be replaced. Usually this is caused by an error in assembly. Refer to "Idler Arm System Assembly (Recycler/Rear Bagger)" on page 6-25 for instructions to avoid this. Fig 190 3428-0187 A 7. Remove the hub assembly and brake drum. The flywheel is pressed onto a taper on the crankshaft. It might require a tap with a hammer to loosen (Fig. 191). A. Wall B Fig 192 B. Bumps 3428-0116 6-24 Fig 191 3428-0103 WPM Drive Systems Manual
-
 1
1 -
2
-
3
-
4
-
5
-
6
-
7
-
8
-
9
-
10
-
11
-
12
-
13
-
14
-
15
-
16
-
17
-
18
-
19
-
20
-
21
-
22
-
23
-
24
-
25
-
26
-
27
-
28
-
29
-
30
-
31
-
32
-
33
-
34
-
35
-
36
-
37
-
38
-
39
-
40
-
41
-
42
-
43
-
44
-
45
-
46
-
47
-
48
-
49
-
50
-
51
-
52
-
53
-
54
-
55
-
56
-
57
-
58
-
59
-
60
-
61
-
62
-
63
-
64
-
65
-
66
-
67
-
68
-
69
-
70
-
71
-
72
-
73
-
74
-
75
-
76
-
77
-
78
-
79
-
80
-
81
-
82
-
83
-
84
-
85
-
86
-
87
-
88
-
89
-
90
-
91
-
92
-
93
-
94
-
95
-
96
-
97
-
98
-
99
-
100
-
101
-
102
-
103
-
104
-
 105
105 -
 106
106 -
 107
107 -
 108
108 -
 109
109 -
 110
110 -
 111
111 -
 112
112 -
 113
113 -
 114
114 -
 115
115 -
116
-
117
-
118
-
119
-
120
-
121
-
122
-
123
-
124
-
125
-
126
-
127
-
128
-
129
-
130
-
131
-
132
-
133
-
134
-
135
-
136
-
137
-
138
-
139
-
140
-
141
-
142
-
143
-
144
 |
 |
