Toshiba 19CV100U User Manual
Toshiba 19CV100U Manual
 |
View all Toshiba 19CV100U manuals
Add to My Manuals
Save this manual to your list of manuals |
Toshiba 19CV100U manual content summary:
- Toshiba 19CV100U | User Manual - Page 1
digital satellite program). For details, please contact your TV antenna installer, cable provider, or satellite provider. © 2010 TOSHIBA CORPORATION All Rights Reserved Owner's Record The model number and serial number are on the back of your TV/DVD. Record these numbers in the spaces below. Refer - Toshiba 19CV100U | User Manual - Page 2
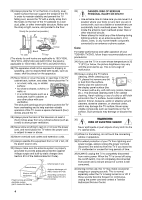
Toshiba LCD TV/DVD. This manual will help you use the many exciting features of your new LCD TV/DVD. Before operating your LCD TV/DVD, please read this manual (such as UL, CSA, ETL). • Follow all instructions supplied by the display and wall mount manufacturers. • If you have any doubts about your - Toshiba 19CV100U | User Manual - Page 3
be easily unplugged in case the product requires service. 21) NEVER route the product's power cord inside a wall or similar enclosed area. 22) Never modify this equipment. Changes or modifications may void: a) the warranty, and b) the user's authority to operate this equipment under the rules - Toshiba 19CV100U | User Manual - Page 4
system. Care For better performance and safer operation of your TOSHIBA TV/DVD, follow these recommendations and precautions: 34) If you use the TV in a room whose temperature is 32 °F (0°C) or below, the picture brightness may vary until the LCD warms up. This is not a sign of malfunction. 35 - Toshiba 19CV100U | User Manual - Page 5
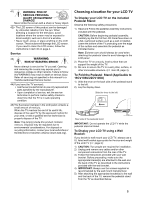
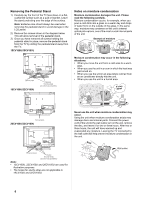
of the TV as described in the instructions provided with the wall bracket. 4) IMPORTANT: Always use the screws supplied or recommended by the wall mount manufacturer. 5) After attaching the appropriate bracket(s) to the wall and the back of the TV, remove the pedestal stand from the TV as described - Toshiba 19CV100U | User Manual - Page 6
the unit in a humid area. It's too warm! 26CV100U/32CV100U Never use the unit when moisture condensation may occur. Using the unit when moisture condensation exists may damage discs and internal parts. Connect the power cord of the unit to the wall outlet, turn on the unit, remove the disc, and - Toshiba 19CV100U | User Manual - Page 7
owner's manual This owner's manual explains the basic instructions of this TV/DVD. Some DVD video discs are produced in a manner that allows specific or limited operation during playback. As such, the TV/DVD TV/DVD is 1. If region numbers, which stand for their playable area, are printed on your DVD - Toshiba 19CV100U | User Manual - Page 8
on this TV/ DVD, please contact Toshiba Customer Service. is a trademark of DVD Format/Logo Licensing Corporation. FCC Declaration of Conformity Compliance Statement (Part 15): The Toshiba 15CV100U, 15CV101U, 19CV100U, 22CV100U, 26CV100U and 32CV100U LCD TV/ DVD combinations comply with Part 15 of - Toshiba 19CV100U | User Manual - Page 9
LCD TV The following symptoms are technical limitations of LCD Display technology and are not an indication of malfunction; therefore, Toshiba is OWNER'S MANUAL CAREFULLY AND RETAIN FOR FUTURE REFERENCE. - SHALL THE UNIT REQUIRE MAINTENANCE, CONTACT AN AUTHORIZED SERVICE CENTER. - USE OF CONTROLS - Toshiba 19CV100U | User Manual - Page 10
Instructions 3 Installation, Care, and Service 3 Choosing a location for your LCD TV 5 Notes on discs 7 Chapter 1: Introduction 12 Features of your new TV 12 Overview of steps for installing, setting up, and using your new TV 12 TV front, top and side panel controls and connections 13 TV - Toshiba 19CV100U | User Manual - Page 11
setup 71 Chapter 11: Troubleshooting 75 General troubleshooting 75 LED Indication 77 Chapter 12: Appendix 78 Specifications 78 Acceptable signal formats for PC IN and HDMI terminals 79 Limited United States Warranty LCD TV/DVD Combination - Depot Repair Warranty ........ 80 The GNU General - Toshiba 19CV100U | User Manual - Page 12
of your new Toshiba integrated HD, LCD TV/DVD: • Integrated digital tuning (8VSB ATSC and QAM) eliminates the need for a separate digital converter set-top box (in most cases). • 1080p output resolution • Two HDMI™ digital, high-definition multimedia interfaces with 1080p input support ( Page 20 - Toshiba 19CV100U | User Manual - Page 13
a stereo headphone (not supplied) with a 1/8inch (3.5 mm) mini plug. Note: Connecting a headphone to the TV/ DVD will mute the sound from the built-in speakers. 8 POWER ─ Press to turn the TV on and off. If the TV stops responding to the controls on the remote control or TV control panel and you - Toshiba 19CV100U | User Manual - Page 14
Chapter 1: Introduction 19CV100U/22CV100U/26CV100U/32CV100U 1 Power LED ─ This indicates the TV's status. See "LED indication" on Page 77 for additional information. 2 Remote sensor ─ Point the remote control toward this remote sensor. Effective range: 3 Auto Brightness Sensor ─ This sensor will - Toshiba 19CV100U | User Manual - Page 15
receive 1080p signals. 10 USB terminal ─ For use when inserting a USB device. 11 Headphone jack ─ For use when inserting a stereo headphone (not supplied) with a 1/8inch (3.5 mm) mini plug. Note: Connecting a headphone to the TV/DVD will mute the sound from the built-in speakers. Note: 22CV100U and - Toshiba 19CV100U | User Manual - Page 16
supplied AC power cord into the TV's AC input jack and the other to a power outlet to turn on and operate the TV. 2 AUDIO/COLOR STREAM HD ─ ColorStream® high-definition component video inputs (with standard stereo audio inputs) for connecting devices with component video output, such as a Toshiba - Toshiba 19CV100U | User Manual - Page 17
only. The input/output terminals on your devices may differ from those illustrated herein. For details on connecting and using your specific devices, refer to each device's owner's manual. Connecting TV to a power source To connect AC power: Connect the AC cord plug into the TV/DVD's AC input jack - Toshiba 19CV100U | User Manual - Page 18
You will need: • standard A/V cables To view the camcorder video: Select the Video video input source on the TV.* * To select the video input source, press on the remote control ( Page 33). The unauthorized recording, use, distribution, or revision of television programs, videotapes, DVDs, and other - Toshiba 19CV100U | User Manual - Page 19
(plus audio cables) from the DVD player to the COLOR STREAM HD terminal on the TV. The COLOR STREAM HD terminal can be used to display Progressive (480p, 720p) and Interlaced (480i, 1080i). Please check the Owner's Manual of the DVD player in order to determine the best output signal available - Toshiba 19CV100U | User Manual - Page 20
a set-top box or DVD player with HDMI or DVI output). The HDMI input can accept and display VGA, SVGA, XGA, WXGA, 480i (60 Hz), 480p (60 Hz), 720p (60 Hz), 1080i (60 Hz), and 1080p (24 Hz/30 Hz/60 Hz) signal formats. For detailed signal specifications, see Page 79. Supported Audio format: Linear PCM - Toshiba 19CV100U | User Manual - Page 21
functions of connected audio/video devices using the TV's remote control if you connect a REGZA-LINK® compatible audio receiver or playback device. For an explanation of setup and operations, see Page 47-49. To connect an audio receiver and playback devices, you will need: • HDMI cables ( Page - Toshiba 19CV100U | User Manual - Page 22
( "Selecting the optical audio output format" on Page 41). 6 To save the new settings, highlight Done and then press . To revert to the factory defaults, highlight Reset and then press . To control the audio: 1 Turn on the TV and the digital audio device. 2 Press on the remote control and open the - Toshiba 19CV100U | User Manual - Page 23
Note: • The PC audio input terminal on the TV is shared with the HDMI 1 analog audio input terminal. • Some PC models cannot be connected to this TV. • An adapter is not needed for computers with a compatible mini D-sub15-pin terminal. • Depending on the DVD's title and the specifications of the PC - Toshiba 19CV100U | User Manual - Page 24
Using the remote control Preparing the remote control for use The remote control can operate your TV/DVD and control the basic functions of connected audio/ video devices if you connect a REGZA-LINK® compatible audio receiver or playback device ( Page 47). Installing the remote control batteries - Toshiba 19CV100U | User Manual - Page 25
the TV/DVD are described here. For the REGZA-LINK® remote control functions, see the section "Using REGZALINK®" ( Page 47). Note: The error message "NOT AVAILABLE" may appear if you press a key for a function that is not available. 1 POWER turns the TV on and off. When the TV is on, the Power LED - Toshiba 19CV100U | User Manual - Page 26
scenes ( Page 62). 30 REPEAT A-B repeats playback of a specific section between two set points ( Page 61). 31 TOP MENU accesses the top menu of DVDs that contain two or more titles ( Page 62). 32 RETURN returns to the root directory in Audio CD playback ( Page 66); returns to previous directory from - Toshiba 19CV100U | User Manual - Page 27
Channel Tuning Mode Time Zone Signal Meter Page 28 29 29 34 32 32 System Status System Information 32 Navigating the menu system You can use the buttons on the remote control or TV control panel to access and navigate your TV's on-screen menu system. • Press to open the menu. • Press or on - Toshiba 19CV100U | User Manual - Page 28
. 4 Next, ANT/CABLE In setup window will appear. Press or to select the input source (Cable or Antenna) for the ANT/CABLE input on the TV. 5 If you select Antenna, the Channel Tuning Mode setup window will appear. To tune only digital channels, select Digital. To tune digital channels preferentially - Toshiba 19CV100U | User Manual - Page 29
TV Programming channels into the TV's channel memory When you press or on the remote control or TV control panel, your TV will stop only on the channels you programmed into the TV's channel memory. Follow the steps below to program channels into the TV unless your Cable TV service lineup changes - Toshiba 19CV100U | User Manual - Page 30
5: Setting up your TV To block channels in the channel memory: You can block specific channels. You will not To save the setting, press . To manually add digital subchannels on a physical channel: Use the Channel Numbers and the Dash ( ) on the remote control to enter the channel number (for example - Toshiba 19CV100U | User Manual - Page 31
on the remote control to highlight the output. If not, the TV will automatically detect and output analog audio from the PC Audio input. When viewing the HDMI 1 input, digital audio from the HDMI input will be output. When viewing the HDMI 1 input, analog audio from the PC Audio input will be output - Toshiba 19CV100U | User Manual - Page 32
digital TV input correspond to a virtual TV channel number. Contact This feature will allow the TV status information to show the the menu bar to select Support Information and view the related TV will turn off automatically after a few seconds. After the TV turns off, unplug the TV power cord - Toshiba 19CV100U | User Manual - Page 33
capability (e.g. Audio Receiver) is connected to the HDMI input: Press on the remote control or INPUT/ENTER on the TV control panel repeatedly to preset list of labels: • - - (default label) • Audio Receiver • Cable • Compact Disc • DTV • DVD • Game Console • HDMI Switch (HDMI inputs only) • Laser - Toshiba 19CV100U | User Manual - Page 34
to choose how tuning will be handled for analog and digital channels when the TV is in Antenna mode. Note: To use this feature, the Input Configuration will have priority when manually entering a channel number using the Channel Number buttons (0-9) on the remote control, analog channels can still - Toshiba 19CV100U | User Manual - Page 35
the picture size that displays the current program the way that looks best to you. You can save separate picture size preferences for each input on your TV. To select the picture size using the remote control: 1 Press on the remote control. 2 While the Picture Size screen is open, you can do one of - Toshiba 19CV100U | User Manual - Page 36
Chapter 6: Using the TV's features Picture Size Picture Size 4:3 HD (for 720p, 1080i, and 1080p DVD, DVHS movies, or PC graphics. Note: • This mode is supported only for HDMI (1080p,1080i, 720p, 480p, and 480i), ColorStream (1080i and 720p), and ANT/ CABLE (digital) inputs (1080p,1080i, and 720p - Toshiba 19CV100U | User Manual - Page 37
to scroll the picture up and down as needed and then press . 5 To save the new DVD (3:2 pulldown processed) from a DVD player connected to the Video, ColorStream HD (component video), or HDMI inputs on the TV from the ColorStream HD input • A 480i, 480p, 720p, 1080i, 1080p, or VGA (60Hz) signal from - Toshiba 19CV100U | User Manual - Page 38
Chapter 6: Using the TV's features Adjusting the picture Selecting the picture mode You can select your desired picture settings from four different modes, as described below. Mode Picture Quality - Toshiba 19CV100U | User Manual - Page 39
mode has two options: • Captions-An on-screen display of the dialogue, narration, and sound effects of TV programs and videos that are closed captioned (usually marked "CC" in program guides). • Text-An on-screen display of information not related to the current program, such as weather or stock - Toshiba 19CV100U | User Manual - Page 40
service. 3 Press . Adjusting the audio Muting the sound Press on the remote control Audio Selectors and then press . 2 Press or to select Audio, and then press or to select the desired service. 3 Press . Selecting stereo/SAP broadcasts The multi-channel TV sound (MTS) feature allows you to output - Toshiba 19CV100U | User Manual - Page 41
mute the TV's built-in speakers. Selecting the optical audio output format You can use this feature to select the optical audio output format when you connect a Dolby Digital decoder or other digital audio system to the Optical Audio Out terminal on the TV ( "Connecting a digital audio system" on - Toshiba 19CV100U | User Manual - Page 42
dynamic range. 1 From the Sound menu, press or to select Audio Setup and then press . 2 Press or to select Dolby Digital Dynamic Range Control and then press or to select Compressed. When Standard is selected, the audio is output with minimal compression. 3 To save the new settings, highlight Done - Toshiba 19CV100U | User Manual - Page 43
is a function of the V-Chip feature in this TV, which supports the U.S. V-Chip system only. To block and unblock TV programs and movies: 1 From the Locks menu, or controlled by the TV or Toshiba, nor is the availability of an additional rating system determined or controlled by Toshiba. Similarly, - Toshiba 19CV100U | User Manual - Page 44
broadcasters Ratings Description and Content themes TV-MA Mature Audience Only (This program is specifically designed to be viewed by rating of the program you are watching, press on the remote control. If it is rated "None," the word "TV-NONE" appears in the display screen (as shown below right - Toshiba 19CV100U | User Manual - Page 45
panel to prevent your settings from being changed accidentally (by children, for example). When the control panel lock is On, none of the controls on the TV control panel will operate except POWER. 1 From the Locks menu, press to display the PIN code entering screen. 2 Enter your four-digit PIN - Toshiba 19CV100U | User Manual - Page 46
can view an image from a PC on the TV screen. When a PC is connected to the TV's PC IN terminal, you can use the PC and then press to get an optimum adjustment automatically. Setting the PC Audio This function allows you to output or mute the sound from your PC when connecting using the PC IN - Toshiba 19CV100U | User Manual - Page 47
Toshiba REGZA-LINK® compatible devices from the TV remote via HDMI connection ( Page 21). When the Enable REGZA-LINK in the REGZALINK Setup menu ( Page 49) is set to On, the following REGZA-LINK® functions will be enabled. REGZA-LINK® playback device (DVD player, etc.) control With your TV's remote - Toshiba 19CV100U | User Manual - Page 48
send a message to turn off all of the devices connected to the TV. Speaker Preference From this item, you can set your audio output preference to the TV speakers or the audio receiver speakers. When this item is set to Audio Receiver, the TV remote can be used to adjust or mute the volume of the - Toshiba 19CV100U | User Manual - Page 49
: On/Off • Speaker Preference: TV Speakers/Audio Receiver 4 To save the new settings, highlight Done and then press . To revert to the factory defaults, highlight Reset and then press . Displaying TV status information To display TV status information using DISPLAY: Press on the remote control. The - Toshiba 19CV100U | User Manual - Page 50
features Using the advanced picture settings features Using dynamic contrast When dynamic contrast is set to On, the TV will detect changes in the picture quality that affect the appearance of your contrast settings and then automatically adjust the video. To select dynamic contrast - Toshiba 19CV100U | User Manual - Page 51
. To turn off Game Mode: Select Off in step 2 above, change the video input, or turn the TV off and then on again. Note: You can change the video input by pressing on the remote control ( Page 33). Using the Auto Brightness Sensor When the Auto Brightness Sensor feature is set to On - Toshiba 19CV100U | User Manual - Page 52
sound processing algorithm from QSound Labs, Inc. that creates 3D audio effects from multiple monophonic sources and sums the outputs to two channels for presentation over regular stereo speakers. To adjust the QSound® settings: 1 Set the TV in Stereo mode ( "Selecting stereo/SAP broadcasts" on Page - Toshiba 19CV100U | User Manual - Page 53
music list will appear. Note: If Auto Start is set to Off, you can start the Media Player manually. To set manual Start: 1 Insert USB device into the USB terminal on the left side of the TV. 2 From the Setup menu, press or to select Media Player and then press . 3 Press or to select Photo - Toshiba 19CV100U | User Manual - Page 54
viewing JPEG files, you can also listen to the music files stored in the USB device. 1 From Media Player menu, press or to select Music and then remote control or TV control panel is pressed for 60 seconds after starting music playback, the TV will enter screen saver mode. Press any button but POWER - Toshiba 19CV100U | User Manual - Page 55
to turn off the Media Player, as well as the TV (up to 180 minutes in 10minute increments). To select the audio output preference. • TV Speakers: to output the music from the TV's built-in speakers. • Audio Receiver: to output the music from a connected amplifier (if available). Note: • The sleep - Toshiba 19CV100U | User Manual - Page 56
. Basic playback (DVD/VCD/CD)* 1 Press POWER on the TV control panel or on the remote control. The Power LED on the front of the TV changes to green the remote control to navigate the disc menu, then press to implement the selected menu option. Playback resume function: Your TV/DVD supports - Toshiba 19CV100U | User Manual - Page 57
on the TV control panel or on the remote control. 2 Wait for the disc to be ejected and then remove the disc from the slot. Disc playback reminders • If the TV/DVD does not operate properly, static electricity build-up may be the cause. Turn off the TV/DVD, then disconnect the power cord from the - Toshiba 19CV100U | User Manual - Page 58
Chapter 8: Basic disc playback Locating a chapter or track (DVD/ VCD/CD) 1 Press SKIP or SKIP repeatedly to display the chapter or track number you want to play. SKIP : To locate succeeding chapters or tracks. - Toshiba 19CV100U | User Manual - Page 59
mode. • Zoom function may not apply to some discs. Locating a specific scene (DVD/VCD/ CD) 1 Press during playback, still or stop mode. Title navigation, playback starts from the first chapter of the selected title. • For audio CDs and Video CDs, you can locate a scene by track number or record - Toshiba 19CV100U | User Manual - Page 60
specific section between two set points. This section will be played repeatedly until you turn off the A-B repeat mode. Enabling repeat playback (DVD/ VCD) 1 Press during playback or stop mode. 2 [DVD] Press repeatedly to select a repeat mode. It can either be by Chapter or by Title. The TV/DVD - Toshiba 19CV100U | User Manual - Page 61
Programmed playback/Random playback You can program the playback sequence of tracks on a Video CD. Or you can set the TV/DVD to play tracks at random. For procedures applicable to audio/MP3/WMA/ JPEG, go to Page 65. Note: • The programmed and random playback modes are not applicable to PBC-enabled - Toshiba 19CV100U | User Manual - Page 62
menu may simply be referred to a "menu" or "title" in the instructions supplied with the DVD. DVD menu (DVD) Some DVDs have an encoded menu that allows users to select a specific disc content, enable a particular DVD feature (e.g. subtitle or soundtrack language), or choose a particular title (for - Toshiba 19CV100U | User Manual - Page 63
be used. • If you select the DTS option in DVDs with DTS feature, no sound will be heard from the TV/DVD's speakers. You need to connect an amplifier equipped with a DTS decoder to the Optical digital audio out jack. Viewing subtitles (DVD) When playing back a disc recorded with subtitles, you can - Toshiba 19CV100U | User Manual - Page 64
turn on the PBC function: Follow steps 1 and 2 above, then press repeatedly until PBC appears. When enabled, PBC allows interactive Video CD playback using the remote control. 64 - Toshiba 19CV100U | User Manual - Page 65
's manual are meant only as a guide. Use of CD-RW discs for recording MP3 files is not recommended. You must obtain any required permission from copyright owners to download or use copyrighted content. Toshiba can not and does not grant such permission. MP3/WMA/JPEG/Audio CD information (CD) MP3 - Toshiba 19CV100U | User Manual - Page 66
WMA-2 WMA-3 Select files JPEG Preview 2 Press or to select another audio file for playback. Folder-1 Folder-2 MP3-1 MP3-2 MP3-3 WMA-1 WMA-2 WMA-3 Select files JPEG Preview 3 Press or to start playback. To stop playback: Press . The TV/DVD records the stop point. " " appears on-screen. Press to - Toshiba 19CV100U | User Manual - Page 67
until Off appears. Viewing a slide show (CD) If there are multiple JPEG files in the selected directory, you can view them in a slide show. For instructions on how to enable the slide show feature and set the interval period between pictures, go to Page 72. 1 Open the file folder containing the - Toshiba 19CV100U | User Manual - Page 68
Audio CD playback modes You can choose to repeat CD playback by track or the entire disc. You can also program the file playback sequence or set the TV/DVD the current session. Once you eject the disc or turn off the TV/DVD, these modes will be disabled. Pressing SKIP or SKIP during playback will - Toshiba 19CV100U | User Manual - Page 69
Chapter 9: Advanced disc playback Programming the playback sequence (CD) 1 In the Option panel of the file browser, press or to select Edit Mode, then press . Folder-1 Folder-2 MP3-1 MP3-2 MP3-3 Edit Mode Program View 2 Press to return to the file list and press or to select a file, then press - Toshiba 19CV100U | User Manual - Page 70
Customizing disc playback You can customize the disc playback settings to suit your preferences. Configuring the disc playback settings (DVD/VCD/CD) 1 In DVD mode, press during stop mode. MPDEea.RBnrCe.uLn.tal : :OEfnf glish SQTuVSboStiuctlnreedSenet Pass:w:O4oE:nr3ndglish AODuiudstpipoluaty - Toshiba 19CV100U | User Manual - Page 71
output corresponding to your audio connection. 73 Parental Set the restriction level for allowable disc content. 73 Password Change the access password for the parental control setting. 74 Note: These setup settings are retained in the TV/DVD's memory. It remains active even if the power - Toshiba 19CV100U | User Manual - Page 72
Options include: English, French, and Spanish. Subtitle / Audio Select the language for the subtitle display and audio track output during disc playback. English French The selected language will be heard or seen. Spanish Auto (Subtitle) The TV/DVD will display the subtitle in the disc's default - Toshiba 19CV100U | User Manual - Page 73
DVD encoding. Digital Out Select the sound format of the digital output depending on the enabled signal connection. Off PCM Bitstream Disables digital sound output. Select this option when there's no equipment connected to the optical DIGITAL AUDIO playback in your TV/DVD. You will be manually. 73 - Toshiba 19CV100U | User Manual - Page 74
temporarily cancel the parental restriction: 1) Load the restricted content DVD that you want to play. 2) Use the Channel Number the disc slot. 2) Press and hold down "4" on the remote control, then press VOLUMEon the TV control panel. The "Initializing" message appears on-screen to indicate that - Toshiba 19CV100U | User Manual - Page 75
. Other problems • If your TV's problem is not addressed in this Troubleshooting section or the recommended solution has not worked, use the Reset Factory Defaults procedure ( Page 32). TV will not turn on • Make sure the power cord is plugged in, and then press POWER. • The remote control batteries - Toshiba 19CV100U | User Manual - Page 76
after you have changed settings of the device, turn off your TV and unplug the power cord, and then plug and turn on again. • If several devices are connected, REGZA- LINK® feature may not operate properly. • Read the instruction manual furnished with the connected REGZA-LINK® device. HDMI - Toshiba 19CV100U | User Manual - Page 77
Chapter 11: Troubleshooting LED Indication The Power LED light on the TV front indicates the TV's status, as described below. LED Indication Power LED • Green is ON (solid) The TV is operating properly. • Red is ON (solid) The TV is in Standby mode. If, after trying the solutions, the problem still - Toshiba 19CV100U | User Manual - Page 78
26CV100U: 19.4 lbs (8.8 kg) 32CV100U: 26.0 lbs (11.8 kg) Operation Conditions Temperature: 32°F - 95°F (0°C - 35°C) Humidity: 20 - 80% (no moisture condensation) Supplied Accessories • Remote control with two size AAA batteries • AC power cord • Owner's manual (this book) • Cleaning cloth (to - Toshiba 19CV100U | User Manual - Page 79
not a malfunction of your TV. Format VGA SVGA XGA 480p 720p 1080i 1080p 1080p 1080p owner's manual are for explanation purposes and may differ from the actual unit. • Designs and specifications are subject to change without notice. • This model may not be compatible with features and/or specifications - Toshiba 19CV100U | User Manual - Page 80
this manual and checking the section "Troubleshooting," you find that service is needed: (1) For instructions on how to obtain warranty service for your LCD TV/DVD Combination, contact TACP's Consumer Solution Center toll free at 1-800-6313811. (2) You must include a copy or original bill of sale or - Toshiba 19CV100U | User Manual - Page 81
LCD TV/DVD COMBINATION). No person, agent, distributor, dealer, or company is authorized to change, modify, or extend the terms of these warranties warranties arising under state law. THIS WARRANTY GIVES YOU SPECIFIC Toshiba Consumer part on the work of the Independent JPEG Group. MPEG Layer-3 audio - Toshiba 19CV100U | User Manual - Page 82
, not price. Our General this service if rights, we need to make that any problems introduced by and the output from the warranty (or else, saying that you provide a warranty) and that users may redistribute the program under these conditions, and telling the user same sections as part of a whole which - Toshiba 19CV100U | User Manual - Page 83
used to control compilation and installation of the executable. However, as a special exception, the source code distributed need not spirit to the present version, but may differ in detail to address new problems or concerns. Each version is given a distinguishing version number. If the Program - Toshiba 19CV100U | User Manual - Page 84
guided WARRANTIES OF MERCHANTABILITY AND FITNESS FOR A PARTICULAR PURPOSE. THE ENTIRE RISK AS TO THE QUALITY AND PERFORMANCE OF THE PROGRAM IS WITH YOU. SHOULD THE PROGRAM PROVE DEFECTIVE, YOU ASSUME THE COST OF ALL NECESSARY SERVICING the best way to it output a short the appropriate parts of the - Toshiba 19CV100U | User Manual - Page 85
needs. This library is provided with all faults, and the entire risk of satisfactory quality, performance, accuracy, and effort is with the user. supplied "AS IS". The Contributing Authors and Group 42, Inc. disclaim all warranties, expressed or implied, including, without limitation, the warranties - Toshiba 19CV100U | User Manual - Page 86
Version 1.2.3, July 18th, 2005 Copyright (C) 1995-2005 Jean-loup Gailly and Mark Adler This software is provided "as-is", without any express or implied warranty. In no event will the authors be held liable for any damages arising from the use of this software. Permission is granted to anyone to - Toshiba 19CV100U | User Manual - Page 87
- Toshiba 19CV100U | User Manual - Page 88
, L.L.C. Corporate Headquarters: 82 TOTOWA ROAD, WAYNE, NJ 07470, U.S.A. NATIONAL SERVICE DIVISION:1420-B TOSHIBA DRIVE, LEBANON, TN 37087, U.S.A. CableClear, ColorStream, GameTimer, and TheaterWide are registered trademarks of Toshiba America Consumer Products, L.L.C. DynaLight is trademark of
-
 1
1 -
 2
2 -
 3
3 -
 4
4 -
 5
5 -
 6
6 -
 7
7 -
8
-
9
-
10
-
11
-
12
-
13
-
14
-
15
-
16
-
17
-
18
-
19
-
20
-
21
-
22
-
23
-
24
-
25
-
26
-
27
-
28
-
29
-
30
-
31
-
32
-
33
-
34
-
35
-
36
-
37
-
38
-
39
-
40
-
41
-
42
-
43
-
44
-
45
-
46
-
47
-
48
-
49
-
50
-
51
-
52
-
53
-
54
-
55
-
56
-
57
-
58
-
59
-
60
-
61
-
62
-
63
-
64
-
65
-
66
-
67
-
68
-
69
-
70
-
71
-
72
-
73
-
74
-
75
-
76
-
77
-
78
-
79
-
80
-
81
-
82
-
83
-
84
-
85
-
86
-
87
-
88
 |
 |
15CV100U
15CV101U
19CV100U
22CV100U
26CV100U
32CV100U
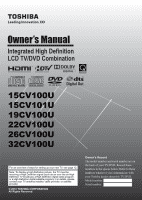
For an overview of steps for setting up your new TV, see page 12.
Note: To display a High Definition picture, the TV must be
receiving a High Definition signal (such as an over-the-air High
Definition TV broadcast, a High Definition digital cable program,
or a High Definition digital satellite program). For details, please
contact your TV antenna installer, cable provider, or satellite
provider.
© 2010 TOSHIBA CORPORATION
All Rights Reserved
Owner’s Record
The model number and serial number are on
the back of your TV/DVD. Record these
numbers in the spaces below. Refer to these
numbers whenever you communicate with
your Toshiba dealer about this TV/DVD.
Model number:
Serial number: