Toshiba 19CV100U User Manual - Page 31
Setting the HDMI, audio mode
 |
View all Toshiba 19CV100U manuals
Add to My Manuals
Save this manual to your list of manuals |
Page 31 highlights
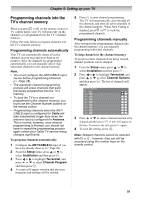
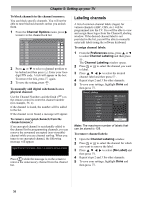
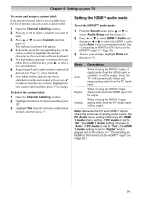
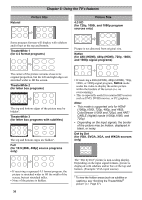
Chapter 5: Setting up your TV To create and assign a custom label: If the desired channel label is not available from the list of presets, you can create a custom label. 1 Open the Channel Labeling window. 2 Press or to select a channel you want to label. 3 Press or to select Custom and then press . The software keyboard will appear. 4 Repeatedly press the corresponding key on the remote control to highlight the desired character on the on-screen software keyboard. 5 The highlighted character is entered after you either press a different key, press , or after a two-second pause. 6 Repeat steps 4 and 5 until you have entered all desired text. Press when finished. 7 New labels will be added to the list in alphabetical order and marked with an icon to indicate that they are custom. Highlight the new custom label and then press to assign. To delete the custom label: 1 Open the Channel Labeling window. 2 Highlight the label to be deleted and then press . 3 Highlight Yes from the deletion confirmation window and then press . Setting the HDMITM audio mode To set the HDMITM audio mode: 1 From the Sound menu, press or to select Audio Setup and then press . 2 Press or to select HDMI 1 Audio and then press or to select the HDMI 1 audio mode (Auto is the recommended mode). See "Connecting an HDMI or DVI device to the HDMI™ input"( Page 20). 3 To save your settings, highlight Done and then press . Mode Description Auto Digital Analog When viewing the HDMI 1 input, if digital audio from the HDMI input is available, it will be output. If not, the TV will automatically detect and output analog audio from the PC Audio input. When viewing the HDMI 1 input, digital audio from the HDMI input will be output. When viewing the HDMI 1 input, analog audio from the PC Audio input will be output. Note: Because the PC and HDMI-1 inputs share the same set of analog audio inputs, the PC Audio menu setting influences the HDMI 1 Audio menu setting. If PC Audio is set to "No", the HDMI 1 Audio setting changes to "Auto". If PC Audio is set to "Yes", the HDMI 1 Audio setting is set to "Digital" and is grayed out in the menu. ( "Connecting an HDMI or DVI device to the HDMI™ input" on Page 20.) 31
-
 1
1 -
2
-
3
-
4
-
5
-
6
-
7
-
8
-
9
-
10
-
11
-
12
-
13
-
14
-
15
-
16
-
17
-
18
-
19
-
20
-
21
-
22
-
23
-
24
-
25
-
 26
26 -
 27
27 -
 28
28 -
 29
29 -
 30
30 -
 31
31 -
 32
32 -
 33
33 -
 34
34 -
 35
35 -
 36
36 -
37
-
38
-
39
-
40
-
41
-
42
-
43
-
44
-
45
-
46
-
47
-
48
-
49
-
50
-
51
-
52
-
53
-
54
-
55
-
56
-
57
-
58
-
59
-
60
-
61
-
62
-
63
-
64
-
65
-
66
-
67
-
68
-
69
-
70
-
71
-
72
-
73
-
74
-
75
-
76
-
77
-
78
-
79
-
80
-
81
-
82
-
83
-
84
-
85
-
86
-
87
-
88
 |
 |