Toshiba A60-S1691ST User Manual - Page 52
Right side
 |
View all Toshiba A60-S1691ST manuals
Add to My Manuals
Save this manual to your list of manuals |
Page 52 highlights
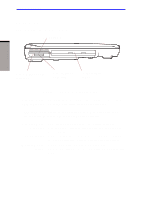
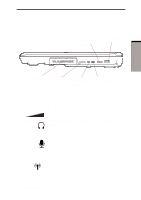
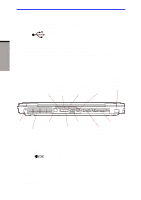
Right side Figure 2-3 shows the computer's right side. WIRELESS COMMUNICATION SWITCH Right side USB PORT THE GRAND TOUR HARDDISK VOLUME CONTROL HEADPHONE JACK MICROPHONE JACK Figure 2-3 The right side of the computer Hard Disk Volume control Headphone jack Microphone jack Provides access to read and write. Use this dial to adjust the volume of the system speaker and headphones. A standard 3.5 mm mini headphone jack enables connection of a stereo headphone (16 ohm minimum) or other device for audio output. When you connect headphones, the internal speaker is automatically disabled. A standard 3.5 mm mini microphone jack enables connection of a three conductive type mini-jack for audio input. Wireless Slide this switch to the right to turn it on and to the left communication to turn it off. switch On Off CAUTION: Set the switch to off in airplanes and hospitals. Check the Wireless communication indicator. It will stop glowing when the wireless communication. 2-3
-
 1
1 -
2
-
3
-
4
-
5
-
6
-
7
-
8
-
9
-
10
-
11
-
12
-
13
-
14
-
15
-
16
-
17
-
18
-
19
-
20
-
21
-
22
-
23
-
24
-
25
-
26
-
27
-
28
-
29
-
30
-
31
-
32
-
33
-
34
-
35
-
36
-
37
-
38
-
39
-
40
-
41
-
42
-
43
-
44
-
45
-
46
-
 47
47 -
 48
48 -
 49
49 -
 50
50 -
 51
51 -
 52
52 -
 53
53 -
 54
54 -
 55
55 -
 56
56 -
 57
57 -
58
-
59
-
60
-
61
-
62
-
63
-
64
-
65
-
66
-
67
-
68
-
69
-
70
-
71
-
72
-
73
-
74
-
75
-
76
-
77
-
78
-
79
-
80
-
81
-
82
-
83
-
84
-
85
-
86
-
87
-
88
-
89
-
90
-
91
-
92
-
93
-
94
-
95
-
96
-
97
-
98
-
99
-
100
-
101
-
102
-
103
-
104
-
105
-
106
-
107
-
108
-
109
-
110
-
111
-
112
-
113
-
114
-
115
-
116
-
117
-
118
-
119
-
120
-
121
-
122
-
123
-
124
-
125
-
126
-
127
-
128
-
129
-
130
-
131
-
132
-
133
-
134
-
135
-
136
-
137
-
138
-
139
-
140
-
141
-
142
-
143
-
144
-
145
-
146
-
147
-
148
-
149
-
150
-
151
-
152
-
153
-
154
-
155
-
156
-
157
-
158
-
159
-
160
-
161
-
162
-
163
-
164
-
165
-
166
-
167
-
168
-
169
-
170
-
171
-
172
-
173
-
174
-
175
-
176
-
177
-
178
-
179
-
180
-
181
-
182
-
183
-
184
-
185
-
186
-
187
-
188
-
189
-
190
-
191
-
192
-
193
-
194
-
195
-
196
-
197
-
198
-
199
-
200
-
201
-
202
-
203
-
204
-
205
-
206
-
207
-
208
-
209
-
210
-
211
-
212
-
213
-
214
-
215
-
216
-
217
-
218
-
219
-
220
-
221
-
222
-
223
-
224
-
225
-
226
-
227
-
228
-
229
-
230
-
231
-
232
-
233
-
234
-
235
-
236
 |
 |
