Toshiba Tecra R850 User Manual - Page 111
DisplayPort, Connecting the DisplayPort, eSATA (External Serial ATA) devices
 |
View all Toshiba Tecra R850 manuals
Add to My Manuals
Save this manual to your list of manuals |
Page 111 highlights
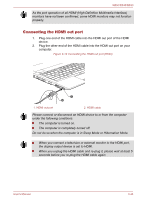
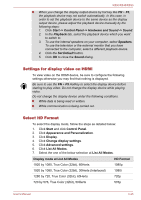
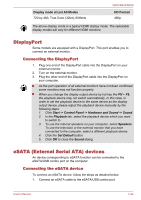
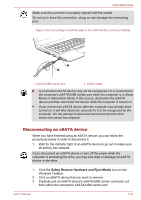
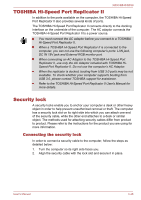
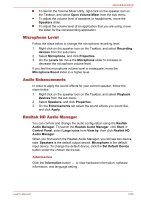
Display mode at List All Modes 720 by 480, True Color (32bit), 60Herts R850/R840/R830 HD Format 480p The above display mode is a typical HDMI display mode. The selectable display modes will vary for different HDMI monitors. DisplayPort Some models are equipped with a DisplayPort. This port enables you to connect an external monitor. Connecting the DisplayPort 1. Plug one end of the DisplayPort cable into the DisplayPort on your external monitor. 2. Turn on the external monitor. 3. Plug the other end of the DisplayPort cable into the DisplayPort on your computer. As the port operation of all external monitors have not been confirmed, some monitors may not function properly. When you change the display output device by hot key like FN + F5, the playback device may not switch automatically. In this case, in order to set the playback device to the same device as the display output device, please adjust the playback device manually by the following steps: 1. Click Start -> Control Panel -> Hardware and Sound -> Sound. 2. In the Playback tab, select the playback device which you want to switch to. 3. To use the internal speakers on your computer, select Speakers. To use the television or the external monitor that you have connected to the computer, select a different playback device. 4. Click the Set Default button. 5. Click OK to close the Sound dialog. eSATA (External Serial ATA) devices An device corresponding to eSATA function can be connected to the eSATA/USB combo port on the computer. Connecting the eSATA device To connect an eSATA device, follow the steps as detailed below: 1. Connect an eSATA cable to the eSATA/USB combo port. User's Manual 3-46
-
 1
1 -
2
-
3
-
4
-
5
-
6
-
7
-
8
-
9
-
10
-
11
-
12
-
13
-
14
-
15
-
16
-
17
-
18
-
19
-
20
-
21
-
22
-
23
-
24
-
25
-
26
-
27
-
28
-
29
-
30
-
31
-
32
-
33
-
34
-
35
-
36
-
37
-
38
-
39
-
40
-
41
-
42
-
43
-
44
-
45
-
46
-
47
-
48
-
49
-
50
-
51
-
52
-
53
-
54
-
55
-
56
-
57
-
58
-
59
-
60
-
61
-
62
-
63
-
64
-
65
-
66
-
67
-
68
-
69
-
70
-
71
-
72
-
73
-
74
-
75
-
76
-
77
-
78
-
79
-
80
-
81
-
82
-
83
-
84
-
85
-
86
-
87
-
88
-
89
-
90
-
91
-
92
-
93
-
94
-
95
-
96
-
97
-
98
-
99
-
100
-
101
-
102
-
103
-
104
-
105
-
 106
106 -
 107
107 -
 108
108 -
 109
109 -
 110
110 -
 111
111 -
 112
112 -
 113
113 -
 114
114 -
 115
115 -
 116
116 -
117
-
118
-
119
-
120
-
121
-
122
-
123
-
124
-
125
-
126
-
127
-
128
-
129
-
130
-
131
-
132
-
133
-
134
-
135
-
136
-
137
-
138
-
139
-
140
-
141
-
142
-
143
-
144
-
145
-
146
-
147
-
148
-
149
-
150
-
151
-
152
-
153
-
154
-
155
-
156
-
157
-
158
-
159
-
160
-
161
-
162
-
163
-
164
-
165
-
166
-
167
-
168
-
169
-
170
-
171
-
172
-
173
-
174
-
175
-
176
-
177
-
178
-
179
-
180
-
181
-
182
-
183
-
184
-
185
-
186
-
187
-
188
-
189
-
190
-
191
-
192
-
193
-
194
-
195
-
196
-
197
-
198
-
199
-
200
-
201
-
202
-
203
-
204
-
205
-
206
-
207
-
208
 |
 |
