Toshiba Tecra R850 User Manual - Page 132
TOSHIBA Password Utility, User Password
 |
View all Toshiba Tecra R850 manuals
Add to My Manuals
Save this manual to your list of manuals |
Page 132 highlights
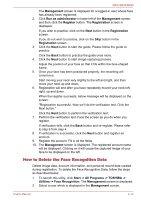
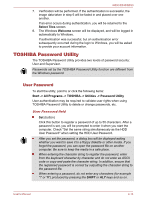
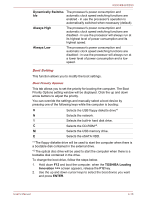
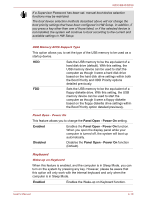
R850/R840/R830 7. Verification will be performed. If the authentication is successful, the image data taken in step 6 will be faded in and placed over one another. If an error occurs during authentication, you will be returned to the Select Tiles screen. 8. The Windows Welcome screen will be displayed, and will be logged in automatically to Windows. If authentication was successful, but an authentication error subsequently occurred during the login to Windows, you will be asked to provide your account information. TOSHIBA Password Utility The TOSHIBA Password Utility provides two levels of password security: User and Supervisor. Passwords set by the TOSHIBA Password Utility function are different from the Windows password. User Password To start the utility, point to or click the following items: Start -> All Programs -> TOSHIBA -> Utilities -> Password Utility User authentication may be required to validate user rights when using TOSHIBA Password Utility to delete or change passwords, etc. User Password field Set (button) Click this button to register a password of up to 50 characters. After a password is set, you will be prompted to enter it when you start the computer. Check "Set the same string simultaneously as the HDD User Password" when setting the HDD User Password. After you set the password, a dialog box will be displayed asking whether you want to save it to a floppy diskette or other media. If you forget the password, you can open the password file on another computer. Be sure to keep the media in a safe place. When entering the character string to register the password, enter from the keyboard character by character and do not enter as ASCII code or copy-and-paste the character string. In addition, ensure that the registered password is correct by outputting the character string to the password file. When entering a password, do not enter any characters (for example "!" or "#") produced by pressing the SHIFT or ALT keys and so on. User's Manual 4-14
-
 1
1 -
2
-
3
-
4
-
5
-
6
-
7
-
8
-
9
-
10
-
11
-
12
-
13
-
14
-
15
-
16
-
17
-
18
-
19
-
20
-
21
-
22
-
23
-
24
-
25
-
26
-
27
-
28
-
29
-
30
-
31
-
32
-
33
-
34
-
35
-
36
-
37
-
38
-
39
-
40
-
41
-
42
-
43
-
44
-
45
-
46
-
47
-
48
-
49
-
50
-
51
-
52
-
53
-
54
-
55
-
56
-
57
-
58
-
59
-
60
-
61
-
62
-
63
-
64
-
65
-
66
-
67
-
68
-
69
-
70
-
71
-
72
-
73
-
74
-
75
-
76
-
77
-
78
-
79
-
80
-
81
-
82
-
83
-
84
-
85
-
86
-
87
-
88
-
89
-
90
-
91
-
92
-
93
-
94
-
95
-
96
-
97
-
98
-
99
-
100
-
101
-
102
-
103
-
104
-
105
-
106
-
107
-
108
-
109
-
110
-
111
-
112
-
113
-
114
-
115
-
116
-
117
-
118
-
119
-
120
-
121
-
122
-
123
-
124
-
125
-
126
-
 127
127 -
 128
128 -
 129
129 -
 130
130 -
 131
131 -
 132
132 -
 133
133 -
 134
134 -
 135
135 -
 136
136 -
 137
137 -
138
-
139
-
140
-
141
-
142
-
143
-
144
-
145
-
146
-
147
-
148
-
149
-
150
-
151
-
152
-
153
-
154
-
155
-
156
-
157
-
158
-
159
-
160
-
161
-
162
-
163
-
164
-
165
-
166
-
167
-
168
-
169
-
170
-
171
-
172
-
173
-
174
-
175
-
176
-
177
-
178
-
179
-
180
-
181
-
182
-
183
-
184
-
185
-
186
-
187
-
188
-
189
-
190
-
191
-
192
-
193
-
194
-
195
-
196
-
197
-
198
-
199
-
200
-
201
-
202
-
203
-
204
-
205
-
206
-
207
-
208
 |
 |