Toshiba Tecra R850 User Manual - Page 51
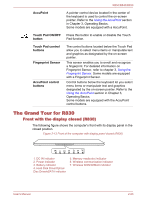
The Grand Tour for R830, Front with the display closed (R830)
 |
View all Toshiba Tecra R850 manuals
Add to My Manuals
Save this manual to your list of manuals |
Page 51 highlights
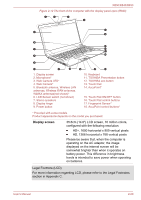
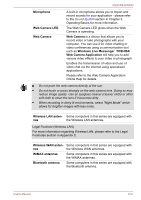
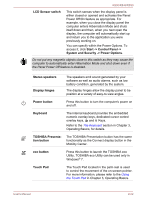
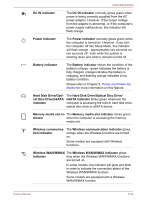
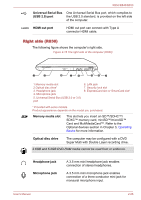
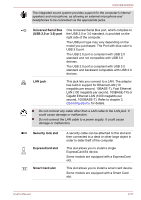
R850/R840/R830 AccuPoint A pointer control device located in the center of the keyboard is used to control the on-screen pointer. Refer to the Using the AccuPoint section in Chapter 3, Operating Basics. Some models are equipped with a AccuPoint. Touch Pad ON/OFF button Press this button to enable or disable the Touch Pad function. Touch Pad control buttons Fingerprint Sensor AccuPoint control buttons The control buttons located below the Touch Pad allow you to select menu items or manipulate text and graphics as designated by the on-screen pointer. This sensor enables you to enroll and recognize a fingerprint. For detailed information on Fingerprint Sensor, refer to chapter 3, Using the Fingerprint Sensor. Some models are equipped with a Fingerprint Sensor. Control buttons below the keyboard let you select menu items or manipulate text and graphics designated by the on-screen pointer. Refer to the Using the AccuPoint section in Chapter 3, Operating Basics. Some models are equipped with the AccuPoint control buttons. The Grand Tour for R830 Front with the display closed (R830) The following figure shows the computer's front with its display panel in the closed position. Figure 2-13 Front of the computer with display panel closed (R830) 12 3 4 5 6 7 1. DC IN indicator 2. Power indicator 3. Battery indicator 4. Hard Disk Drive/Optical Disc Drive/eSATA indicator 5. Memory media slot indicator 6. Wireless communication indicator 7. Wireless WAN/WiMAX indicator User's Manual 2-23
-
 1
1 -
2
-
3
-
4
-
5
-
6
-
7
-
8
-
9
-
10
-
11
-
12
-
13
-
14
-
15
-
16
-
17
-
18
-
19
-
20
-
21
-
22
-
23
-
24
-
25
-
26
-
27
-
28
-
29
-
30
-
31
-
32
-
33
-
34
-
35
-
36
-
37
-
38
-
39
-
40
-
41
-
42
-
43
-
44
-
45
-
 46
46 -
 47
47 -
 48
48 -
 49
49 -
 50
50 -
 51
51 -
 52
52 -
 53
53 -
 54
54 -
 55
55 -
 56
56 -
57
-
58
-
59
-
60
-
61
-
62
-
63
-
64
-
65
-
66
-
67
-
68
-
69
-
70
-
71
-
72
-
73
-
74
-
75
-
76
-
77
-
78
-
79
-
80
-
81
-
82
-
83
-
84
-
85
-
86
-
87
-
88
-
89
-
90
-
91
-
92
-
93
-
94
-
95
-
96
-
97
-
98
-
99
-
100
-
101
-
102
-
103
-
104
-
105
-
106
-
107
-
108
-
109
-
110
-
111
-
112
-
113
-
114
-
115
-
116
-
117
-
118
-
119
-
120
-
121
-
122
-
123
-
124
-
125
-
126
-
127
-
128
-
129
-
130
-
131
-
132
-
133
-
134
-
135
-
136
-
137
-
138
-
139
-
140
-
141
-
142
-
143
-
144
-
145
-
146
-
147
-
148
-
149
-
150
-
151
-
152
-
153
-
154
-
155
-
156
-
157
-
158
-
159
-
160
-
161
-
162
-
163
-
164
-
165
-
166
-
167
-
168
-
169
-
170
-
171
-
172
-
173
-
174
-
175
-
176
-
177
-
178
-
179
-
180
-
181
-
182
-
183
-
184
-
185
-
186
-
187
-
188
-
189
-
190
-
191
-
192
-
193
-
194
-
195
-
196
-
197
-
198
-
199
-
200
-
201
-
202
-
203
-
204
-
205
-
206
-
207
-
208
 |
 |