Toshiba Tecra R850 User Manual - Page 149
Monitoring of power condition, Battery indicator
 |
View all Toshiba Tecra R850 manuals
Add to My Manuals
Save this manual to your list of manuals |
Page 149 highlights
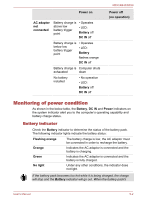
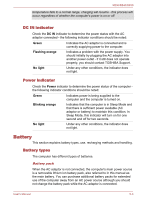
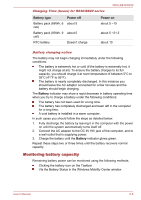
Power on AC adaptor not connected Battery charge is • Operates above low battery trigger point • LED: Battery off DC IN off Battery charge is • Operates below low battery trigger point • LED: Battery flashes orange DC IN off Battery charge is Computer shuts exhausted down No battery installed • No operation • LED: Battery off DC IN off R850/R840/R830 Power off (no operation) Monitoring of power condition As shown in the below table, the Battery, DC IN and Power indicators on the system indicator alert you to the computer's operating capability and battery charge status. Battery indicator Check the Battery indicator to determine the status of the battery pack. The following indicator lights indicate the battery status: Flashing orange The battery charge is low, the AC adaptor must be connected in order to recharge the battery. Orange Indicates the AC adaptor is connected and the battery is charging. Green Indicates the AC adaptor is connected and the battery is fully charged. No light Under any other conditions, the indicator does not light. If the battery pack becomes too hot while it is being charged, the charge will stop and the Battery indicator will go out. When the battery pack's User's Manual 5-2
-
 1
1 -
2
-
3
-
4
-
5
-
6
-
7
-
8
-
9
-
10
-
11
-
12
-
13
-
14
-
15
-
16
-
17
-
18
-
19
-
20
-
21
-
22
-
23
-
24
-
25
-
26
-
27
-
28
-
29
-
30
-
31
-
32
-
33
-
34
-
35
-
36
-
37
-
38
-
39
-
40
-
41
-
42
-
43
-
44
-
45
-
46
-
47
-
48
-
49
-
50
-
51
-
52
-
53
-
54
-
55
-
56
-
57
-
58
-
59
-
60
-
61
-
62
-
63
-
64
-
65
-
66
-
67
-
68
-
69
-
70
-
71
-
72
-
73
-
74
-
75
-
76
-
77
-
78
-
79
-
80
-
81
-
82
-
83
-
84
-
85
-
86
-
87
-
88
-
89
-
90
-
91
-
92
-
93
-
94
-
95
-
96
-
97
-
98
-
99
-
100
-
101
-
102
-
103
-
104
-
105
-
106
-
107
-
108
-
109
-
110
-
111
-
112
-
113
-
114
-
115
-
116
-
117
-
118
-
119
-
120
-
121
-
122
-
123
-
124
-
125
-
126
-
127
-
128
-
129
-
130
-
131
-
132
-
133
-
134
-
135
-
136
-
137
-
138
-
139
-
140
-
141
-
142
-
143
-
 144
144 -
 145
145 -
 146
146 -
 147
147 -
 148
148 -
 149
149 -
 150
150 -
 151
151 -
 152
152 -
 153
153 -
 154
154 -
155
-
156
-
157
-
158
-
159
-
160
-
161
-
162
-
163
-
164
-
165
-
166
-
167
-
168
-
169
-
170
-
171
-
172
-
173
-
174
-
175
-
176
-
177
-
178
-
179
-
180
-
181
-
182
-
183
-
184
-
185
-
186
-
187
-
188
-
189
-
190
-
191
-
192
-
193
-
194
-
195
-
196
-
197
-
198
-
199
-
200
-
201
-
202
-
203
-
204
-
205
-
206
-
207
-
208
 |
 |