Toshiba Tecra R850 User Manual - Page 67
The Keyboard, AccuPoint precautions, Replacing the cap - screen replacement
 |
View all Toshiba Tecra R850 manuals
Add to My Manuals
Save this manual to your list of manuals |
Page 67 highlights
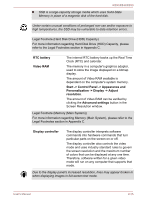
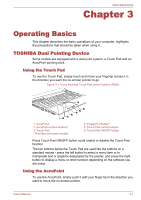
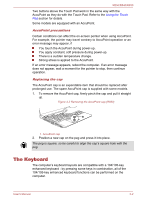
R850/R840/R830 Two buttons above the Touch Pad work in the same way with the AccuPoint as they do with the Touch Pad. Refer to the Using the Touch Pad section for details. Some models are equipped with an AccuPoint. AccuPoint precautions Certain conditions can affect the on-screen pointer when using AccuPoint. For example, the pointer may travel contrary to AccuPoint operation or an error message may appear, if You touch the AccuPoint during power-up. You apply constant, soft pressure during power-up. There is a sudden temperature change. Strong stress is applied to the AccuPoint. If an error message appears, reboot the computer. If an error message does not appear, wait a moment for the pointer to stop, then continue operation. Replacing the cap The AccuPoint cap is an expendable item that should be replaced after prolonged use. The spare AccuPoint cap is supplied with some models. 1. To remove the AccuPoint cap, firmly pinch the cap and pull it straight up. Figure 3-2 Removing the AccuPoint cap (R850) 1 1. AccuPoint cap 2. Position a new cap on the peg and press it into place. The peg is square, so be careful to align the cap's square hole with the peg. The Keyboard The computer's keyboard layouts are compatible with a 104/105-key enhanced keyboard - by pressing some keys in combination, all of the 104/105-key enhanced keyboard functions can be performed on the computer. User's Manual 3-2
-
 1
1 -
2
-
3
-
4
-
5
-
6
-
7
-
8
-
9
-
10
-
11
-
12
-
13
-
14
-
15
-
16
-
17
-
18
-
19
-
20
-
21
-
22
-
23
-
24
-
25
-
26
-
27
-
28
-
29
-
30
-
31
-
32
-
33
-
34
-
35
-
36
-
37
-
38
-
39
-
40
-
41
-
42
-
43
-
44
-
45
-
46
-
47
-
48
-
49
-
50
-
51
-
52
-
53
-
54
-
55
-
56
-
57
-
58
-
59
-
60
-
61
-
 62
62 -
 63
63 -
 64
64 -
 65
65 -
 66
66 -
 67
67 -
 68
68 -
 69
69 -
 70
70 -
 71
71 -
 72
72 -
73
-
74
-
75
-
76
-
77
-
78
-
79
-
80
-
81
-
82
-
83
-
84
-
85
-
86
-
87
-
88
-
89
-
90
-
91
-
92
-
93
-
94
-
95
-
96
-
97
-
98
-
99
-
100
-
101
-
102
-
103
-
104
-
105
-
106
-
107
-
108
-
109
-
110
-
111
-
112
-
113
-
114
-
115
-
116
-
117
-
118
-
119
-
120
-
121
-
122
-
123
-
124
-
125
-
126
-
127
-
128
-
129
-
130
-
131
-
132
-
133
-
134
-
135
-
136
-
137
-
138
-
139
-
140
-
141
-
142
-
143
-
144
-
145
-
146
-
147
-
148
-
149
-
150
-
151
-
152
-
153
-
154
-
155
-
156
-
157
-
158
-
159
-
160
-
161
-
162
-
163
-
164
-
165
-
166
-
167
-
168
-
169
-
170
-
171
-
172
-
173
-
174
-
175
-
176
-
177
-
178
-
179
-
180
-
181
-
182
-
183
-
184
-
185
-
186
-
187
-
188
-
189
-
190
-
191
-
192
-
193
-
194
-
195
-
196
-
197
-
198
-
199
-
200
-
201
-
202
-
203
-
204
-
205
-
206
-
207
-
208
 |
 |