Toshiba Tecra R850 User Manual - Page 88
TOSHIBA VIDEO PLAYER, Notes on use
 |
View all Toshiba Tecra R850 manuals
Add to My Manuals
Save this manual to your list of manuals |
Page 88 highlights
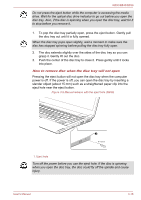
R850/R840/R830 When you back up a DVD disc, be sure that the source drive supports recording to DVD-R, DVD-R DL, DVD-RW, DVD+R, DVD+R DL or DVD+RW media - if this is not the case then the source disc might not be backed up correctly. When you back up a DVD-R, DVD-R DL, DVD-RW, DVD+R, DVD+R DL or DVD+RW disc, be sure to use the same type of disc. You cannot partially delete any data written to a CD-RW, DVD-RW or DVD+RW disc. Data Verification To verify that data has been written or rewritten correctly to a data disc you should follow the steps below before you begin the write/rewrite process: 1. Click Start -> All Programs -> TOSHIBA -> CD&DVD Applications > Disc Creator to access the TOSHIBA Disc Creator. 2. Display the setting dialog box by one of the following two steps: Click the Recording settings button ( ) for writing on the main toolbar in the Data CD/DVD mode. Select Settings for Each Mode -> Data CD/DVD in the Settings menu. 3. Mark the Verify Written Data check box. 4. Select File Open or Full Compare mode. 5. Click the OK button. How to learn more about TOSHIBA Disc Creator Please refer to the Help files for additional TOSHIBA Disc Creator information. TOSHIBA VIDEO PLAYER Please be aware of the following limitations when you use the TOSHIBA VIDEO PLAYER: Notes on use This software can only be used on Windows 7. TOSHIBA VIDEO PLAYER software is supported for playback of DVD-Video and DVD-VR. Frame dropping, audio skipping or out of sync audio and video may occur during playback of some DVD-Video titles. Close all other applications when using the TOSHIBA VIDEO PLAYER. Do not open any other applications or carry out any other operations during video playback. Playback may stop or not function properly in some situations. Unfinalized DVDs created on home DVD recorders may not be playable on the computer. User's Manual 3-23
-
 1
1 -
2
-
3
-
4
-
5
-
6
-
7
-
8
-
9
-
10
-
11
-
12
-
13
-
14
-
15
-
16
-
17
-
18
-
19
-
20
-
21
-
22
-
23
-
24
-
25
-
26
-
27
-
28
-
29
-
30
-
31
-
32
-
33
-
34
-
35
-
36
-
37
-
38
-
39
-
40
-
41
-
42
-
43
-
44
-
45
-
46
-
47
-
48
-
49
-
50
-
51
-
52
-
53
-
54
-
55
-
56
-
57
-
58
-
59
-
60
-
61
-
62
-
63
-
64
-
65
-
66
-
67
-
68
-
69
-
70
-
71
-
72
-
73
-
74
-
75
-
76
-
77
-
78
-
79
-
80
-
81
-
82
-
 83
83 -
 84
84 -
 85
85 -
 86
86 -
 87
87 -
 88
88 -
 89
89 -
 90
90 -
 91
91 -
 92
92 -
 93
93 -
94
-
95
-
96
-
97
-
98
-
99
-
100
-
101
-
102
-
103
-
104
-
105
-
106
-
107
-
108
-
109
-
110
-
111
-
112
-
113
-
114
-
115
-
116
-
117
-
118
-
119
-
120
-
121
-
122
-
123
-
124
-
125
-
126
-
127
-
128
-
129
-
130
-
131
-
132
-
133
-
134
-
135
-
136
-
137
-
138
-
139
-
140
-
141
-
142
-
143
-
144
-
145
-
146
-
147
-
148
-
149
-
150
-
151
-
152
-
153
-
154
-
155
-
156
-
157
-
158
-
159
-
160
-
161
-
162
-
163
-
164
-
165
-
166
-
167
-
168
-
169
-
170
-
171
-
172
-
173
-
174
-
175
-
176
-
177
-
178
-
179
-
180
-
181
-
182
-
183
-
184
-
185
-
186
-
187
-
188
-
189
-
190
-
191
-
192
-
193
-
194
-
195
-
196
-
197
-
198
-
199
-
200
-
201
-
202
-
203
-
204
-
205
-
206
-
207
-
208
 |
 |