Xerox 3300MFP User Guide - Page 131
Scanning, Scanning Process with TWAIN- enabled Software, Scanning Using the WIA Driver, Windows XP
 |
UPC - 095205744415
View all Xerox 3300MFP manuals
Add to My Manuals
Save this manual to your list of manuals |
Page 131 highlights
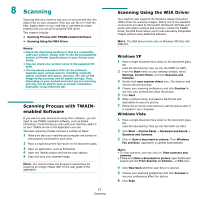
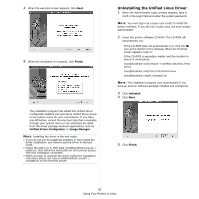
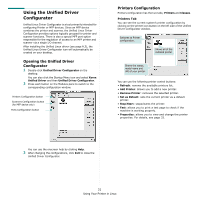
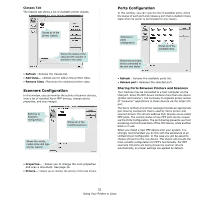
8 Scanning Scanning with your machine lets you turn pictures and text into digital files on your computer. Then you can fax or e-mail the files, display them on your web site or use them to create projects that you can print using the WIA driver. This chapter includes: • Scanning Process with TWAIN-enabled Software • Scanning Using the WIA Driver NOTES: • Check the Operating System(s) that are compatible with your printer. Please refer to the OS Compatibility section of Printer Specifications in your Printer User Guide. • You can check your printer name in the supplied CDROM. • The maximum resolution that can be achieved depends upon various factors, including computer speed, available disk space, memory, the size of the image being scanned, and bit depth settings. Thus, depending on your system and what you are scanning, you may not be able to scan at certain resolutions, especially using enhanced dpi. Scanning Process with TWAINenabled Software If you want to scan documents using other software, you will need to use TWAIN-compliant software, such as Adobe Photoshop. The first time you scan with your machine, select it as your TWAIN source in the application you use. The basic scanning process involves a number of steps: 1 Make sure that your machine and computer are turned on and properly connected to each other. 2 Place a single document face down on the document glass. 3 Open an application, such as Photoshop. 4 Open the TWAIN window and set the scan options. 5 Scan and save your scanned image. NOTE: You need to follow the program's instructions for acquiring an image. Please refer to the user guide of the application. 27 Scanning Scanning Using the WIA Driver Your machine also supports the Windows Image Acquisition (WIA) driver for scanning images. WIA is one of the standard components provided by Microsoft Windows XP/Vista and works with digital cameras and scanners. Unlike the TWAIN driver, the WIA driver allows you to scan and easily manipulate images without using additional software. NOTE: The WIA driver works only on Windows XP/Vista with USB port. Windows XP 1 Place a single document face down on the document glass. OR Load the document(s) face up into the DADF (or ADF). 2 From the Start menu on your desktop window, select Settings, Control Panel, and then Scanners and Cameras. 3 Double click your scanner driver icon. The Scanner and Camera Wizard launches. 4 Choose your scanning preferences and click Preview to see how your preferences affect the picture. 5 Click Next. 6 Enter a picture name, and select a file format and destination to save the picture. 7 Follow the on-screen instructions to edit the picture after it is copied to your computer. Windows Vista 1 Place a single document face down on the document glass. OR Load the document(s) face up into the DADF (or ADF). 2 Click Start → Control Panel → Hardware and Sound → Scanners and Cameras. 3 Click on Scan a document or picture. Then Windows Fax and Scan application is opened automatically. NOTE: • To view scanners, user can click on View scanners and cameras. • If there is not Scan a document or picture, open the MS paint program and click From Scanner or Camera... on File menu. 4 Click New Scan and then scan driver is opened. 5 Choose your scanning preferences and click Preview to see your preferences affect the picture. 6 Click Scan.
-
 1
1 -
2
-
3
-
4
-
5
-
6
-
7
-
8
-
9
-
10
-
11
-
12
-
13
-
14
-
15
-
16
-
17
-
18
-
19
-
20
-
21
-
22
-
23
-
24
-
25
-
26
-
27
-
28
-
29
-
30
-
31
-
32
-
33
-
34
-
35
-
36
-
37
-
38
-
39
-
40
-
41
-
42
-
43
-
44
-
45
-
46
-
47
-
48
-
49
-
50
-
51
-
52
-
53
-
54
-
55
-
56
-
57
-
58
-
59
-
60
-
61
-
62
-
63
-
64
-
65
-
66
-
67
-
68
-
69
-
70
-
71
-
72
-
73
-
74
-
75
-
76
-
77
-
78
-
79
-
80
-
81
-
82
-
83
-
84
-
85
-
86
-
87
-
88
-
89
-
90
-
91
-
92
-
93
-
94
-
95
-
96
-
97
-
98
-
99
-
100
-
101
-
102
-
103
-
104
-
105
-
106
-
107
-
108
-
109
-
110
-
111
-
112
-
113
-
114
-
115
-
116
-
117
-
118
-
119
-
120
-
121
-
122
-
123
-
124
-
125
-
 126
126 -
 127
127 -
 128
128 -
 129
129 -
 130
130 -
 131
131 -
 132
132 -
 133
133 -
 134
134 -
 135
135 -
 136
136 -
137
-
138
-
139
-
140
-
141
-
142
-
143
-
144
-
145
-
146
-
147
-
148
 |
 |