Xerox 3300MFP User Guide - Page 27
Network setup, Introduction, Via network administration programs, Via the control panel - default password
 |
UPC - 095205744415
View all Xerox 3300MFP manuals
Add to My Manuals
Save this manual to your list of manuals |
Page 27 highlights
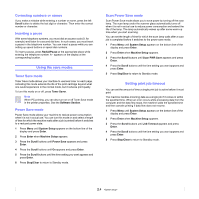
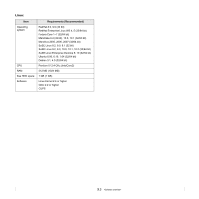
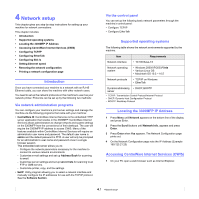
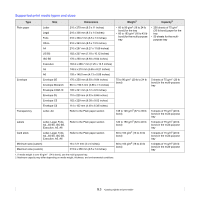
4 Network setup This chapter gives you step-by-step instructions for setting up your machine for network connections. This chapter includes: • Introduction • Supported operating systems • Locating the 3300MFP IP Address • Accessing CentreWare Internet Services (CWIS) • Configuring TCP/IP • Configuring EtherTalk • Configuring 802.1x • Setting Ethernet speed • Restoring the network configuration • Printing a network configuration page Introduction Once you have connected your machine to a network with an RJ-45 Ethernet cable, you can share the machine with other network users. You need to set up the network protocols on the machine to use it as your network printer. Protocols can be set up by the following two methods: Via network administration programs You can configure your machine's print server settings and manage the machine via the following programs that came with your machine: • CentreWare IS: CentreWare Internet Services is the embedded HTTP server application that resides in the 3300MFP. CentreWare Internet Services allows administrators to change network and system settings on the 3300MFP from the convenience of their desktops. The user will require the 3300MFP IP address to access CWIS. Many of the features available within CentreWare Internet Services will require an administrator user name and password. The default user name is admin and the default password is 1111. A user will only be prompted for an administrator's user name and password once in a single browser session. This embedded web server allows you to: - Configure the network parameters necessary for the machine to connect to various network environments. - Customize e-mail settings and set up Address Book for scanning to email. - Customize server settings and set up server lists for scanning to an FTP or SMB servers. - Customize printer, copy, and fax settings. • SetIP: Utility program allowing you to select a network interface and manually configure the IP addresses for use with the TCP/IP protocol. See the Software Section. Via the control panel You can set up the following basic network parameters through the machine's control panel: • Configure TCP/IP • Configure EtherTalk Supported operating systems The following table shows the network environments supported by the machine: Item Requirements Network interface • 10/100 Base-TX Network operating system • Windows 2000/XP/2003/Vista • Various Linux OS • Macintosh OS 10.3 ~ 10.5 Network protocols • TCP/IP on Windows • EtherTalk Dynamic addressing • DHCP, BOOTP server • TCP/IP: Transmission Control Protocol/Internet Protocol • DHCP: Dynamic Host Configuration Protocol • BOOTP: Bootstrap Protocol Locating the 3300MFP IP Address 1 Press Menu until Network appears on the bottom line of the display and press Enter. 2 Press the Scroll buttons until Network Info. appears and press Enter. 3 Press Enter when Yes appears. The Network Configuration page prints out. 4 On the Network Configuration page note the IP Address (Example 169.123.21.23) Accessing CentreWare Internet Services (CWIS) 1 On your PC open a web browser such as Internet Explorer. 4.1
-
 1
1 -
2
-
3
-
4
-
5
-
6
-
7
-
8
-
9
-
10
-
11
-
12
-
13
-
14
-
15
-
16
-
17
-
18
-
19
-
20
-
21
-
 22
22 -
 23
23 -
 24
24 -
 25
25 -
 26
26 -
 27
27 -
 28
28 -
 29
29 -
 30
30 -
 31
31 -
 32
32 -
33
-
34
-
35
-
36
-
37
-
38
-
39
-
40
-
41
-
42
-
43
-
44
-
45
-
46
-
47
-
48
-
49
-
50
-
51
-
52
-
53
-
54
-
55
-
56
-
57
-
58
-
59
-
60
-
61
-
62
-
63
-
64
-
65
-
66
-
67
-
68
-
69
-
70
-
71
-
72
-
73
-
74
-
75
-
76
-
77
-
78
-
79
-
80
-
81
-
82
-
83
-
84
-
85
-
86
-
87
-
88
-
89
-
90
-
91
-
92
-
93
-
94
-
95
-
96
-
97
-
98
-
99
-
100
-
101
-
102
-
103
-
104
-
105
-
106
-
107
-
108
-
109
-
110
-
111
-
112
-
113
-
114
-
115
-
116
-
117
-
118
-
119
-
120
-
121
-
122
-
123
-
124
-
125
-
126
-
127
-
128
-
129
-
130
-
131
-
132
-
133
-
134
-
135
-
136
-
137
-
138
-
139
-
140
-
141
-
142
-
143
-
144
-
145
-
146
-
147
-
148
 |
 |