Xerox 3300MFP User Guide - Page 58
Forwarding sent faxes to email address, Forwarding received faxes to another fax machine - windows 7 driver
 |
UPC - 095205744415
View all Xerox 3300MFP manuals
Add to My Manuals
Save this manual to your list of manuals |
Page 58 highlights
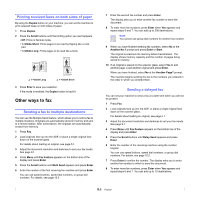
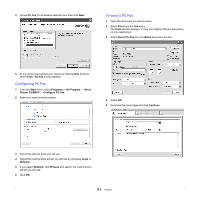
4 Press Enter when Fax appears. 5 Press the Scroll buttons until Send Forward appears and press Enter. 6 Press the Scroll buttons to select On and press Enter. 7 Enter the number of the fax machine to which faxes are to be sent and press Enter. 8 Press Stop/Clear to return to Standby mode. Subsequent sent faxes will be forwarded to the specified fax machine. Forwarding sent faxes to email address You can set the machine to send copies of all outgoing faxes to a specified destination, in addition to the email address you entered. 1 Press Fax. 2 Press Menu until Fax Feature appears on the bottom line of the display and press Enter. 3 Press the Scroll buttons until Forward appears and press Enter. 4 Press the Scroll buttons until E-mail appears and press Enter. 5 Press the Scroll buttons until Send Forward appears and press Enter. 6 Press the Scroll buttons to select On and press Enter. 7 Enter your email address and press Enter. 8 Enter the email address to which faxes are to be sent and press Enter. 9 Press Stop/Clear to return to Standby mode. Subsequent sent faxes will be forwarded to the specified email address. Forwarding received faxes to another fax machine You can set your machine to forward incoming faxes to another fax number during a specified time period. When a fax arrives at your machine, it is stored in memory. Then, the machine dials the fax number that you have specified and sends the fax. 1 Press Fax. 2 Press Menu until Fax Feature appears on the bottom line of the display and press Enter. 3 Press the Scroll buttons until Forward appears and press Enter. 4 Press Enter when Fax appears. 5 Press the Scroll buttons until Rcv. Forward appears and press Enter. 6 Press the Scroll buttons until Forward appears and press Enter. To set the machine to print out a fax when fax forwarding has been completed, select Forward&Print. 7 Enter the number of the fax machine to which faxes are to be sent and press Enter. 8 Enter the starting time and press Enter. 9 Enter the ending time and press Enter. 10 Press Stop/Clear to return to Standby mode. Subsequent received faxes will be forwarded to the specified fax machine. Forwarding received faxes to email address You can set your machine to forward incoming faxes to the email address you entered. 1 Press Fax. 2 Press Menu until Fax Feature appears on the bottom line of the display and press Enter. 3 Press the Scroll buttons until Forward appears and press Enter. 4 Press the Scroll buttons until E-mail appears and press Enter. 5 Press the Scroll buttons until Rcv. Forward appears and press Enter. 6 Press the Scroll buttons until Forward appears and press Enter. To set the machine to print out a fax when fax forwarding has been completed, select Forward&Print. 7 Enter your email address and press Enter. 8 Enter the email address to which faxes are to be sent and press Enter. 9 Press Stop/Clear to return to Standby mode. Subsequent received faxes will be forwarded to the specified email address. Sending a Fax from a PC You can send a fax from your PC without going to the multi-function printer. To send a fax from your PC, you need to install the PC-fax software and customize the software setting's. See the Software Section. Installing PC-Fax Software 1 To install the PC-Fax, insert the supplied Xerox Drivers CD. 2 The CD-ROM should automatically run, and the installation window appears. 3 When the language selection window appears, select the appropriate language and then click Install Software. 9.8
-
 1
1 -
2
-
3
-
4
-
5
-
6
-
7
-
8
-
9
-
10
-
11
-
12
-
13
-
14
-
15
-
16
-
17
-
18
-
19
-
20
-
21
-
22
-
23
-
24
-
25
-
26
-
27
-
28
-
29
-
30
-
31
-
32
-
33
-
34
-
35
-
36
-
37
-
38
-
39
-
40
-
41
-
42
-
43
-
44
-
45
-
46
-
47
-
48
-
49
-
50
-
51
-
52
-
 53
53 -
 54
54 -
 55
55 -
 56
56 -
 57
57 -
 58
58 -
 59
59 -
 60
60 -
 61
61 -
 62
62 -
 63
63 -
64
-
65
-
66
-
67
-
68
-
69
-
70
-
71
-
72
-
73
-
74
-
75
-
76
-
77
-
78
-
79
-
80
-
81
-
82
-
83
-
84
-
85
-
86
-
87
-
88
-
89
-
90
-
91
-
92
-
93
-
94
-
95
-
96
-
97
-
98
-
99
-
100
-
101
-
102
-
103
-
104
-
105
-
106
-
107
-
108
-
109
-
110
-
111
-
112
-
113
-
114
-
115
-
116
-
117
-
118
-
119
-
120
-
121
-
122
-
123
-
124
-
125
-
126
-
127
-
128
-
129
-
130
-
131
-
132
-
133
-
134
-
135
-
136
-
137
-
138
-
139
-
140
-
141
-
142
-
143
-
144
-
145
-
146
-
147
-
148
 |
 |