Xerox 3300MFP User Guide - Page 63
Speed dial numbers, Enter, Address Book, New&Edit, Speed Dial, Stop/Clear, Address, Scroll
 |
UPC - 095205744415
View all Xerox 3300MFP manuals
Add to My Manuals
Save this manual to your list of manuals |
Page 63 highlights
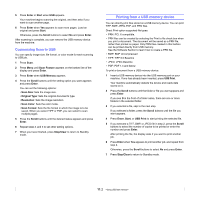
Registering after pressing a speed button 1 Press Fax. 2 Press one of the speed buttons. 3 Press Enter when Yes appears. 4 Enter the name you want and press Enter. For details on how to enter alphanumeric characters, see page 2.3. 5 Enter the fax number you want to store and press Enter. Registering after entering a number first 1 Press Fax. 2 Enter the fax number you want to store. 3 Press one of the speed buttons. 4 Press Enter when Yes appears. Note If you press a speed button already assigned, the display asks if you want to overwrite. Press Enter to confirm Yes and continue. To start over with another speed button, select No. 5 Enter the name you want and press Enter. For details on how to enter alphanumeric characters, see page 2.3. 6 Press Enter to confirm the number. Using speed buttons When you are prompted to enter a fax number while sending a fax: • To retrieve a number from speed buttons 1 to 15, press the corresponding speed button and press Enter. • To retrieve a number from speed buttons 16 to 30, press 16-30 and then the corresponding speed button, and press Enter. Speed dial numbers You can store up to 240 frequently-used fax numbers in speed dial numbers. Registering a speed dial number 1 Press Fax. 2 Press Address Book until New&Edit appears on the bottom line of the display and press Enter. 3 Press Enter when Speed Dial appears. 4 Enter a speed dial number between 0 and 239 and press Enter. If an entry is already stored in the number you choose, the display shows the name to allow you to change it. To start over with another speed dial number, press Exit. 5 Enter the name you want and press Enter. For details on how to enter alphanumeric characters, see page 2.3. 6 Enter the fax number you want and press Enter. 7 Press Stop/Clear to return to Standby mode. Editing speed dial numbers 1 Press Address Book until New&Edit appears on the bottom line of the display and press Enter. 2 Press Enter when Speed Dial appears. 3 Enter the speed dial number you want to edit and press Enter. 4 Change the name and press Enter. 5 Change the fax number and press Enter. 6 Press Stop/Clear to return to Standby mode. Using speed dial numbers When you are prompted to enter a destination number while sending a fax, enter the speed dial number at which you stored the number you want. • For a one-digit (0-9) speed dial number, press and hold the corresponding digit button on the number keypad. • For a two- or three-digit speed dial number, press the first digit button(s) and then hold down the last digit button. You can also search through memory for an entry by pressing Address Book. See page 10.4. Group dial numbers If you frequently send the same document to several destinations, you can group these destinations and set them under a group dial number. You can then use a group dial number to send a document to all of the destinations within the group. You can set up to 200 (0 through 199) group dial numbers using the destination's existing speed dial numbers. Registering a group dial number 1 Press Fax. 2 Press Address Book until New&Edit appears on the bottom line of the display and press Enter. 3 Press the Scroll buttons until Group Dial appears and press Enter. 4 Enter a group dial number between 0 and 199 and press Enter. 5 Enter a speed dial number and press Enter. 6 Press Enter when Yes appears. 7 Repeat steps 5 and 6 to include other speed dial numbers into the group. 10.3
-
 1
1 -
2
-
3
-
4
-
5
-
6
-
7
-
8
-
9
-
10
-
11
-
12
-
13
-
14
-
15
-
16
-
17
-
18
-
19
-
20
-
21
-
22
-
23
-
24
-
25
-
26
-
27
-
28
-
29
-
30
-
31
-
32
-
33
-
34
-
35
-
36
-
37
-
38
-
39
-
40
-
41
-
42
-
43
-
44
-
45
-
46
-
47
-
48
-
49
-
50
-
51
-
52
-
53
-
54
-
55
-
56
-
57
-
 58
58 -
 59
59 -
 60
60 -
 61
61 -
 62
62 -
 63
63 -
 64
64 -
 65
65 -
 66
66 -
 67
67 -
 68
68 -
69
-
70
-
71
-
72
-
73
-
74
-
75
-
76
-
77
-
78
-
79
-
80
-
81
-
82
-
83
-
84
-
85
-
86
-
87
-
88
-
89
-
90
-
91
-
92
-
93
-
94
-
95
-
96
-
97
-
98
-
99
-
100
-
101
-
102
-
103
-
104
-
105
-
106
-
107
-
108
-
109
-
110
-
111
-
112
-
113
-
114
-
115
-
116
-
117
-
118
-
119
-
120
-
121
-
122
-
123
-
124
-
125
-
126
-
127
-
128
-
129
-
130
-
131
-
132
-
133
-
134
-
135
-
136
-
137
-
138
-
139
-
140
-
141
-
142
-
143
-
144
-
145
-
146
-
147
-
148
 |
 |
