Xerox 3300MFP User Guide - Page 143
For a USB-connected Macintosh, Installable Options
 |
UPC - 095205744415
View all Xerox 3300MFP manuals
Add to My Manuals
Save this manual to your list of manuals |
Page 143 highlights
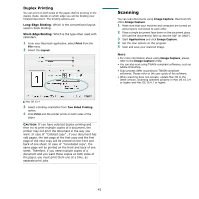
For a USB-connected Macintosh 1 Follow the instructions on "Installing Software for Macintosh" on page 37 to install the PPD file on your computer. 2 Open Print Center or Printer Setup Utility from the Utilities folder. •For MAC OS 10.5, open System Preferences from the Applications folder, and click Print & Fax. 3 Click Add on the Printer List. •For MAC OS 10.5, press the "+" icon then a display window will pop up. 4 For MAC OS 10.3, select the USB tab. •For MAC OS 10.4, click Default Browser and find the USB connection. •For MAC OS 10.5, click Default and find the USB connection. 5 Select your printer name. 6 For MAC OS 10.3, if Auto Select does not work properly, select Xerox in Printer Model and your printer name in Model Name. •For MAC OS 10.4, if Auto Select does not work properly, select Xerox in Print Using and your printer name in Model. •For MAC OS 10.5, if Auto Select does not work properly, select Select a driver to use... and your printer name in Print Using. Your machine appears on the Printer List and is set as the default printer. 7 Click Add. Installable Options After setting up for your printer, you can set some more detailed options. 1 Open Print Center or Printer Setup Utility from the Utilities folder. •For MAC OS 10.5, open System Preferences from the Applications folder, and click Print & Fax. 2 Select your printer model name. 3 Click Show Info. •For MAC OS 10.5, click Options & Supplies... 4 Select Installable Options tab. •For MAC OS 10.5, Select Driver tab. 5 Configure each items in Installable Options window. •Tray n: If the machine have optional tray n, you have to check the tray name. •Duplex Unit: If the machine has duplex unit, you have t o check this item. •Printer Memory: If you installed additional printer memory, you have to configure the size of memory. 6 Select Apply Change. 39 Using Your Printer with a Macintosh
-
 1
1 -
2
-
3
-
4
-
5
-
6
-
7
-
8
-
9
-
10
-
11
-
12
-
13
-
14
-
15
-
16
-
17
-
18
-
19
-
20
-
21
-
22
-
23
-
24
-
25
-
26
-
27
-
28
-
29
-
30
-
31
-
32
-
33
-
34
-
35
-
36
-
37
-
38
-
39
-
40
-
41
-
42
-
43
-
44
-
45
-
46
-
47
-
48
-
49
-
50
-
51
-
52
-
53
-
54
-
55
-
56
-
57
-
58
-
59
-
60
-
61
-
62
-
63
-
64
-
65
-
66
-
67
-
68
-
69
-
70
-
71
-
72
-
73
-
74
-
75
-
76
-
77
-
78
-
79
-
80
-
81
-
82
-
83
-
84
-
85
-
86
-
87
-
88
-
89
-
90
-
91
-
92
-
93
-
94
-
95
-
96
-
97
-
98
-
99
-
100
-
101
-
102
-
103
-
104
-
105
-
106
-
107
-
108
-
109
-
110
-
111
-
112
-
113
-
114
-
115
-
116
-
117
-
118
-
119
-
120
-
121
-
122
-
123
-
124
-
125
-
126
-
127
-
128
-
129
-
130
-
131
-
132
-
133
-
134
-
135
-
136
-
137
-
 138
138 -
 139
139 -
 140
140 -
 141
141 -
 142
142 -
 143
143 -
 144
144 -
 145
145 -
 146
146 -
 147
147 -
 148
148
 |
 |