Xerox 8560MFP Advanced Features Guide - Page 51
Start, Settings, Printers, Properties, Details, Print to the Following Port, Port Settings
 |
UPC - 095205428841
View all Xerox 8560MFP manuals
Add to My Manuals
Save this manual to your list of manuals |
Page 51 highlights
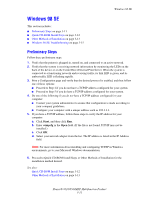
Windows 98 SE Changing a PhaserPort IP Address If the system's IP address is changed, you must change the IP address for the device's corresponding port: 1. Click Start, click Settings, and then click Printers. 2. Right-click the system to be changed to a new PhaserPort IP address, and then click Properties. 3. Select the Details tab. 4. Verify that PhaserPort appears in the Print to the Following Port field. 5. Click Port Settings. The Configure PhaserPort dialog box appears. 6. Do one of the following: a. If you know the correct IP address or DNS name for the system, enter that information. b. If you don't know the system's IP address or DNS name, click Browse to display a list of systems on the network. c. Double-click the appropriate system. PhaserPort automatically enters the information into the Configure PhaserPort dialog box. Note: To search the network again, click Refresh. To expand the search to other subnets, click Advanced. 7. Click OK. 8. Click OK again to apply the changes. Phaser® 8510/8560MFP Multifunction Product 3-14
-
 1
1 -
2
-
3
-
4
-
5
-
6
-
7
-
8
-
9
-
10
-
11
-
12
-
13
-
14
-
15
-
16
-
17
-
18
-
19
-
20
-
21
-
22
-
23
-
24
-
25
-
26
-
27
-
28
-
29
-
30
-
31
-
32
-
33
-
34
-
35
-
36
-
37
-
38
-
39
-
40
-
41
-
42
-
43
-
44
-
45
-
 46
46 -
 47
47 -
 48
48 -
 49
49 -
 50
50 -
 51
51 -
 52
52 -
 53
53 -
 54
54 -
 55
55 -
 56
56 -
57
-
58
-
59
-
60
-
61
-
62
-
63
-
64
-
65
-
66
-
67
-
68
-
69
-
70
-
71
-
72
-
73
-
74
-
75
-
76
-
77
-
78
-
79
-
80
-
81
-
82
-
83
-
84
-
85
-
86
-
87
-
88
-
89
-
90
-
91
-
92
-
93
-
94
-
95
-
96
-
97
-
98
-
99
-
100
 |
 |
