ZyXEL ZYWALL USG 100 User Guide - Page 124
Example 2: Linux, 6.4 How to Manage ZyWALL Configuration Files
 |
View all ZyXEL ZYWALL USG 100 manuals
Add to My Manuals
Save this manual to your list of manuals |
Page 124 highlights
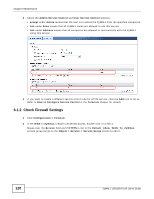
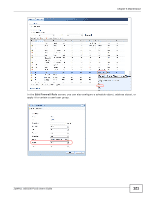
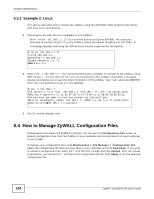
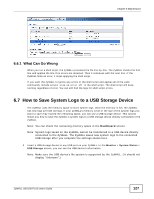
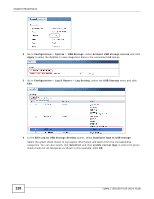
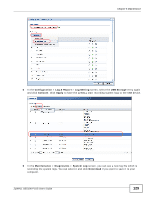
Chapter 6 Maintenance 6.3.2 Example 2: Linux This section describes how to access the ZyWALL using the OpenSSH client program that comes with most Linux distributions. 1 Test whether the SSH service is available on the ZyWALL. Enter "telnet 192.168.1.1 22" at a terminal prompt and press [ENTER]. The computer attempts to connect to port 22 on the ZyWALL (using the default IP address of 192.168.1.1). A message displays indicating the SSH protocol version supported by the ZyWALL. $ telnet 192.168.1.1 22 Trying 192.168.1.1... Connected to 192.168.1.1. Escape character is '^]'. SSH-1.5-1.0.0 2 Enter "ssh -1 192.168.1.1". This command forces your computer to connect to the ZyWALL using SSH version 1. If this is the first time you are connecting to the ZyWALL using SSH, a message displays prompting you to save the host information of the ZyWALL. Type "yes" and press [ENTER]. Then enter the password to log in to the ZyWALL. $ ssh -1 192.168.1.1 The authenticity of host '192.168.1.1 (192.168.1.1)' can't be established. RSA1 key fingerprint is 21:6c:07:25:7e:f4:75:80:ec:af:bd:d4:3d:80:53:d1. Are you sure you want to continue connecting (yes/no)? yes Warning: Permanently added '192.168.1.1' (RSA1) to the list of known hosts. [email protected]'s password: 3 The CLI screen displays next. 6.4 How to Manage ZyWALL Configuration Files Configuration files define the ZyWALL's settings. You can use the Configuration File screen to backup configuration files from the ZyWALL to your computer and restore them from your computer to the ZyWALL. To backup your configuration files, click Maintenance > File Manager > Configuration File. Select the configuration file that you want save to your computer and click Download. If you want to upload a configuration file, select the *.conf file from its path and click Upload. After the upload is successful, you can find the *.conf file in the configuration file list. Click Apply to run the selected configuration file. 124 ZyWALL USG100-PLUS User's Guide
-
 1
1 -
2
-
3
-
4
-
5
-
6
-
7
-
8
-
9
-
10
-
11
-
12
-
13
-
14
-
15
-
16
-
17
-
18
-
19
-
20
-
21
-
22
-
23
-
24
-
25
-
26
-
27
-
28
-
29
-
30
-
31
-
32
-
33
-
34
-
35
-
36
-
37
-
38
-
39
-
40
-
41
-
42
-
43
-
44
-
45
-
46
-
47
-
48
-
49
-
50
-
51
-
52
-
53
-
54
-
55
-
56
-
57
-
58
-
59
-
60
-
61
-
62
-
63
-
64
-
65
-
66
-
67
-
68
-
69
-
70
-
71
-
72
-
73
-
74
-
75
-
76
-
77
-
78
-
79
-
80
-
81
-
82
-
83
-
84
-
85
-
86
-
87
-
88
-
89
-
90
-
91
-
92
-
93
-
94
-
95
-
96
-
97
-
98
-
99
-
100
-
101
-
102
-
103
-
104
-
105
-
106
-
107
-
108
-
109
-
110
-
111
-
112
-
113
-
114
-
115
-
116
-
117
-
118
-
 119
119 -
 120
120 -
 121
121 -
 122
122 -
 123
123 -
 124
124 -
 125
125 -
 126
126 -
 127
127 -
 128
128 -
 129
129 -
130
-
131
-
132
-
133
-
134
-
135
-
136
-
137
-
138
-
139
-
140
 |
 |