Alesis iO Mix Reference Manual - Page 23
Installation Macintosh - 4 channel audio interface
 |
View all Alesis iO Mix manuals
Add to My Manuals
Save this manual to your list of manuals |
Page 23 highlights
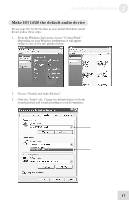
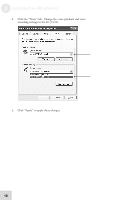
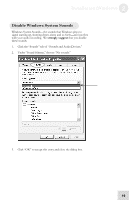
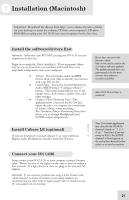
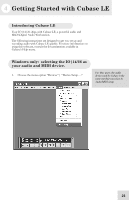
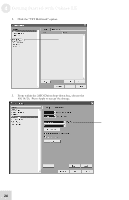
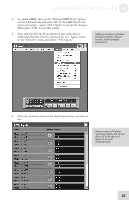
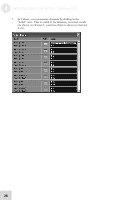
3 Installation (Macintosh) Important: Download the drivers from http://www.alesis.com onto a folder on your desktop or insert the software CD into your computer's CD drive BEFORE you plug your IO|14/26 into your computer for the first time. Install the software/drivers first Important: Follow these steps BEFORE you plug your IO14/26 into your computer for the first time. Begin by running the Alesis installer(s). These programs (there may be one or more than one installer) will install three very important components onto your computer: • Drivers. The CoreAudio and CoreMIDI drivers allow your Mac to identify and interact with your IO|14/26. • Control Panel. Access the Control Panel from Audio/MIDI Setup's "Configure Device" button. The control panel allows you to set sample rates, clock sources, buffer sizes, and other settings. • Hardware Direct Monitoring Panel. This application lets you route the IO|14/26's inputs directly to its outputs for a minimum of latency (delay) when recording. The Hardware Direct Monitoring Panel also allows you to change Headphone2 and S/PDIF output assignments. Install Cubase LE (optional) If you are interested in using Cubase LE as your multitrack Digital Audio Workstation, install it from the CD now. If you have access to the Internet, check http://www.alesis.com for the very latest software updates. The updates posted there are guaranteed to be the most current, best software versions available. Mac OS X 10.4 or later is required. Your CoreAudio application may describe the IO|14/26 channels simply as "1, 2, 3, 4, etc." Note that, if you are using an IO|14, the S/PDIF channels will not appear at the end of the channel list but rather at an earlier position. Connect your IO|14/26 Now, connect your IO|14/26 to your computer using a Firewire cable. Watch for one of the lights on the unit to turn on within a few seconds. If a light does not turn on, plug in the external AC adapter. Important: If you experience problems when using a 4-pin Firewire cable (small connector) to connect the interface to your laptop computer, we recommend that you either switch to higher quality cables or install a six-pin PC card adapter into the notebook. 21
-
 1
1 -
2
-
3
-
4
-
5
-
6
-
7
-
8
-
9
-
10
-
11
-
12
-
13
-
14
-
15
-
16
-
17
-
 18
18 -
 19
19 -
 20
20 -
 21
21 -
 22
22 -
 23
23 -
 24
24 -
 25
25 -
 26
26 -
 27
27 -
 28
28 -
29
-
30
-
31
-
32
-
33
-
34
-
35
-
36
-
37
-
38
-
39
-
40
-
41
-
42
-
43
-
44
-
45
-
46
-
47
-
48
-
49
-
50
-
51
-
52
-
53
-
54
-
55
-
56
-
57
-
58
-
59
-
60
-
61
-
62
-
63
-
64
-
65
-
66
-
67
-
68
-
69
-
70
 |
 |
