Alesis iO Mix Reference Manual - Page 40
Save/Recall Settings, Device Configuration Control Panel, shortcut, Headphones 2 Assignment, S/PDIF
 |
View all Alesis iO Mix manuals
Add to My Manuals
Save this manual to your list of manuals |
Page 40 highlights
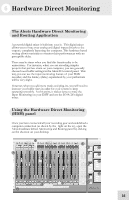
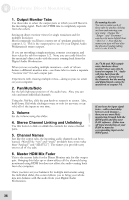
6 Hardware Direct Monitoring Numbers 12 through 15: Load/Save and Audio Routing Settings 12. Save/Recall Settings Your HDM settings will only be recalled if you save them. Save them as "default.hdm" and they will be recalled every time that the panel is opened. Save setups that you want to recall for specific sessions under some other name. 13. Device Configuration (Control Panel shortcut) Click "Device Configuration" to go immediately to the IO14/26 Control Panel, where you can set the sample rate, clock master, device nickname, etc. 14. Headphones 2 Assignment The first set of headphones always follows the Out 1/2 mix. The second pair of headphones is freely assignable to follow any of the analog output pairs. 15. S/PDIF output assignment The S/PDIF digital output, like the second headphones output, can be assigned to follow any output pair. For the IO|26, these output pairs all correspond to physical, line-level outs. They all exist in hardware. While the IO|14 only has one stereo pair of line-level outputs, the IO|14 reports these additional output pairs to your Digital Audio Workstation. These additional pairs allow you to make headphone 2 and S/PDIF assignments to more than just the built-in stereo output. This "virtual" routing providesIO|14 owners with much of the power of its big brother, the IO|26. The S/PDIF output mirrors the volume of the analog 1/2 outputs. Changes made to the main volume encoder on the front of the unit, and changes made to the +4/-10 output level switches on the Hardware Direct Monitoring application, will change the level of the S/PDIF output. 38
-
 1
1 -
2
-
3
-
4
-
5
-
6
-
7
-
8
-
9
-
10
-
11
-
12
-
13
-
14
-
15
-
16
-
17
-
18
-
19
-
20
-
21
-
22
-
23
-
24
-
25
-
26
-
27
-
28
-
29
-
30
-
31
-
32
-
33
-
34
-
 35
35 -
 36
36 -
 37
37 -
 38
38 -
 39
39 -
 40
40 -
 41
41 -
 42
42 -
 43
43 -
 44
44 -
 45
45 -
46
-
47
-
48
-
49
-
50
-
51
-
52
-
53
-
54
-
55
-
56
-
57
-
58
-
59
-
60
-
61
-
62
-
63
-
64
-
65
-
66
-
67
-
68
-
69
-
70
 |
 |