Alesis iO Mix Reference Manual - Page 41
Getting In Deeper, Hardware
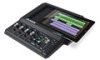 |
View all Alesis iO Mix manuals
Add to My Manuals
Save this manual to your list of manuals |
Page 41 highlights
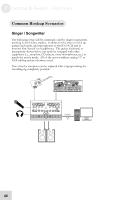
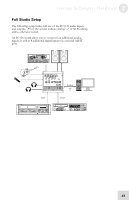
7 Getting In Deeper: Hardware Cabling 101 Cables are a crucial (and often overlooked) part of a studio. Many beginners run into problems because they use inappropriate or poor quality cabling to connect their gear and their recordings suffer as a result. Don't let this happen to you! Use the following guidelines to maximize your sound quality: 1. Use balanced cabling wherever possible - The IO|14 and IO|26 are fully balanced recording devices that will give you the best sound quality when using "balanced" cabling wherever possible. Technically speaking, balanced cables carry your signal over three conductors (known as "hot" "cold" and "ground) as opposed to "unbalanced" cables which only have two conductors (known as "hot" and "ground"). Because of this design difference, balanced cables pick up much less radio frequency (RF) and electromagnetic (EM) noise. Musically speaking, this means you'll have much less unwanted humming, hissing, and buzzing noises in your recordings. 2. Minimize Cable Length - As your cable length increases, so does your signal's susceptibility to unwanted noise. Try to minimize your cable runs as much as possible to preserve sound quality. Don't sweat over minor differences in length (i.e., using 20' of cable when you only need 15'), but definitely don't use a 100 ft. cable if all you need is 10 ft.! 3. Use High Quality Cables - Not all cables are the same! Try to use well constructed, high-quality cables whenever possible. Two cables may look the same on the outside, but a high quality cable will have better shielding and soldering on its connectors. This means a good cable will perform better and last much longer than a cheap one. 4. Keep 'em separated! - Try to keep your audio cables and power cables separate from each other. Power cables tend to emit lots of electromagnetic noise and if you bunch all of your cables together to make them look tidy, you're increasing the noise that is picked up by your audio cables. Group your cables in two bunches if possible (i.e., an "audio" group and an "other" group) and keep these groups separate. Even a few inches between the two groups will substantially cut down on noise. If your power and audio cables need to cross paths, have them do so at 90 degree angles to minimize contact. 39
-
 1
1 -
2
-
3
-
4
-
5
-
6
-
7
-
8
-
9
-
10
-
11
-
12
-
13
-
14
-
15
-
16
-
17
-
18
-
19
-
20
-
21
-
22
-
23
-
24
-
25
-
26
-
27
-
28
-
29
-
30
-
31
-
32
-
33
-
34
-
35
-
 36
36 -
 37
37 -
 38
38 -
 39
39 -
 40
40 -
 41
41 -
 42
42 -
 43
43 -
 44
44 -
 45
45 -
 46
46 -
47
-
48
-
49
-
50
-
51
-
52
-
53
-
54
-
55
-
56
-
57
-
58
-
59
-
60
-
61
-
62
-
63
-
64
-
65
-
66
-
67
-
68
-
69
-
70
 |
 |