Alesis iO Mix Reference Manual - Page 38
Output Monitor Tabs, Pan/Mute/Solo, Volume, Stereo Channel Linking and Unlinking, Channel Names,
 |
View all Alesis iO Mix manuals
Add to My Manuals
Save this manual to your list of manuals |
Page 38 highlights
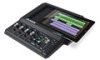
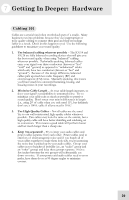
6 Hardware Direct Monitoring 1. Output Monitor Tabs Use these tabs to select the output pairs to which you will blend in the incoming signal. Each tab's HDM mix is completely separate from the others. Setting up direct monitor mixes for single musicians and for multiple musicians Most commonly, you'll have a stereo set of speakers attached to outputs 1/2. This is the output pair to use for your Digital Audio Workstation's stereo outputs. If you are recording a single musician, connect your inputs, and then select the tab for outputs 1/2. Now, you can easily blend in the musician's direct audio with the music coming back from the Digital Audio Workstation. When you are recording multiple musicians-each of whom desires a different monitor mix-use these tabs to create a separate "monitor mix" for each output pair. Experiment with creating multiple mixes-doing so puts no strain on your computer. 2. Pan/Mute/Solo Set the left/right pan position of the audio here. Also, you can solo and mute individual channels. Using the Shift key, click the pan knob to return it to center. Also, hold down Shift while clicking to mute or solo (or un-mute or unsolo) all of the inputs at one time. 3. Volume Set the volume using this slider. 4. Stereo Channel Linking and Unlinking Use this button to link or unlink the controls for stereo channel pairs. 5. Channel Names Just like the output tabs, the incoming audio channels can be renamed. (Words like "vox" and "snare" probably have more value than "Analog1" and "ADAT12.") The names you provide carry over to all of the tabs. 6. Master HDM Mix Fader This is the master fader for the Direct Monitor mix for this output pair. Bringing this fader up or down affects all the channels being monitored using HDM but does not affect the audio coming back from the computer. Once you have set your balances for multiple instruments using the individual slider, this control allows you to bring your whole mix into balance with the audio from your Digital Audio Workstation. Re-naming the tabs You can re-name each of these tabs by double-clicking on them and entering your new name. (Names like "Singer" and "Drummer" can be a lot more helpful than "Out 3-4.") Note that the names you type will not alter the physical routing taking place in the IO14/26. At 176.4k and 192k sample rates, hardware direct monitor mixes can only be heard on outputs 1-4. Audio will play back from the computer as normal on all the channels, but the analog and digital inputs cannot be monitored on outputs 5-8. If you hear the input signal twice-with a short delay between each instance- then you are most likely monitoring through both the HDM panel and also your DAW software. Either turn off input monitoring on your DAW or mute the corresponding input on the HDM panel. 36
-
 1
1 -
2
-
3
-
4
-
5
-
6
-
7
-
8
-
9
-
10
-
11
-
12
-
13
-
14
-
15
-
16
-
17
-
18
-
19
-
20
-
21
-
22
-
23
-
24
-
25
-
26
-
27
-
28
-
29
-
30
-
31
-
32
-
 33
33 -
 34
34 -
 35
35 -
 36
36 -
 37
37 -
 38
38 -
 39
39 -
 40
40 -
 41
41 -
 42
42 -
 43
43 -
44
-
45
-
46
-
47
-
48
-
49
-
50
-
51
-
52
-
53
-
54
-
55
-
56
-
57
-
58
-
59
-
60
-
61
-
62
-
63
-
64
-
65
-
66
-
67
-
68
-
69
-
70
 |
 |