Alesis iO Mix Reference Manual - Page 39
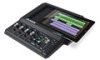
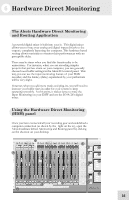
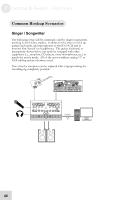
Narrow/Wide View Switch, Metering Options, Bank Hide/Show buttons, ADAT-S/PDIF Toggle, Main Level - 4 channel mixer recorder
 |
View all Alesis iO Mix manuals
Add to My Manuals
Save this manual to your list of manuals |
Page 39 highlights
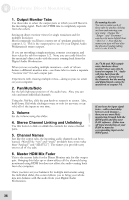
Hardware Direct Monitoring 6 For outputs 1 and 2, the MIX BLEND knob on the front panel of the hardware can also be used to control this slider. 7. Narrow/Wide View Switch You can switch between "Narrow" and "Wide" views of the HDM panel. Note that the Input Monitor tab is always in Narrow mode. 8. Metering Options Choose from a number of different metering options here. Meter Scale Under "Meter Scale," choose "High," "Medium," or "Safe." These options change the thresholds at which the meters change to yellow and then to red. WHATEVER SETTING YOU CHOOSE, THE ACTUAL AUDIO BEING RECORDED IS UNTOUCHED. Rather, these modes can help keep you from recording too "hot," resulting in digital "overs." Peak Hold time Set how long the highest peak of the incoming audio should be displayed. Peak Reset Click this button at any time to reset the peak levels of the meters. 9. Bank Hide/Show buttons In "Wide" mode, not all channels are visible at once. If you are not using some of your channels, choose to hide them. Note that these buttons are grayed out in "Narrow" mode. 10. ADAT-S/PDIF Toggle The HDM mixer can mix 24 inputs. At 44.1kHz and 48kHz, the io|26 offers 26 inputs, 2 more than the total. Therefore, at these sample rates, choose to monitor either ADAT 15/16 or S/PDIF. Your choice here will not affect the number of channels seen by your DAW. Your DAW will always see all IO|14/26 channels. This choice only affects the audio that you monitor through this HDM application. If you still need to monitor those last two channels, you can always do so through your Digital Audio Workstation software, though some increased latency will result. 11. Main Level The position of the MAIN LEVEL(outs 1/2) knob is indicated here for convenience (Windows only). The metering options do not change how audio is actually recorded. They only change how the audio is metered on screen. For highly unpredictable audio (live concerts, maniac drummers, etc.), consider using "Safe" metering and trying to keep your audio in the yellow area of the meter scale. Then, if an unpredictable audio event occurs, your audio is more likely to be recorded cleanly. For predictable dynamic sources, like distorted electric guitar or sources where you've inserted a hardware limiter in the recording path, don't be afraid to push your meters up into the red zone. (Red in this panel means "caution," not "uh-oh!") 37
-
 1
1 -
2
-
3
-
4
-
5
-
6
-
7
-
8
-
9
-
10
-
11
-
12
-
13
-
14
-
15
-
16
-
17
-
18
-
19
-
20
-
21
-
22
-
23
-
24
-
25
-
26
-
27
-
28
-
29
-
30
-
31
-
32
-
33
-
 34
34 -
 35
35 -
 36
36 -
 37
37 -
 38
38 -
 39
39 -
 40
40 -
 41
41 -
 42
42 -
 43
43 -
 44
44 -
45
-
46
-
47
-
48
-
49
-
50
-
51
-
52
-
53
-
54
-
55
-
56
-
57
-
58
-
59
-
60
-
61
-
62
-
63
-
64
-
65
-
66
-
67
-
68
-
69
-
70
 |
 |