Alpine iLX-507 Owners Manual - Page 65
Switching the Image Pattern for the Rear Camera, Front Camera Operation, Displaying the Camera Image
 |
View all Alpine iLX-507 manuals
Add to My Manuals
Save this manual to your list of manuals |
Page 65 highlights
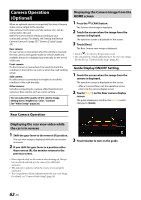
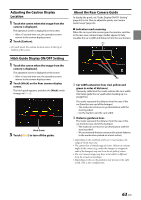
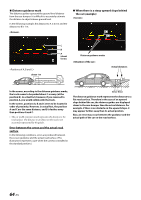
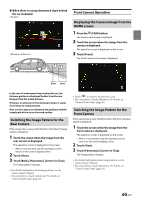
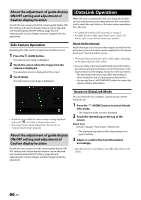
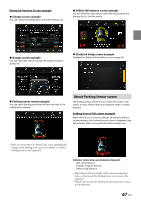
■ When there is a steep downward slope behind the car (example) Front Camera Operation Displaying the Camera Image from the HOME screen 1 Press the (CAM) button. The Camera view image is displayed. 2 Touch the screen when the image from the camera is displayed. The operation screen is displayed on the screen. 3 Touch [Front]. The Front Camera view image is displayed. Error Error In the case of a downward slope behind the car, the distance guides are displayed farther from the rear bumper than the actual distance. If there is an obstacle on the downward slope, it seems closer than its actual position. Also, an error may occur between the guidance and the actual path of the car on the road surface. Switching the Image Pattern for the Rear Camera If the camera has a view switch function, the Direct Change switch is displayed. 1 Touch the screen when the image from the rear camera is displayed. The operation screen is displayed on the screen. • After a 5-second time-out, the operation screen returns to the camera display screen. 2 Touch [View]. 3 Touch [Back], [Panorama], [Corner] or [Top]. The image pattern changes. • For detailed information about image patterns, see the camera Owner's Manual. • You can perform a Guide Adjustment. For details, see "Camera Guide Setup" (page 26). • Touch [ ] to return to the previous screen. • You can perform a Guide Adjustment. For details, see "Camera Guide Setup" (page 26) Switching the Image Pattern for the Front Camera If the camera has a view switch function, the Direct Change switch is displayed. 1 Touch the screen when the image from the front camera is displayed. The operation screen is displayed on the screen. • After a 5-second time-out, the operation screen returns to the camera display screen. 2 Touch [View]. 3 Touch [Panorama], [Corner] or [Top]. The image pattern changes. • For detailed information about image patterns, see the camera Owner's Manual. • You can perform a Guide Adjustment. For details, see "Camera Guide Setup" (page 26). 65-EN
-
 1
1 -
2
-
3
-
4
-
5
-
6
-
7
-
8
-
9
-
10
-
11
-
12
-
13
-
14
-
15
-
16
-
17
-
18
-
19
-
20
-
21
-
22
-
23
-
24
-
25
-
26
-
27
-
28
-
29
-
30
-
31
-
32
-
33
-
34
-
35
-
36
-
37
-
38
-
39
-
40
-
41
-
42
-
43
-
44
-
45
-
46
-
47
-
48
-
49
-
50
-
51
-
52
-
53
-
54
-
55
-
56
-
57
-
58
-
59
-
 60
60 -
 61
61 -
 62
62 -
 63
63 -
 64
64 -
 65
65 -
 66
66 -
 67
67 -
 68
68 -
 69
69 -
 70
70 -
71
-
72
-
73
-
74
-
75
-
76
-
77
-
78
-
79
-
80
-
81
-
82
-
83
-
84
-
85
-
86
-
87
-
88
-
89
-
90
-
91
-
92
 |
 |
