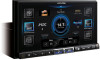
Alpine iLX-507 Owners Manual - Page 77
Installation, Caution concerning the installation location, Mounting the Microphone
 |
View all Alpine iLX-507 manuals
Add to My Manuals
Save this manual to your list of manuals |
Page 77 highlights
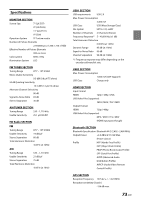
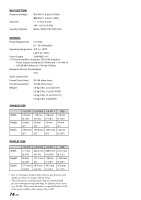
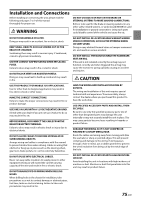
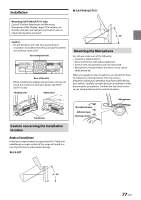
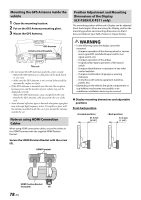
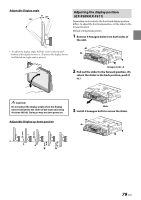
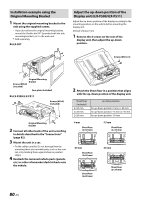
Installation ■ iLX-F509/iLX-F511 Mounting (iLX-F509/iLX-F511 only) Consult "Position Adjustment and Mounting Dimensions of the Display" (page 78) in advance so that this unit does not obstruct your field of vision or impair driving when mounted. Caution • Do not block the unit's fan, thus preventing air circulation. If blocked, heat will accumulate inside the unit and may cause a fire. Air ventilation hole Rear of the Unit • When installing the display unit and main unit, do not touch the connectors with your hands. (iLX-F509/ iLX-F511 only) Connectors Caution concerning the installation location Angle of installation Install at an angle between horizontal and 30°. Note that installing at an angle outside of this range will result in a loss of performance and possibly damage. ■ iLX-507 0 - 30° Mounting the Microphone For safe use, make sure of the following: • Location is stable and firm. • Does not interfere with safety equipment. • Driver's view and operations are not obstructed. • Microphone is located where the driver's voice can be easily picked up. When you speak into the microphone, you should not have to change your driving posture. This may cause a distraction, taking your attention away from safely driving your vehicle. Carefully consider direction and distance while mounting the microphone. Confirm that the driver's voice can be easily picked up at the selected location. Microphone base Adhesive tape Steering column Microphone 0 - 30° 77-EN
-
 1
1 -
2
-
3
-
4
-
5
-
6
-
7
-
8
-
9
-
10
-
11
-
12
-
13
-
14
-
15
-
16
-
17
-
18
-
19
-
20
-
21
-
22
-
23
-
24
-
25
-
26
-
27
-
28
-
29
-
30
-
31
-
32
-
33
-
34
-
35
-
36
-
37
-
38
-
39
-
40
-
41
-
42
-
43
-
44
-
45
-
46
-
47
-
48
-
49
-
50
-
51
-
52
-
53
-
54
-
55
-
56
-
57
-
58
-
59
-
60
-
61
-
62
-
63
-
64
-
65
-
66
-
67
-
68
-
69
-
70
-
71
-
 72
72 -
 73
73 -
 74
74 -
 75
75 -
 76
76 -
 77
77 -
 78
78 -
 79
79 -
 80
80 -
 81
81 -
 82
82 -
83
-
84
-
85
-
86
-
87
-
88
-
89
-
90
-
91
-
92
 |
 |
