Apple MC408LL Apple Technician Guide - Page 89
General Information, Tools, Cosmetic Care, Reassembly Steps
 |
UPC - 885909370924
View all Apple MC408LL manuals
Add to My Manuals
Save this manual to your list of manuals |
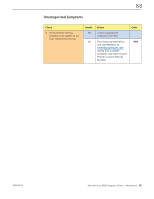
Page 89 highlights
2010-08-03 General Information Tools The following tools are required to service the computer: • ESD wriststrap and mat • Torx T6, magnetized • Torx T8, magnetized • Torx T9, magnetized • Hex 2mm (or 5/64-inch) wrench • #0 Phillips screwdriver • Logic board removal tool (922-9588) Important: This is a required tool to service the Mac mini (Mid 2010) • Tweezers (optional) • Black stick (922-5065), or other non-conductive nylon or plastic tool • Soft cloth (to protect removed parts from scratches) • Isopropyl alcohol and cleaning cloth (if needed) • Scissors or razor knife to cut tape to size (if needed) • Screw tray Note: The logic board removal tool is required to dislodge the logic board assembly. Dislodging or removing the logic board assembly is required to access many parts (see the First Remove Hierarchy heading). Refer to Knowledge Base article "Hand Tools for Desktop and Portable Repairs--AP/CA/EU/JP/ LA/US" to purchase tools: http://support.apple.com/kb/HT3452 Cosmetic Care Cosmetic surfaces have a high exposure to potential damage or scratching, due to the method of working on the Mac mini (Mid 2010). Be extremely careful not to damage the housing and other cosmetic surfaces with inadvertent tool movements, or to damage the cosmetic Mylar on the top hard drive when removing or installing. In general, avoid scratching interior or exterior surfaces, and avoid leaving fingerprints. Reassembly Steps When there are no replacement steps listed, replace parts in the exact reverse order of the Removal procedure. Important: Do not overtighten screws. Install all screws by hand. Do not use power tools. Mac mini (Mid 2010) Take Apart - General Information 89
-
 1
1 -
2
-
3
-
4
-
5
-
6
-
7
-
8
-
9
-
10
-
11
-
12
-
13
-
14
-
15
-
16
-
17
-
18
-
19
-
20
-
21
-
22
-
23
-
24
-
25
-
26
-
27
-
28
-
29
-
30
-
31
-
32
-
33
-
34
-
35
-
36
-
37
-
38
-
39
-
40
-
41
-
42
-
43
-
44
-
45
-
46
-
47
-
48
-
49
-
50
-
51
-
52
-
53
-
54
-
55
-
56
-
57
-
58
-
59
-
60
-
61
-
62
-
63
-
64
-
65
-
66
-
67
-
68
-
69
-
70
-
71
-
72
-
73
-
74
-
75
-
76
-
77
-
78
-
79
-
80
-
81
-
82
-
83
-
 84
84 -
 85
85 -
 86
86 -
 87
87 -
 88
88 -
 89
89 -
 90
90 -
 91
91 -
 92
92 -
 93
93 -
 94
94 -
95
-
96
-
97
-
98
-
99
-
100
-
101
-
102
-
103
-
104
-
105
-
106
-
107
-
108
-
109
-
110
-
111
-
112
-
113
-
114
-
115
-
116
-
117
-
118
-
119
-
120
-
121
-
122
-
123
-
124
-
125
-
126
-
127
-
128
-
129
-
130
-
131
-
132
-
133
-
134
-
135
-
136
-
137
-
138
-
139
-
140
-
141
-
142
-
143
-
144
-
145
-
146
-
147
-
148
-
149
-
150
 |
 |
