Brother International BES-116 Instruction Manual - English - Page 23
Bobbin winder (optional), Attach table L
 |
View all Brother International BES-116 manuals
Add to My Manuals
Save this manual to your list of manuals |
Page 23 highlights
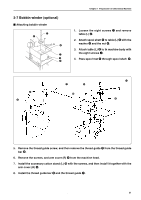
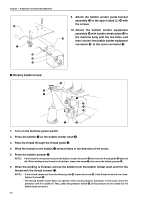
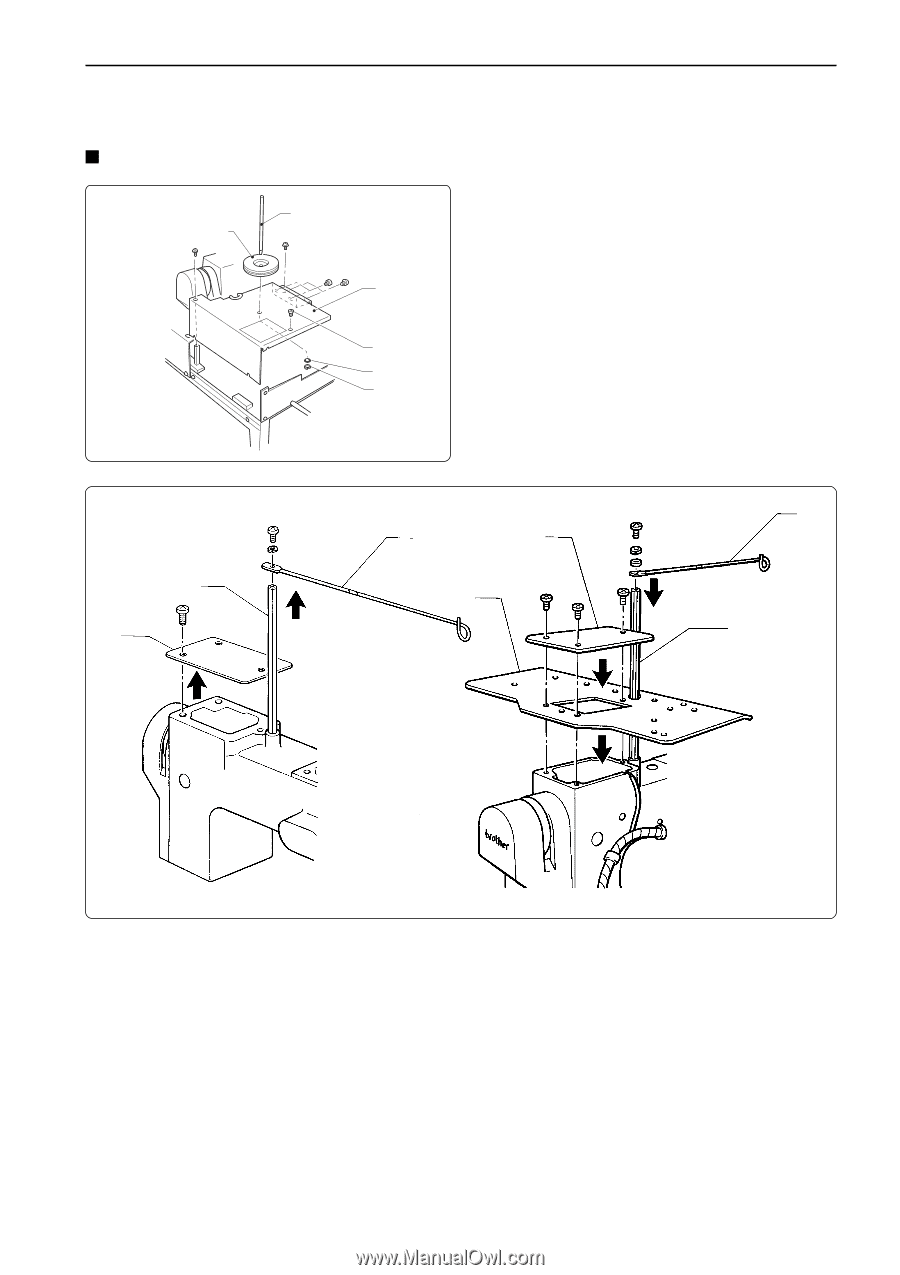
3-7 Bobbin winder (optional) Attaching bobbin winder t y w q e r Chapter 1 Preparation of Embroidery Machine 1. Loosen the eight screws q and remove table (L) w. 2. Attach spool shaft t to table (L) w with the washer e and the nut r. 3. Attach table (L) w to th machine body with the eight screws q. 4. Pass spool mat y through spool shaft t. i o u o !0 u i 5. Remove the thread guide screw, and then remove the thread guide u from the thread guide bar i. 6. Remove the screws, and arm cover (R) o from the machine head. 7. Install the accessory cotton stand (L) !0 with the screws, and then install it together with the arm cover (R) o. 8. Install the thread guide bar i and the thread guide u. BES-116AC 21
-
 1
1 -
2
-
3
-
4
-
5
-
6
-
7
-
8
-
9
-
10
-
11
-
12
-
13
-
14
-
15
-
16
-
17
-
 18
18 -
 19
19 -
 20
20 -
 21
21 -
 22
22 -
 23
23 -
 24
24 -
 25
25 -
 26
26 -
 27
27 -
 28
28 -
29
-
30
-
31
-
32
-
33
-
34
-
35
-
36
-
37
-
38
-
39
-
40
-
41
-
42
-
43
-
44
-
45
-
46
-
47
-
48
-
49
-
50
-
51
-
52
-
53
-
54
-
55
-
56
-
57
-
58
-
59
-
60
-
61
-
62
-
63
-
64
-
65
-
66
-
67
-
68
-
69
-
70
-
71
-
72
-
73
-
74
-
75
-
76
-
77
-
78
-
79
-
80
-
81
-
82
-
83
-
84
-
85
-
86
-
87
-
88
-
89
-
90
-
91
-
92
-
93
-
94
-
95
-
96
-
97
-
98
-
99
-
100
-
101
-
102
-
103
-
104
-
105
-
106
-
107
-
108
-
109
-
110
-
111
-
112
-
113
-
114
-
115
-
116
-
117
-
118
-
119
-
120
-
121
-
122
-
123
-
124
-
125
-
126
-
127
-
128
-
129
-
130
-
131
-
132
-
133
-
134
-
135
-
136
-
137
-
138
-
139
-
140
-
141
-
142
-
143
-
144
-
145
-
146
-
147
-
148
-
149
-
150
-
151
-
152
-
153
 |
 |
Chapter 1
Preparation of Embroidery Machine
BES-116AC
21
3-7 Bobbin winder (optional)
Attaching bobbin winder
1.
Loosen the eight screws
q
and remove
table (L)
w
.
2.
Attach spool shaft
t
to table (L)
w
with the
washer
e
and the nut
r
.
3.
Attach table (L)
w
to th machine body with
the eight screws
q
.
4.
Pass spool mat
y
through spool shaft
t
.
y
t
w
q
e
r
u
i
o
!
0
o
u
i
5.
Remove the thread guide screw, and then remove the thread guide
u
from the thread guide
bar
i
.
6.
Remove the screws, and arm cover (R)
o
from the machine head.
7.
Install the accessory cotton stand (L)
!
0
with the screws, and then install it together with the
arm cover (R)
o
.
8.
Install the thread guide bar
i
and the thread guide
u
.