Brother International BES-116 Instruction Manual - English - Page 24
with bobbin winder plate, the machine body with the two bolts,
 |
View all Brother International BES-116 manuals
Add to My Manuals
Save this manual to your list of manuals |
Page 24 highlights
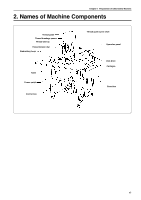
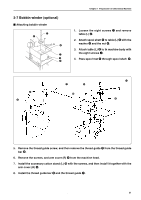
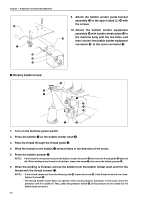
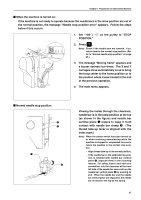
Chapter 1 Preparation of Embroidery Machine !0 !1 !4 !5 !3 9. Attach the bobbin winder guide bracket assembly !1 to the spool stand (L) !0 with the screws. 10. Attach the bobbin winder equipment assembly !3 with bobbin winder plate !2 to !2 the machine body with the two bolts, and then connect the bobbin winder equipment connector !5 to the nylon connector !4. Winding bobbin thread i e t u y r o q w 1. Turn on the machine power switch. 2. Press the bobbin q on the bobbin winder shaft w. 3. Pass the thread through the thread guide e. 4. Wind the thread on the bobbin q several times in the direction of the arrow. 5. Press the bobbin presser r. NOTE) If the thread is not wound evenly on the bobbin, loosen the screw t and move the thread guide e right and left. When winding more thread on the bobbin, loosen the screw y, then move the bobbin presser r. 6 When the winding is finished, remove the bobbin from the bobbin winder shaft and trim the thread with the thread trimmer u. NOTE) • If the thread comes out from the thread guide e, loosen the knob i. If the thread is wound too loose, tighten the knob i. • The thread winder motor does not operate if the circuit protector activated. In that case, leave the protector until it's cooled off. Then, press the protector switch o. (If the protector is not cooled off, the switch does not work.) 22 BES-116AC
-
 1
1 -
2
-
3
-
4
-
5
-
6
-
7
-
8
-
9
-
10
-
11
-
12
-
13
-
14
-
15
-
16
-
17
-
18
-
 19
19 -
 20
20 -
 21
21 -
 22
22 -
 23
23 -
 24
24 -
 25
25 -
 26
26 -
 27
27 -
 28
28 -
 29
29 -
30
-
31
-
32
-
33
-
34
-
35
-
36
-
37
-
38
-
39
-
40
-
41
-
42
-
43
-
44
-
45
-
46
-
47
-
48
-
49
-
50
-
51
-
52
-
53
-
54
-
55
-
56
-
57
-
58
-
59
-
60
-
61
-
62
-
63
-
64
-
65
-
66
-
67
-
68
-
69
-
70
-
71
-
72
-
73
-
74
-
75
-
76
-
77
-
78
-
79
-
80
-
81
-
82
-
83
-
84
-
85
-
86
-
87
-
88
-
89
-
90
-
91
-
92
-
93
-
94
-
95
-
96
-
97
-
98
-
99
-
100
-
101
-
102
-
103
-
104
-
105
-
106
-
107
-
108
-
109
-
110
-
111
-
112
-
113
-
114
-
115
-
116
-
117
-
118
-
119
-
120
-
121
-
122
-
123
-
124
-
125
-
126
-
127
-
128
-
129
-
130
-
131
-
132
-
133
-
134
-
135
-
136
-
137
-
138
-
139
-
140
-
141
-
142
-
143
-
144
-
145
-
146
-
147
-
148
-
149
-
150
-
151
-
152
-
153
 |
 |
