Brother International BES-116 Instruction Manual - English - Page 32
in A., threads may be broken, or the material may shrink during embroidering.
 |
View all Brother International BES-116 manuals
Add to My Manuals
Save this manual to your list of manuals |
Page 32 highlights
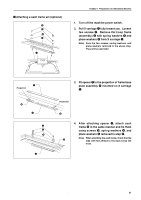
Chapter 1 Preparation of Embroidery Machine Attaching a tubular round frame (optional) Note) When using a tubular round frame with the frame for it, remove table from the machine. e w Figure A i o q Figure B t y r u Figure C t y 1. Attach two frame sets w for tubular round frame to X carriage q with two screws e. Fit the projections of the X carriage into the inner holes. 2. As Figures B and C show, while pushing up plate springs t, insert the right and left metal parts of tubular round frame r and fit projections y into the hole of the tubular round frame. 3. If the material over the tubular round frame is not set properly, stitches may be skipped, threads may be broken, or the material may shrink during embroidering. Make an adjustment using screw u. 4. Remove screw o in Figure A. Position frame arms i R and L for the tubular round frame according to the mounting pitch of the tubular round frame, and attach the arms. Note) Attach the frame arms R and L symmetrically. 30 BES-116AC
-
 1
1 -
2
-
3
-
4
-
5
-
6
-
7
-
8
-
9
-
10
-
11
-
12
-
13
-
14
-
15
-
16
-
17
-
18
-
19
-
20
-
21
-
22
-
23
-
24
-
25
-
26
-
 27
27 -
 28
28 -
 29
29 -
 30
30 -
 31
31 -
 32
32 -
 33
33 -
 34
34 -
 35
35 -
 36
36 -
 37
37 -
38
-
39
-
40
-
41
-
42
-
43
-
44
-
45
-
46
-
47
-
48
-
49
-
50
-
51
-
52
-
53
-
54
-
55
-
56
-
57
-
58
-
59
-
60
-
61
-
62
-
63
-
64
-
65
-
66
-
67
-
68
-
69
-
70
-
71
-
72
-
73
-
74
-
75
-
76
-
77
-
78
-
79
-
80
-
81
-
82
-
83
-
84
-
85
-
86
-
87
-
88
-
89
-
90
-
91
-
92
-
93
-
94
-
95
-
96
-
97
-
98
-
99
-
100
-
101
-
102
-
103
-
104
-
105
-
106
-
107
-
108
-
109
-
110
-
111
-
112
-
113
-
114
-
115
-
116
-
117
-
118
-
119
-
120
-
121
-
122
-
123
-
124
-
125
-
126
-
127
-
128
-
129
-
130
-
131
-
132
-
133
-
134
-
135
-
136
-
137
-
138
-
139
-
140
-
141
-
142
-
143
-
144
-
145
-
146
-
147
-
148
-
149
-
150
-
151
-
152
-
153
 |
 |
