Brother International BES-116 Instruction Manual - English - Page 31
Attachment of Embroidery Hoop and Frame, As shown
 |
View all Brother International BES-116 manuals
Add to My Manuals
Save this manual to your list of manuals |
Page 31 highlights
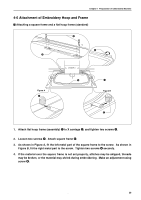
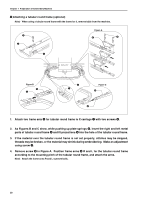
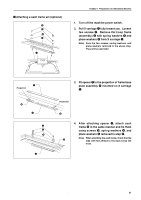
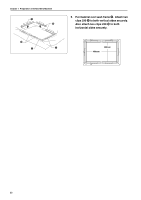
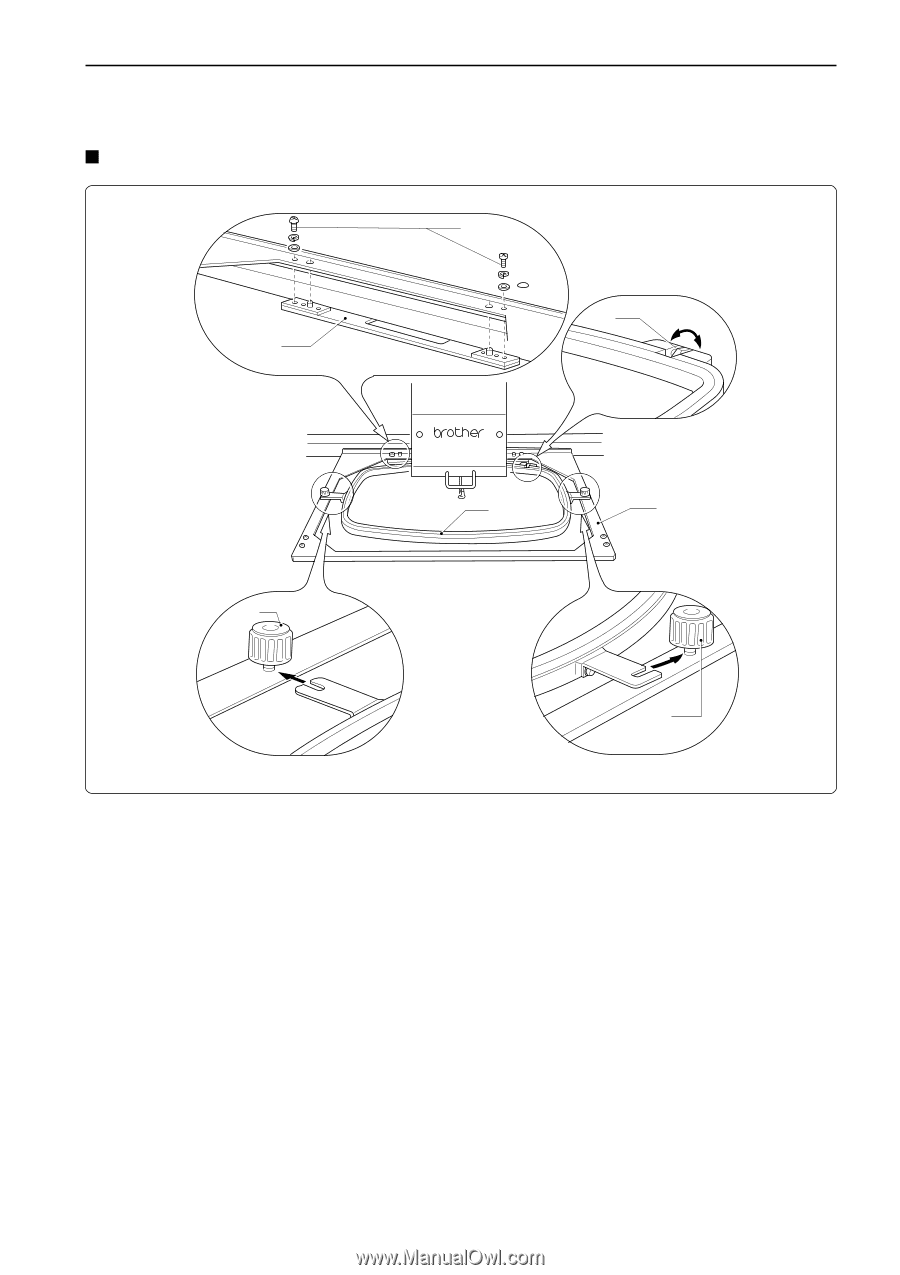
Chapter 1 Preparation of Embroidery Machine 4-6 Attachment of Embroidery Hoop and Frame Attaching a square frame and a flat hoop frame (standard) e y w Figure A r t q Figure B r 1. Attach flat hoop frame (assembly) q to X carriage w, and tighten two screws e. Fit the projections of the X carriage into the inner holes. 2. Loosen two screws r. Attach square frame t. 3. As shown in Figure A, fit the left metal part of the square frame to the screw. As shown in Figure B, fit the right metal part to the screw. Tighten two screws r securely. 4. If the material over the square frame is not set properly, stitches may be skipped, threads may be broken, or the material may shrink during embroidering. Make an adjustment using screw y. BES-116AC 29
-
 1
1 -
2
-
3
-
4
-
5
-
6
-
7
-
8
-
9
-
10
-
11
-
12
-
13
-
14
-
15
-
16
-
17
-
18
-
19
-
20
-
21
-
22
-
23
-
24
-
25
-
 26
26 -
 27
27 -
 28
28 -
 29
29 -
 30
30 -
 31
31 -
 32
32 -
 33
33 -
 34
34 -
 35
35 -
 36
36 -
37
-
38
-
39
-
40
-
41
-
42
-
43
-
44
-
45
-
46
-
47
-
48
-
49
-
50
-
51
-
52
-
53
-
54
-
55
-
56
-
57
-
58
-
59
-
60
-
61
-
62
-
63
-
64
-
65
-
66
-
67
-
68
-
69
-
70
-
71
-
72
-
73
-
74
-
75
-
76
-
77
-
78
-
79
-
80
-
81
-
82
-
83
-
84
-
85
-
86
-
87
-
88
-
89
-
90
-
91
-
92
-
93
-
94
-
95
-
96
-
97
-
98
-
99
-
100
-
101
-
102
-
103
-
104
-
105
-
106
-
107
-
108
-
109
-
110
-
111
-
112
-
113
-
114
-
115
-
116
-
117
-
118
-
119
-
120
-
121
-
122
-
123
-
124
-
125
-
126
-
127
-
128
-
129
-
130
-
131
-
132
-
133
-
134
-
135
-
136
-
137
-
138
-
139
-
140
-
141
-
142
-
143
-
144
-
145
-
146
-
147
-
148
-
149
-
150
-
151
-
152
-
153
 |
 |
Chapter 1
Preparation of Embroidery Machine
BES-116AC
29
4-6 Attachment of Embroidery Hoop and Frame
Attaching a square frame and a flat hoop frame (standard)
1.
Attach flat hoop frame (assembly)
q
to X carriage
w
, and tighten two screws
e
.
Fit the projections of the X carriage into the inner holes.
2.
Loosen two screws
r
.
Attach square frame
t
.
3.
As shown in Figure A, fit the left metal part of the square frame to the screw.
As shown in
Figure B, fit the right metal part to the screw.
Tighten two screws
r
securely.
4.
If the material over the square frame is not set properly, stitches may be skipped, threads
may be broken, or the material may shrink during embroidering.
Make an adjustment using
screw
y
.
w
q
t
e
y
r
r
Figure A
Figure B