Brother International BES-116 Instruction Manual - English - Page 25
Preparation for Embroidering, 4-1 Upper Threading
 |
View all Brother International BES-116 manuals
Add to My Manuals
Save this manual to your list of manuals |
Page 25 highlights
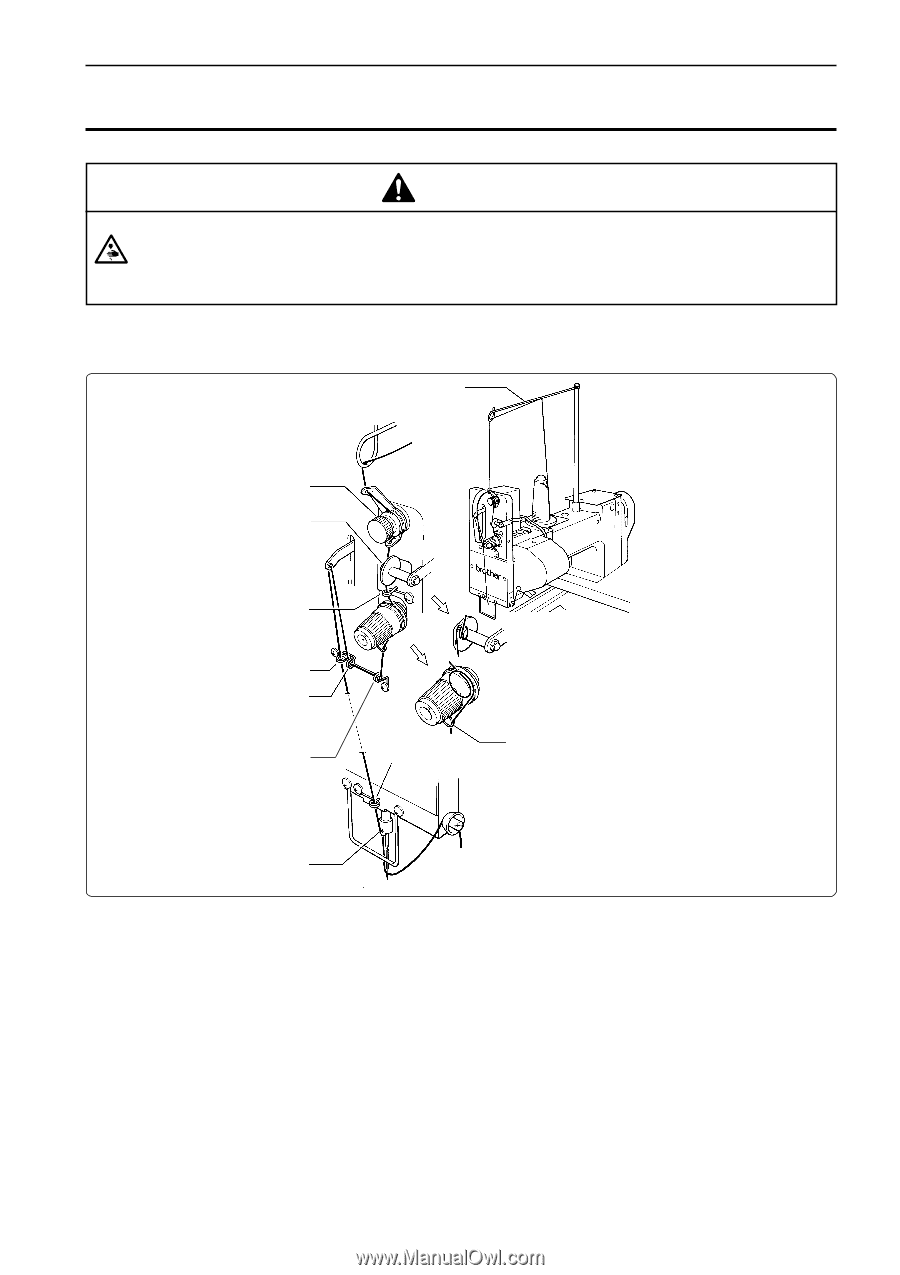
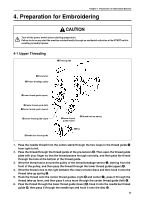
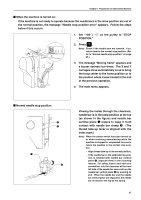
Chapter 1 Preparation of Embroidery Machine 4. Preparation for Embroidering CAUTION Turn off the power switch before starting preparation. Failure to do so may start the machine unintentionally through an accidental activation of the START switch, resulting in bodily injuries. 4-1 Upper Threading qThread guide wPre-tension eThread breakage pulley rLower thread guide (upper) iCenter thread guide (left) uCenter thread guide (center) yCenter thread guide (right) !N0 eedle bar thread guide oLower thread guide (lower) tThread take-up spring !D1 isc 1. Pass the needle thread from the cotton stand through the two loops in the thread guide q from right to left. 2. Pass the thread through the thread guide of the pre-tension w. Then open the thread guide plate with your finger so that the thread passes through correctly, and then pass the thread through the hole at the bottom of the thread guide. 3. Wind the thread twice around the pulley of the thread breakage sensor e, starting from the front of the pulley, and then pass the thread through the lower thread guide (upper) r. 4. Wind the thread once to the right between the rotary tension discs and then hook it onto the thread take-up spring t. 5. Hook the thread onto the center thread guides (right y and center u), pass it through the thread take-up lever, and then pass it once more through the center thread guide (left) i. 6. Pass the thread through the lower thread guide (lower) o, hook it onto the needle bar thread guide !0, then pass it through the needle eye and hook it onto the disc !.1 BES-116AC 23
-
 1
1 -
2
-
3
-
4
-
5
-
6
-
7
-
8
-
9
-
10
-
11
-
12
-
13
-
14
-
15
-
16
-
17
-
18
-
19
-
 20
20 -
 21
21 -
 22
22 -
 23
23 -
 24
24 -
 25
25 -
 26
26 -
 27
27 -
 28
28 -
 29
29 -
 30
30 -
31
-
32
-
33
-
34
-
35
-
36
-
37
-
38
-
39
-
40
-
41
-
42
-
43
-
44
-
45
-
46
-
47
-
48
-
49
-
50
-
51
-
52
-
53
-
54
-
55
-
56
-
57
-
58
-
59
-
60
-
61
-
62
-
63
-
64
-
65
-
66
-
67
-
68
-
69
-
70
-
71
-
72
-
73
-
74
-
75
-
76
-
77
-
78
-
79
-
80
-
81
-
82
-
83
-
84
-
85
-
86
-
87
-
88
-
89
-
90
-
91
-
92
-
93
-
94
-
95
-
96
-
97
-
98
-
99
-
100
-
101
-
102
-
103
-
104
-
105
-
106
-
107
-
108
-
109
-
110
-
111
-
112
-
113
-
114
-
115
-
116
-
117
-
118
-
119
-
120
-
121
-
122
-
123
-
124
-
125
-
126
-
127
-
128
-
129
-
130
-
131
-
132
-
133
-
134
-
135
-
136
-
137
-
138
-
139
-
140
-
141
-
142
-
143
-
144
-
145
-
146
-
147
-
148
-
149
-
150
-
151
-
152
-
153
 |
 |