Brother International HL-1870n Network Users Manual - English - Page 34
Windows 2000/XP Printing (Printer Driver already installed), Windows NT 4.0 Printing - windows 7 driver
 |
View all Brother International HL-1870n manuals
Add to My Manuals
Save this manual to your list of manuals |
Page 34 highlights
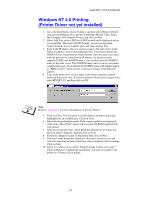
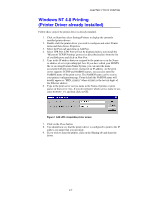
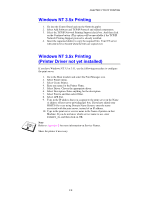
CHAPTER 2 TCP/IP PRINTING Windows 2000/XP Printing (Printer Driver already installed) If you have already installed the printer driver and wish to configure it for network printing, follow these steps: 1. Select the printer driver you wish to configure 2. Select File and then chose Properties 3. Click the Ports tab of the driver and click "Add Port" 4. Select the port that you wish to use, typically this would be "Standard TCP/IP Port", then click the "New Port..." button. 5. The standard TCP/IP Port Wizard will start. Follow steps 6-10 of the "Standard TCP/IP Port Printing" section. Windows NT 4.0 Printing If you did not install the TCP/IP protocol or the Microsoft TCP/IP Printing protocol during the installation of your Windows NT 4.0 system (either workstation or server) follow these steps. Please note that it is essential that you install the Microsoft TCP/IP Printing protocol if you wish to print over the network using the TCP/IP protocol. If you have already installed the TCP/IP protocol and Printing protocol proceed to step 2. Step 1: Running the Network applet, click on the Protocols tab. 1. Select Add, and double click on TCP/IP protocol. 2. Insert the requested disk(s), or CD-ROM, to copy the required files. 3. Click on the Services tab, click on Add and double click on Microsoft TCP/IP Printing. 4. Again insert the requested disk (s) or CD-ROM. 5. Click on the Protocols tab when then copying is finished. 6. Double click on the TCP/IP Protocol option and add the host IP address, subnet mask, and gateway address. Consult your system manager for these addresses. 7. Click OK twice to exit (your NT server will need to be re-booted). 2-5
-
 1
1 -
2
-
3
-
4
-
5
-
6
-
7
-
8
-
9
-
10
-
11
-
12
-
13
-
14
-
15
-
16
-
17
-
18
-
19
-
20
-
21
-
22
-
23
-
24
-
25
-
26
-
27
-
28
-
 29
29 -
 30
30 -
 31
31 -
 32
32 -
 33
33 -
 34
34 -
 35
35 -
 36
36 -
 37
37 -
 38
38 -
 39
39 -
40
-
41
-
42
-
43
-
44
-
45
-
46
-
47
-
48
-
49
-
50
-
51
-
52
-
53
-
54
-
55
-
56
-
57
-
58
-
59
-
60
-
61
-
62
-
63
-
64
-
65
-
66
-
67
-
68
-
69
-
70
-
71
-
72
-
73
-
74
-
75
-
76
-
77
-
78
-
79
-
80
-
81
-
82
-
83
-
84
-
85
-
86
-
87
-
88
-
89
-
90
-
91
-
92
-
93
-
94
-
95
-
96
-
97
-
98
-
99
-
100
-
101
-
102
-
103
-
104
-
105
-
106
-
107
-
108
-
109
-
110
-
111
-
112
-
113
-
114
-
115
-
116
-
117
-
118
-
119
-
120
-
121
-
122
-
123
-
124
-
125
-
126
-
127
-
128
-
129
-
130
-
131
-
132
-
133
-
134
-
135
-
136
-
137
-
138
-
139
-
140
-
141
-
142
-
143
-
144
-
145
-
146
-
147
-
148
-
149
 |
 |