Brother International HL-1870n Network Users Manual - English - Page 87
PostScript Printer Description PPD File Insert the CD-ROM
 |
View all Brother International HL-1870n manuals
Add to My Manuals
Save this manual to your list of manuals |
Page 87 highlights
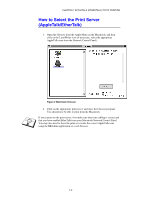
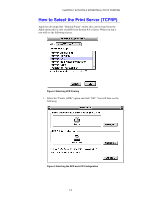
CHAPTER 7 APPLETALK (ETHERTALK) TCP/IP PRINTING 2. At this point we must select the correct PPD file for the printer and also configure the correct LPR information. Click the "Change" button in the "PostScript Printer Description (PPD) File" section. Insert the CD-ROM that contains the PPD file for the printer and select the appropriate PPD file. 3. Now select the "Change" button below the "LPR Printer Selection" text. 4. You must then enter the IP address and service name of details of the printer. When specifying the "Queue", use the value "brn_xxxxxx_p1_at" where xxxxxx are the last 6 digits of the Ethernet address. Figure 5 Entering the IP address and Queue If you do not specify the correct value the printer may not print, or it may not print the data correctly. Please ensure that the value you enter here matches with the Service name of the printer. 7-5
-
 1
1 -
2
-
3
-
4
-
5
-
6
-
7
-
8
-
9
-
10
-
11
-
12
-
13
-
14
-
15
-
16
-
17
-
18
-
19
-
20
-
21
-
22
-
23
-
24
-
25
-
26
-
27
-
28
-
29
-
30
-
31
-
32
-
33
-
34
-
35
-
36
-
37
-
38
-
39
-
40
-
41
-
42
-
43
-
44
-
45
-
46
-
47
-
48
-
49
-
50
-
51
-
52
-
53
-
54
-
55
-
56
-
57
-
58
-
59
-
60
-
61
-
62
-
63
-
64
-
65
-
66
-
67
-
68
-
69
-
70
-
71
-
72
-
73
-
74
-
75
-
76
-
77
-
78
-
79
-
80
-
81
-
 82
82 -
 83
83 -
 84
84 -
 85
85 -
 86
86 -
 87
87 -
 88
88 -
 89
89 -
 90
90 -
 91
91 -
 92
92 -
93
-
94
-
95
-
96
-
97
-
98
-
99
-
100
-
101
-
102
-
103
-
104
-
105
-
106
-
107
-
108
-
109
-
110
-
111
-
112
-
113
-
114
-
115
-
116
-
117
-
118
-
119
-
120
-
121
-
122
-
123
-
124
-
125
-
126
-
127
-
128
-
129
-
130
-
131
-
132
-
133
-
134
-
135
-
136
-
137
-
138
-
139
-
140
-
141
-
142
-
143
-
144
-
145
-
146
-
147
-
148
-
149
 |
 |
