Brother International HL-1870n Network Users Manual - English - Page 81
Go to Type, press ENTER, highlight Remote Other/Unknown
 |
View all Brother International HL-1870n manuals
Add to My Manuals
Save this manual to your list of manuals |
Page 81 highlights
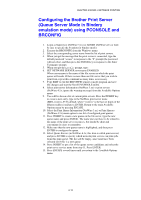
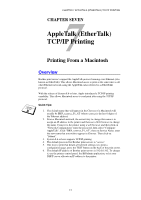
CHAPTER 6 NOVELL NETWARE PRINTING The following steps apply to configuring a remote printer on NetWare 3.xx systems: 6. a. b. c. d. e. f. g. h. i. Select print server Information from the PCONSOLE main menu and choose the name of the PSERVER NLM. Select print server configuration and then printer configuration. Select any "Not Installed" printer and press Enter. Remember the number of this printer, since it will be used later in the configuration process. If desired, type in a new name for the printer. Go to Type, press ENTER, highlight Remote Other/Unknown and press ENTER again. The other settings in this menu are not required. Push ESCAPE and save the changes. Push ESCAPE and select Queues Serviced by Printer. Highlight the printer name that you just configured and press ENTER. Press INSERT, choose the desired print queue, and press ENTER (you can accept the default priority). Press ESCAPE several times to exit PCONSOLE. Assigning the Remote printer name and number using BRCONFIG 7. a. b. Execute the BRCONFIG from the Windows menu. Select the Brother print server from the list of print servers. When you get the message that the print server is connected, press the ENTER key and type Where the default password "access" in response to the "#" prompt (the password will not echo) and then press the ENTER key again in response to the Enter Username> prompt. When you get the Local> prompt, type: SET NETWARE NPRINTER nlm number ON service SET NETWARE RESCAN EXIT • Where nlm is the name of the PSERVER NLM on your file server • Number is the printer number (must match the printer number you selected during the PCONSOLE configuration in the previous steps) • Service is the name of the service assigned by NetWare print server name(where the default services are BRN_xxxxxx_P1 for the Brother printer, where "xxxxxx is the last six digits of the Ethernet address (MAC address)). 6-17
-
 1
1 -
2
-
3
-
4
-
5
-
6
-
7
-
8
-
9
-
10
-
11
-
12
-
13
-
14
-
15
-
16
-
17
-
18
-
19
-
20
-
21
-
22
-
23
-
24
-
25
-
26
-
27
-
28
-
29
-
30
-
31
-
32
-
33
-
34
-
35
-
36
-
37
-
38
-
39
-
40
-
41
-
42
-
43
-
44
-
45
-
46
-
47
-
48
-
49
-
50
-
51
-
52
-
53
-
54
-
55
-
56
-
57
-
58
-
59
-
60
-
61
-
62
-
63
-
64
-
65
-
66
-
67
-
68
-
69
-
70
-
71
-
72
-
73
-
74
-
75
-
 76
76 -
 77
77 -
 78
78 -
 79
79 -
 80
80 -
 81
81 -
 82
82 -
 83
83 -
 84
84 -
 85
85 -
 86
86 -
87
-
88
-
89
-
90
-
91
-
92
-
93
-
94
-
95
-
96
-
97
-
98
-
99
-
100
-
101
-
102
-
103
-
104
-
105
-
106
-
107
-
108
-
109
-
110
-
111
-
112
-
113
-
114
-
115
-
116
-
117
-
118
-
119
-
120
-
121
-
122
-
123
-
124
-
125
-
126
-
127
-
128
-
129
-
130
-
131
-
132
-
133
-
134
-
135
-
136
-
137
-
138
-
139
-
140
-
141
-
142
-
143
-
144
-
145
-
146
-
147
-
148
-
149
 |
 |