Brother International HL-1870n Network Users Manual - English - Page 99
PATHWORKS for DOS Configuration, Click Close, OK, Close, and Exit to get out of the Print Manager.
 |
View all Brother International HL-1870n manuals
Add to My Manuals
Save this manual to your list of manuals |
Page 99 highlights
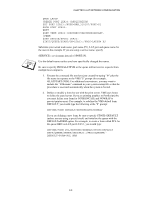
CHAPTER 9 LAT NETWORK CONFIGURATION PATHWORKS for DOS Configuration To configure the print server for PATHWORKS for DOS: 1. Create a VMS queue as previously described. 2. Run PCSA_MANAGER on the VMS system a. Type MENU to get the PCSA menu. b. Select SERVICE OPTIONS c. Select ADD SERVICE (do not use the ADD PRINTER QUEUE option as this will add a PCL printer reset that will affect PostScript printing. d. Select PRINTER SERVICE e. Enter service name (pick a name) f. Enter VMS queue name (previously defined) g. Enter VMS form name (use the default if you do not have a specific form defined) 3. Perform the following steps on the PC: a. If you are using DOS, type the command USE LPTx:\\node\service at the DOS prompt, where x is the PC parallel port number, node is the DECnet node name and service is the service name picked previously. For example: USE LPT1:\\VAX\LASER You may delete this print service by typing LATCP at the C:> prompt and then entering the command DELETE LPT1: b. If you are using Windows 3.1x, make sure that you have selected DEC PATHWORKS as the network under the Windows Setup icon. c. Then Click on the Print Manager icon, select Options and then Printer Setup d. Click Add, go to the List of Printers, select the desired printer type, and click Install. If desired, click Set as Default Printer. e. Click Connect and select the desired port (e.g., LPT1). Click Network and select the port you chose above and type in the network path (\\node\service, where node is the DECnet node name and service is the service name picked previously; for example, \\VAX\LASER). f. Click Connect (the Current Printer Connection should show the port and the network path that you selected). g. Click Close, OK, Close, and Exit to get out of the Print Manager. 9-5
-
 1
1 -
2
-
3
-
4
-
5
-
6
-
7
-
8
-
9
-
10
-
11
-
12
-
13
-
14
-
15
-
16
-
17
-
18
-
19
-
20
-
21
-
22
-
23
-
24
-
25
-
26
-
27
-
28
-
29
-
30
-
31
-
32
-
33
-
34
-
35
-
36
-
37
-
38
-
39
-
40
-
41
-
42
-
43
-
44
-
45
-
46
-
47
-
48
-
49
-
50
-
51
-
52
-
53
-
54
-
55
-
56
-
57
-
58
-
59
-
60
-
61
-
62
-
63
-
64
-
65
-
66
-
67
-
68
-
69
-
70
-
71
-
72
-
73
-
74
-
75
-
76
-
77
-
78
-
79
-
80
-
81
-
82
-
83
-
84
-
85
-
86
-
87
-
88
-
89
-
90
-
91
-
92
-
93
-
 94
94 -
 95
95 -
 96
96 -
 97
97 -
 98
98 -
 99
99 -
 100
100 -
 101
101 -
 102
102 -
 103
103 -
 104
104 -
105
-
106
-
107
-
108
-
109
-
110
-
111
-
112
-
113
-
114
-
115
-
116
-
117
-
118
-
119
-
120
-
121
-
122
-
123
-
124
-
125
-
126
-
127
-
128
-
129
-
130
-
131
-
132
-
133
-
134
-
135
-
136
-
137
-
138
-
139
-
140
-
141
-
142
-
143
-
144
-
145
-
146
-
147
-
148
-
149
 |
 |