Brother International HL-1870n Network Users Manual - English - Page 37
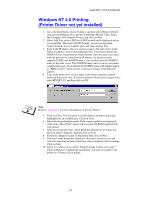
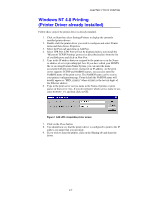
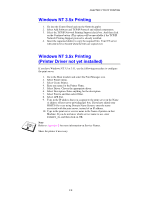
Windows NT 3.5x Printing, Windows NT 3.5x Printing (Printer Driver not yet installed
 |
View all Brother International HL-1870n manuals
Add to My Manuals
Save this manual to your list of manuals |
Page 37 highlights
CHAPTER 2 TCP/IP PRINTING Windows NT 3.5x Printing 1. Go into the Control Panel and run the Network applet. 2. Select Add Software and TCP/IP Protocol and related components. 3. Select the TCP/IP Network Printing Support check box. And then click on the Continue button. (This option will be unavailable if the TCP/IP Network Printing Support protocol is already installed. 4. Insert the requested disk(s) to copy the required files. Your NT server will need to be re-booted when the files are copied over. Windows NT 3.5x Printing (Printer Driver not yet installed) If you have Windows NT 3.5 or 3.51, use the following procedure to configure the print server. 1. Go to the Main window and select the Print Manager icon. 2. Select Printer menu. 3. Select Create Printer. 4. Enter any name for the Printer Name. 5. Select Driver. Choose the appropriate driver. 6. Select Description. Enter anything for the description. 7. Select Print to and then select Other. 8. Select LPR Port. 9. Type in the IP address that you assigned to the print server in the Name or address of host server providing lpd: box. If you have edited your HOSTS file or are using Domain Name System, enter the name associated with the print server, instead of an IP address. 10. Type in the print server service name in the Name of printer on that Machine. If you do not know which service name to use, enter BINARY_P1 and then click on OK. Note Refer to Appendix B for more information on Service Names. Share the printer if necessary. 2-8
-
 1
1 -
2
-
3
-
4
-
5
-
6
-
7
-
8
-
9
-
10
-
11
-
12
-
13
-
14
-
15
-
16
-
17
-
18
-
19
-
20
-
21
-
22
-
23
-
24
-
25
-
26
-
27
-
28
-
29
-
30
-
31
-
 32
32 -
 33
33 -
 34
34 -
 35
35 -
 36
36 -
 37
37 -
 38
38 -
 39
39 -
 40
40 -
 41
41 -
 42
42 -
43
-
44
-
45
-
46
-
47
-
48
-
49
-
50
-
51
-
52
-
53
-
54
-
55
-
56
-
57
-
58
-
59
-
60
-
61
-
62
-
63
-
64
-
65
-
66
-
67
-
68
-
69
-
70
-
71
-
72
-
73
-
74
-
75
-
76
-
77
-
78
-
79
-
80
-
81
-
82
-
83
-
84
-
85
-
86
-
87
-
88
-
89
-
90
-
91
-
92
-
93
-
94
-
95
-
96
-
97
-
98
-
99
-
100
-
101
-
102
-
103
-
104
-
105
-
106
-
107
-
108
-
109
-
110
-
111
-
112
-
113
-
114
-
115
-
116
-
117
-
118
-
119
-
120
-
121
-
122
-
123
-
124
-
125
-
126
-
127
-
128
-
129
-
130
-
131
-
132
-
133
-
134
-
135
-
136
-
137
-
138
-
139
-
140
-
141
-
142
-
143
-
144
-
145
-
146
-
147
-
148
-
149
 |
 |
