Brother International HL-6050DN Users Manual - English - Page 33
left and one on the right hand side as shown in When you have finished printing your
 |
UPC - 012502609568
View all Brother International HL-6050DN manuals
Add to My Manuals
Save this manual to your list of manuals |
Page 33 highlights
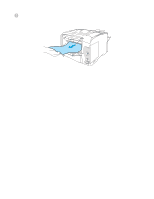
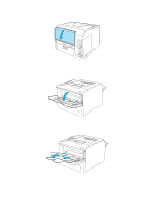
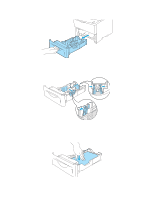
Envelopes that have been creased after they have been printed At the back of the printer, open the back output tray and push down the two blue tabs one on the left and one on the right hand side (as shown in Figure 1-31). When you have finished printing your envelopes, close the back output tray to reset the two blue tabs back to their original position. Figure 1-31 5 Put envelopes in the MP tray so that they touch the back of the tray and remain under the maximum paper height guides on both sides of the tray. Put the side to be printed on first, face up, with the leading edge (top) of the envelope in first. Do not put more than 3 envelopes in the MP tray at any one time, or it may cause a jam. Figure 1-32 Make sure that the envelopes are neatly stacked and in the proper position in the MP tray. If they are not, the envelopes may not be fed properly, resulting in a skewed printout or a jam. 1 - 25 ABOUT THIS PRINTER
-
 1
1 -
2
-
3
-
4
-
5
-
6
-
7
-
8
-
9
-
10
-
11
-
12
-
13
-
14
-
15
-
16
-
17
-
18
-
19
-
20
-
21
-
22
-
23
-
24
-
25
-
26
-
27
-
 28
28 -
 29
29 -
 30
30 -
 31
31 -
 32
32 -
 33
33 -
 34
34 -
 35
35 -
 36
36 -
 37
37 -
 38
38 -
39
-
40
-
41
-
42
-
43
-
44
-
45
-
46
-
47
-
48
-
49
-
50
-
51
-
52
-
53
-
54
-
55
-
56
-
57
-
58
-
59
-
60
-
61
-
62
-
63
-
64
-
65
-
66
-
67
-
68
-
69
-
70
-
71
-
72
-
73
-
74
-
75
-
76
-
77
-
78
-
79
-
80
-
81
-
82
-
83
-
84
-
85
-
86
-
87
-
88
-
89
-
90
-
91
-
92
-
93
-
94
-
95
-
96
-
97
-
98
-
99
-
100
-
101
-
102
-
103
-
104
-
105
-
106
-
107
-
108
-
109
-
110
-
111
-
112
-
113
-
114
-
115
-
116
-
117
-
118
-
119
-
120
-
121
-
122
-
123
-
124
-
125
-
126
-
127
-
128
-
129
-
130
-
131
-
132
-
133
-
134
-
135
-
136
-
137
-
138
-
139
-
140
-
141
-
142
-
143
-
144
-
145
-
146
-
147
-
148
-
149
-
150
-
151
-
152
-
153
-
154
-
155
-
156
-
157
-
158
-
159
-
160
-
161
-
162
-
163
-
164
-
165
-
166
-
167
-
168
-
169
-
170
-
171
-
172
-
173
-
174
-
175
-
176
-
177
-
178
-
179
 |
 |
