Brother International HL-6050DN Users Manual - English - Page 41
The side to be printed on must be face up., When you put transparencies in the MP tray
 |
UPC - 012502609568
View all Brother International HL-6050DN manuals
Add to My Manuals
Save this manual to your list of manuals |
Page 41 highlights
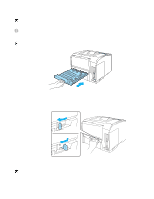
5 Put transparencies in the MP tray. Put the side to be printed on first, face up, with the leading edge (top) of the paper in first. Make sure the transparencies touch the back of the tray and remain under the maximum paper height guides on both sides of the tray. Do not put more than 10 transparencies in the MP tray at any one time, or it may cause a jam. Figure 1-43 Make sure that the transparencies are straight and in the proper position in the MP tray. If they are not, the transparencies may not be fed properly, resulting in a skewed printout or a jam. 6 While pressing the paper guide release lever, slide the paper guide to fit the transparency size. Figure 1-44 When you put transparencies in the MP tray, please remember the following: ■ The side to be printed on must be face up. ■ Put the leading edge (top of the transparencies) in first and push it gently into the tray. ■ The top of the transparency stack must be under the maximum paper height guides that are on both sides of the tray. 1 - 33 ABOUT THIS PRINTER
-
 1
1 -
2
-
3
-
4
-
5
-
6
-
7
-
8
-
9
-
10
-
11
-
12
-
13
-
14
-
15
-
16
-
17
-
18
-
19
-
20
-
21
-
22
-
23
-
24
-
25
-
26
-
27
-
28
-
29
-
30
-
31
-
32
-
33
-
34
-
35
-
 36
36 -
 37
37 -
 38
38 -
 39
39 -
 40
40 -
 41
41 -
 42
42 -
 43
43 -
 44
44 -
 45
45 -
 46
46 -
47
-
48
-
49
-
50
-
51
-
52
-
53
-
54
-
55
-
56
-
57
-
58
-
59
-
60
-
61
-
62
-
63
-
64
-
65
-
66
-
67
-
68
-
69
-
70
-
71
-
72
-
73
-
74
-
75
-
76
-
77
-
78
-
79
-
80
-
81
-
82
-
83
-
84
-
85
-
86
-
87
-
88
-
89
-
90
-
91
-
92
-
93
-
94
-
95
-
96
-
97
-
98
-
99
-
100
-
101
-
102
-
103
-
104
-
105
-
106
-
107
-
108
-
109
-
110
-
111
-
112
-
113
-
114
-
115
-
116
-
117
-
118
-
119
-
120
-
121
-
122
-
123
-
124
-
125
-
126
-
127
-
128
-
129
-
130
-
131
-
132
-
133
-
134
-
135
-
136
-
137
-
138
-
139
-
140
-
141
-
142
-
143
-
144
-
145
-
146
-
147
-
148
-
149
-
150
-
151
-
152
-
153
-
154
-
155
-
156
-
157
-
158
-
159
-
160
-
161
-
162
-
163
-
164
-
165
-
166
-
167
-
168
-
169
-
170
-
171
-
172
-
173
-
174
-
175
-
176
-
177
-
178
-
179
 |
 |
