Brother International MFC-6650MC Users Manual - English - Page 157
The Brother Multi-Function Link Pro offers 100 brightness settings, Brightness, Contrast
 |
View all Brother International MFC-6650MC manuals
Add to My Manuals
Save this manual to your list of manuals |
Page 157 highlights
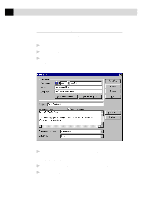
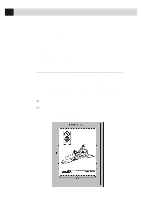
143 U S I N G T H E M U L T I - F U N C T I O N L I N K P R O S O F T W A R E Brightness Brightness: Adjusting the brightness settings to obtain the best image. The Brother Multi-Function Link Pro offers 100 brightness settings (-50 to 50). The default value is 0, representing an "average" setting. You can set the brightness level by dragging the slidebar to the right to lighten the image or to the left to darken the image. You can also type a value in the box to set the settings. If the scanned image is too light, set a lower brightness value and scan the document again. If the image is too dark, set a higher brightness value and scan the document again. Contrast The contrast setting is adjustable only when you have selected one of the gray scale settings, but it is not available when Black & White is selected as the gray Scale. Increasing the contrast level (by dragging the slidebar to the right) emphasizes dark and light areas of the Image, while decreasing the contrast level (by dragging the slidebar to the left) ravels more detail in gray areas. Instead of using the slidebar, you can type a value in the box to set the contrast. Custom Size Set the Size to one of the following: • Letter (8 1/2 x 11 in.) • A4 (210 x 297 mm.) • Legal (8 1/2 x 14 in.) • A5 (148 x 210 mm.) • B5 (182 x 257 mm.) • Executive (7 1/4 x 10 1/2 in.) • Business Card (60 x 90 mm.) • Custom (User adjustable from 0.35 x 0.35 in. to 8.5 x 14 in.) After you select a size, you can adjust the scanning area further by using the left mouse button to drag the dotted outline of the scanning area. This is useful when you want to crop an image when scanning.
-
 1
1 -
2
-
3
-
4
-
5
-
6
-
7
-
8
-
9
-
10
-
11
-
12
-
13
-
14
-
15
-
16
-
17
-
18
-
19
-
20
-
21
-
22
-
23
-
24
-
25
-
26
-
27
-
28
-
29
-
30
-
31
-
32
-
33
-
34
-
35
-
36
-
37
-
38
-
39
-
40
-
41
-
42
-
43
-
44
-
45
-
46
-
47
-
48
-
49
-
50
-
51
-
52
-
53
-
54
-
55
-
56
-
57
-
58
-
59
-
60
-
61
-
62
-
63
-
64
-
65
-
66
-
67
-
68
-
69
-
70
-
71
-
72
-
73
-
74
-
75
-
76
-
77
-
78
-
79
-
80
-
81
-
82
-
83
-
84
-
85
-
86
-
87
-
88
-
89
-
90
-
91
-
92
-
93
-
94
-
95
-
96
-
97
-
98
-
99
-
100
-
101
-
102
-
103
-
104
-
105
-
106
-
107
-
108
-
109
-
110
-
111
-
112
-
113
-
114
-
115
-
116
-
117
-
118
-
119
-
120
-
121
-
122
-
123
-
124
-
125
-
126
-
127
-
128
-
129
-
130
-
131
-
132
-
133
-
134
-
135
-
136
-
137
-
138
-
139
-
140
-
141
-
142
-
143
-
144
-
145
-
146
-
147
-
148
-
149
-
150
-
151
-
 152
152 -
 153
153 -
 154
154 -
 155
155 -
 156
156 -
 157
157 -
 158
158 -
 159
159 -
 160
160 -
 161
161 -
 162
162 -
163
-
164
-
165
-
166
-
167
-
168
-
169
-
170
-
171
-
172
-
173
-
174
-
175
-
176
-
177
-
178
-
179
-
180
-
181
-
182
-
183
-
184
-
185
-
186
-
187
-
188
-
189
-
190
-
191
-
192
-
193
-
194
-
195
-
196
-
197
-
198
-
199
-
200
-
201
-
202
-
203
-
204
-
205
-
206
-
207
-
208
-
209
-
210
-
211
-
212
-
213
-
214
-
215
-
216
-
217
-
218
-
219
-
220
-
221
-
222
-
223
-
224
-
225
-
226
-
227
-
228
-
229
-
230
-
231
-
232
-
233
-
234
-
235
-
236
-
237
-
238
-
239
-
240
-
241
-
242
-
243
-
244
-
245
-
246
-
247
-
248
-
249
-
250
-
251
-
252
-
253
-
254
-
255
-
256
-
257
 |
 |
