Brother International MFC-6650MC Users Manual - English - Page 166
Adding Contacts One at a Time, Selecting a Group (or a Contact from a Group), Add to List >, Remove
 |
View all Brother International MFC-6650MC manuals
Add to My Manuals
Save this manual to your list of manuals |
Page 166 highlights
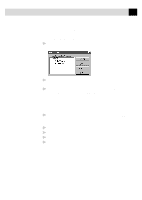
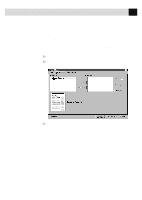
152 C H A P T E R F I F T E E N Adding Contacts One at a Time s Enter the recipient's information in the First Name, Last Name, or Company Name fields. The Contact Manager will search for the contact and fill in the rest of the recipient's information-OR-If the recipient is not in its database, you must enter the information. s If you do not want to save this recipient in your contact database, click the Add to List > button. The recipient's name appears in the Recipient List box. (To delete a recipient from the list, click the Remove button.) You can broadcast a fax to multiple recipients by adding them to the Recipient List. You can add multiple recipients to your recipient list in one of two ways: s Add each recipient manually (by name or company) s Add groups from your Contact Manager database Selecting a Group (or a Contact from a Group) 1 Click the Group button to display groups and contacts within the Groups. 2 Click a group name to select it. 3 Click the Add Group button to add that group to the Recipient List -OR-To add a single contact within the group, click the contact name, then click the Add Contact button. 4 To view the details about a recipient, select the recipient from the Recipient List. Then click the Detail button. 5 Use the Send As drop down list to choose how faxes are sent to a group or to a contact. s Selecting Fax sends the selected file to the fax number shown in the Fax # field. For convenience, you can use the country code lookup. s Selecting E-mail sends the file to the e-mail address shown in the E-mail field.
-
 1
1 -
2
-
3
-
4
-
5
-
6
-
7
-
8
-
9
-
10
-
11
-
12
-
13
-
14
-
15
-
16
-
17
-
18
-
19
-
20
-
21
-
22
-
23
-
24
-
25
-
26
-
27
-
28
-
29
-
30
-
31
-
32
-
33
-
34
-
35
-
36
-
37
-
38
-
39
-
40
-
41
-
42
-
43
-
44
-
45
-
46
-
47
-
48
-
49
-
50
-
51
-
52
-
53
-
54
-
55
-
56
-
57
-
58
-
59
-
60
-
61
-
62
-
63
-
64
-
65
-
66
-
67
-
68
-
69
-
70
-
71
-
72
-
73
-
74
-
75
-
76
-
77
-
78
-
79
-
80
-
81
-
82
-
83
-
84
-
85
-
86
-
87
-
88
-
89
-
90
-
91
-
92
-
93
-
94
-
95
-
96
-
97
-
98
-
99
-
100
-
101
-
102
-
103
-
104
-
105
-
106
-
107
-
108
-
109
-
110
-
111
-
112
-
113
-
114
-
115
-
116
-
117
-
118
-
119
-
120
-
121
-
122
-
123
-
124
-
125
-
126
-
127
-
128
-
129
-
130
-
131
-
132
-
133
-
134
-
135
-
136
-
137
-
138
-
139
-
140
-
141
-
142
-
143
-
144
-
145
-
146
-
147
-
148
-
149
-
150
-
151
-
152
-
153
-
154
-
155
-
156
-
157
-
158
-
159
-
160
-
 161
161 -
 162
162 -
 163
163 -
 164
164 -
 165
165 -
 166
166 -
 167
167 -
 168
168 -
 169
169 -
 170
170 -
 171
171 -
172
-
173
-
174
-
175
-
176
-
177
-
178
-
179
-
180
-
181
-
182
-
183
-
184
-
185
-
186
-
187
-
188
-
189
-
190
-
191
-
192
-
193
-
194
-
195
-
196
-
197
-
198
-
199
-
200
-
201
-
202
-
203
-
204
-
205
-
206
-
207
-
208
-
209
-
210
-
211
-
212
-
213
-
214
-
215
-
216
-
217
-
218
-
219
-
220
-
221
-
222
-
223
-
224
-
225
-
226
-
227
-
228
-
229
-
230
-
231
-
232
-
233
-
234
-
235
-
236
-
237
-
238
-
239
-
240
-
241
-
242
-
243
-
244
-
245
-
246
-
247
-
248
-
249
-
250
-
251
-
252
-
253
-
254
-
255
-
256
-
257
 |
 |