Brother International MFC-6650MC Users Manual - English - Page 162
Creating an Inbound Account, Installing NetCentric™ FaxStorm
 |
View all Brother International MFC-6650MC manuals
Add to My Manuals
Save this manual to your list of manuals |
Page 162 highlights
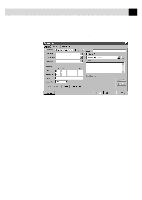
148 C H A P T E R F I F T E E N JobID-Number that uniquely identifies the fax job. The JobID is comprised of the identification number of the server to which the fax was sent and a unique number that identifies the fax itself. Pages-Number of pages in the fax. Status-Final status of the fax job, either DONE or FAILED. Creating an Inbound Account 1 Log on to your account home page using a web browser or select Web from the Utilities menu, then select Account Home Page. 2 Click the Options button on the left-hand side of your account home page. 3 Click the Inbox icon. The Inbox frame appears within the browser. 4 Choose two (2) items, one from each drop-down list: s The server where you want to receive inbound faxes on the Internet Service Provider you use s The notification method you want (Notify by Email, Forward by Email, or No Notification or Delivery) You will be provided with the telephone number of your fax Inbox. Give this number to people sending faxes to your fax Inbox. Installing NetCentric™ FaxStorm Before you begin, you must be connected to the Internet with your Browser running and be connected to your existing web-based NetCentric™ account. 1 Log in to your web-based NetCentric™ account. 2 Insert the Brother CD-ROM into your computer CD-ROM drive. 3 Click on the NetCentric™ FaxStorm button to install the software and follow the prompts on the screen. If you are using a Proxy server, you must enter the server name and address on the second page of the Account Setup Wizard. See your Account Administrator for this information.
-
 1
1 -
2
-
3
-
4
-
5
-
6
-
7
-
8
-
9
-
10
-
11
-
12
-
13
-
14
-
15
-
16
-
17
-
18
-
19
-
20
-
21
-
22
-
23
-
24
-
25
-
26
-
27
-
28
-
29
-
30
-
31
-
32
-
33
-
34
-
35
-
36
-
37
-
38
-
39
-
40
-
41
-
42
-
43
-
44
-
45
-
46
-
47
-
48
-
49
-
50
-
51
-
52
-
53
-
54
-
55
-
56
-
57
-
58
-
59
-
60
-
61
-
62
-
63
-
64
-
65
-
66
-
67
-
68
-
69
-
70
-
71
-
72
-
73
-
74
-
75
-
76
-
77
-
78
-
79
-
80
-
81
-
82
-
83
-
84
-
85
-
86
-
87
-
88
-
89
-
90
-
91
-
92
-
93
-
94
-
95
-
96
-
97
-
98
-
99
-
100
-
101
-
102
-
103
-
104
-
105
-
106
-
107
-
108
-
109
-
110
-
111
-
112
-
113
-
114
-
115
-
116
-
117
-
118
-
119
-
120
-
121
-
122
-
123
-
124
-
125
-
126
-
127
-
128
-
129
-
130
-
131
-
132
-
133
-
134
-
135
-
136
-
137
-
138
-
139
-
140
-
141
-
142
-
143
-
144
-
145
-
146
-
147
-
148
-
149
-
150
-
151
-
152
-
153
-
154
-
155
-
156
-
 157
157 -
 158
158 -
 159
159 -
 160
160 -
 161
161 -
 162
162 -
 163
163 -
 164
164 -
 165
165 -
 166
166 -
 167
167 -
168
-
169
-
170
-
171
-
172
-
173
-
174
-
175
-
176
-
177
-
178
-
179
-
180
-
181
-
182
-
183
-
184
-
185
-
186
-
187
-
188
-
189
-
190
-
191
-
192
-
193
-
194
-
195
-
196
-
197
-
198
-
199
-
200
-
201
-
202
-
203
-
204
-
205
-
206
-
207
-
208
-
209
-
210
-
211
-
212
-
213
-
214
-
215
-
216
-
217
-
218
-
219
-
220
-
221
-
222
-
223
-
224
-
225
-
226
-
227
-
228
-
229
-
230
-
231
-
232
-
233
-
234
-
235
-
236
-
237
-
238
-
239
-
240
-
241
-
242
-
243
-
244
-
245
-
246
-
247
-
248
-
249
-
250
-
251
-
252
-
253
-
254
-
255
-
256
-
257
 |
 |